Artificial Intelligence
Unleashing Agentic AI Analytics on Amazon SageMaker with Amazon Athena and Amazon Quick
Modern enterprises face mounting challenges in extracting actionable insights from vast data lakes and lakehouses spanning petabytes of structured and unstructured data. Traditional analytics require specialized technical expertise in SQL, data modeling, and business intelligence tools, creating bottlenecks that slow decision-making across retail, financial services, healthcare, Travel & Hospitality, manufacturing and many more industries. This architecture demonstrates how agentic AI assistant from Amazon Quick transform data analytics into a self-service capability. It showcases enabling business users to query complex structured datasets and mix with unstructured data to find the valuable insights to improve their business outcomes through intuitive natural language interfaces.
To demonstrate the functionality, we built a lakehouse using the TPC-H datasets as our foundation. This integrated architecture leverages Amazon Simple Storage Service (Amazon S3) as a storage, Amazon SageMaker and AWS Glue for lakehouse, Amazon Athena for serverless SQL querying across multiple storage formats (S3 Table, Iceberg, and Parquet), and multiple features from Quick to build dashboard and conversational AI agents that provide natural language access to data insights. Through integrated knowledge bases using Amazon Quick spaces, this solution democratizes lakehouse data access for business users while preserving enterprise-grade security, governance frameworks, and the scalability required for modern data-driven decision-making across the organization.
Solution Overview
The following diagram shows the overall design and corresponding dataflow that we implemented as part of this blog post.

Figure 1: Overall design diagram Reference following steps for the detailed end to end data flow and user interaction capabilities.
- Data Source Ingestion: Structured Data TPC-H serves as the primary data source, containing benchmark datasets stored in relational database format. AWS hosted the TPC-H data in the publicly available s3 bucket (s3://redshift-downloads/TPC-H/2.18/100GB)
- Data Load: Amazon Athena performs the first query layer, executing serverless SQL queries against the TPC-H structured data to extract, prepare data for processing, load data in S3, and create corresponding catalog in Glue.
- Multi-Format Storage Layer: To illustrate the versatility of Data lake and Lakehouse we saved the data into three optimized storage formats:
- Amazon S3 -CSV: Use external table to create Athena table based on existing CSV files.
- Amazon S3 (Apache Iceberg-parquet): ACID-compatible table format enabling time-travel and schema evolution
- Amazon S3 Table: Amazon S3 Tables deliver the first cloud object store with built-in Apache Iceberg support and streamline storing tabular data at scale.
- Metadata Cataloging: AWS Glue Catalog indexes all three storage formats, creating a unified metadata layer that enables seamless querying across different data formats.
- Lakehouse Query Layer: We used the Amazon Athena SQL queries across storage formats (S3 Table, Iceberg, and Parquet) using the Glue Catalog metadata, providing a unified query interface.
- Business Intelligence Pipeline: Structured TPC-H data flows into Amazon Quick, which integrates with Quick Sight to create:
- Dataset – We utilized Amazon Athena connection from Amazon Quick to extract structured data to load in Quick SPICE (Super-fast, Parallel, In-memory Calculation Engine) dataset
- Topic – Organized data domains for business context
- Dashboard Using Q – Interactive visualizations with natural language query capabilities to build the dashboard and publish it
- AI Knowledge Enhancement: Parallel to the structured data flow, a Web Crawler for TPC-H specifications ingests unstructured data (documentation, specifications) and feeds it into Knowledge Bases to provide contextual understanding.
- Conversational Agentic AI Layer: Knowledge Bases power Amazon Quick spaces (collaborative environments), which in turn enable the Amazon Quick chat agents with contextual awareness and domain knowledge for natural language interactions.
- End User Access: Users interact with the system through two primary interfaces:
- Dashboard Using Q – Visual analytics and self-service Business Intelligence
- Chat Agent – Conversational AI for natural language data exploration
Pre-requisite
Before you get started, make sure you have the following prerequisites:
- An AWS account and Amazon Quick account
- A basic understanding of Amazon Simple Storage Service, Amazon SageMaker, AWS Lake Formation, and Amazon Athena
- Console role with permissions to create the dataset in S3, run Athena queries, create Glue catalog, Lake Formation admin privileges, and access Quick features. To decide the relevant policy/policies reference policy document.
Data Preparation for lakehouse / data Lake
In this section, we will mimic many of the data lake features by working with external tables, which allow querying data stored in Amazon S3 without loading it into a managed storage layer. We will explore Open Table Format (OTF) tables using Apache Iceberg to consider possible ACID transactions supported tables. Amazon managed S3 Tables will be leveraged to showcase how Amazon natively supports Iceberg-compatible table management directly within S3, simplifying lakehouse architecture at scale. Throughout these exercises, we will use the industry-standard TPC-H dataset, a benchmark workload representing a realistic business data model with orders, customers, and line items to make sure our examples are both meaningful and reproducible.
We will leverage Amazon Athena for data preparation. If this is your first time using Amazon Athena, you’ll need to create an Amazon S3 bucket to store your query results. Athena uses S3 as its output location before you can run queries. Follow the official AWS getting started guide to complete this one-time setup: Getting Started with Amazon Athena. Alternately, you can use Managed query results feature.
Tip: Choose an S3 bucket in the same AWS Region as your data sources to avoid cross-region data transfer costs and latency.
Once your S3 output location is configured, you’re ready to proceed.
Create the Glue Database
Start by creating a Glue database that will serve as the metadata catalog for all your tables using Athena. Run the following SQL in the Athena query editor:
CREATE DATABASE IF NOT EXISTS blog_qs_athena_tpc_h_db_sql COMMENT 'TPC-H database'; 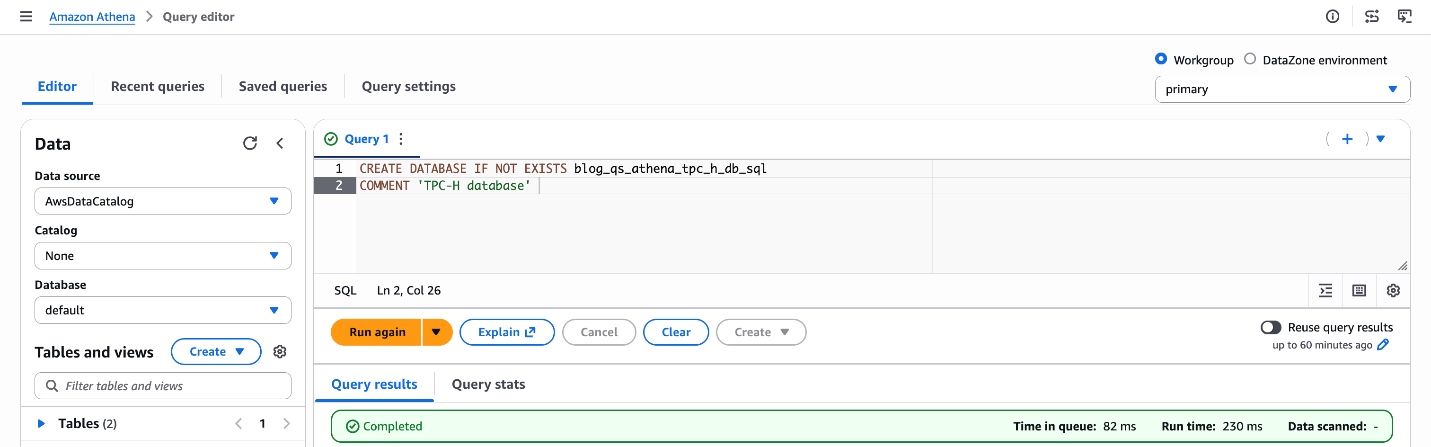
Figure 2: Database creation blog_qs_athena_tpc_h_db_sql
What this does: This registers a logical database in the AWS Glue Data Catalog, which Athena uses to organize and discover your tables. Tables created in subsequent steps will live under this database.
Create an External Table on S3
Next, create an external table pointing to the TPC-H “customer” dataset stored in a public S3 bucket ('s3://redshift-downloads/TPC-H/2.18/100GB/customer/'). External tables in Athena don’t move or copy data — they query it directly from S3, making this a fast and cost-effective way to explore raw data.
CREATE EXTERNAL TABLE IF NOT EXISTS blog_qs_athena_tpc_h_db_sql.customer_csv
(
	C_CUSTKEY INT,
	C_NAME STRING,
	C_ADDRESS STRING,
	C_NATIONKEY INT,
	C_PHONE STRING,
	C_ACCTBAL DOUBLE,
	C_MKTSEGMENT STRING,
	C_COMMENT STRING
)
ROW FORMAT DELIMITED FIELDS TERMINATED BY '|'
STORED AS TEXTFILE
LOCATION 's3://redshift-downloads/TPC-H/2.18/100GB/customer/'
TBLPROPERTIES ('classification' = 'csv');
Verify the table by previewing a few rows:
SELECT * FROM blog_qs_athena_tpc_h_db_sql.customer_csv LIMIT 10; 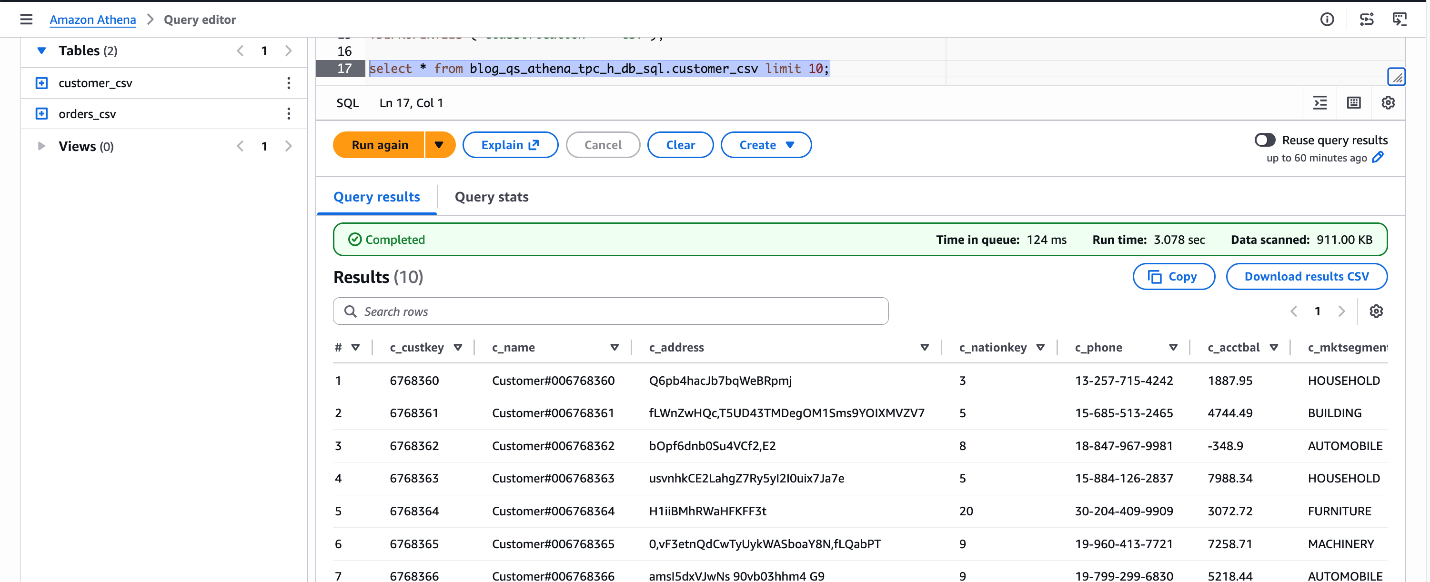
Figure 3: verify blog_qs_athena_tpc_h_db_sql.customer_csv
Create an Apache Iceberg Table
Next, we will mimic the table using Apache Iceberg, which is an open table format that brings ACID transactions, time travel, and partition evolution to your data lake — making it ideal for production-grade workloads. This is a three-step process.
Step1: Create the S3 Bucket – Before writing SQL queries, set up your storage layer. You can create an S3 bucket using the AWS Management Console or AWS CLI.
For this blog, I’m using the S3 bucket: amzn-s3-demo-bucket
Note: Your bucket name will be different, as S3 bucket names must be globally unique across all AWS accounts.
Step2: Create an External CSV Table for Orders – First, register the raw orders data as an external table in its original format, in our case it’s CSV.
CREATE EXTERNAL TABLE IF NOT EXISTS blog_qs_athena_tpc_h_db_sql.orders_csv
(
	O_ORDERKEY BIGINT,
	O_CUSTKEY BIGINT,
	O_ORDERSTATUS STRING,
	O_TOTALPRICE DOUBLE,
	O_ORDERDATE STRING,
	O_ORDERPRIORITY STRING,
	O_CLERK STRING,
	O_SHIPPRIORITY INT,
	O_COMMENT STRING
)
ROW FORMAT SERDE 'org.apache.hadoop.hive.serde2.lazy.LazySimpleSerDe'
WITH SERDEPROPERTIES ('field.delim' = '|')
LOCATION 's3://redshift-downloads/TPC-H/2.18/100GB/orders/'
TBLPROPERTIES ('classification' = 'csv');
Let’s verify the dataset.
SELECT * FROM blog_qs_athena_tpc_h_db_sql.orders_csv LIMIT 10;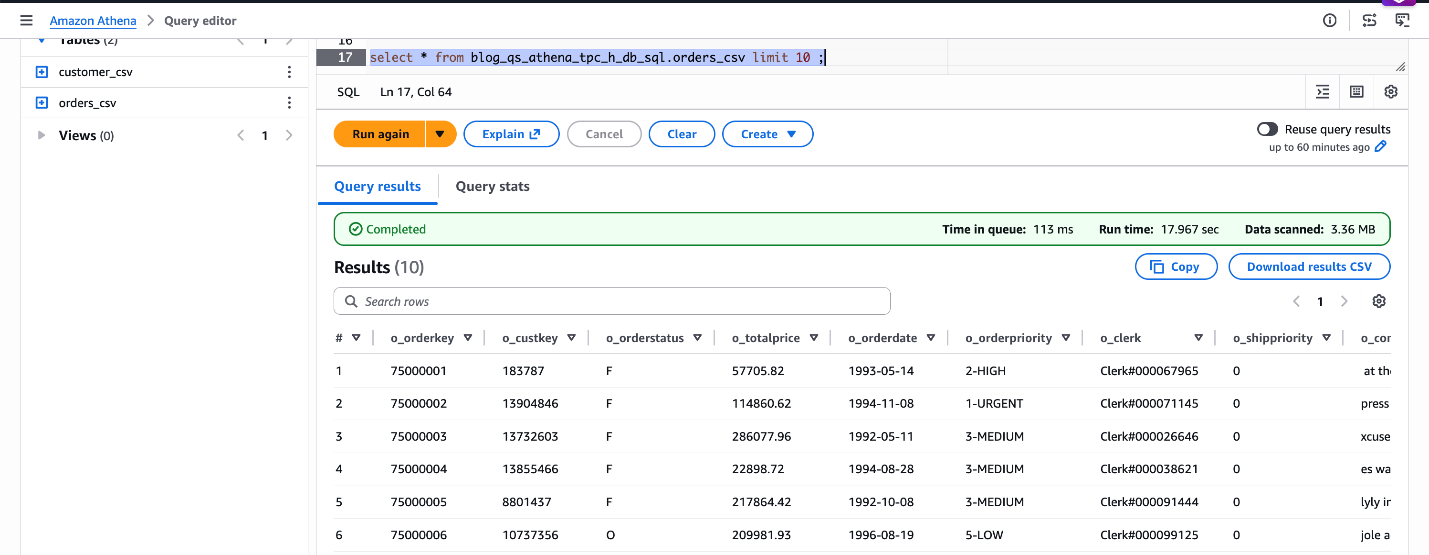
Figure 4: verify blog_qs_athena_tpc_h_db_sql.orders_csv
Step3: Create the Iceberg Table Using CREATE TABLE AS SELECT (CTAS) – Use CREATE TABLE AS SELECT (CTAS) to create a self-managed Iceberg table in Parquet format, partitioned by order date. We’ll load a sample date range O_ORDERDATE BETWEEN ‘1998-06-01’ AND ‘1998-12-31’.
CREATE TABLE blog_qs_athena_tpc_h_db_sql.orders_iceberg
WITH (
	table_type = 'ICEBERG',
	format = 'PARQUET',
	is_external = false,
	partitioning = ARRAY['o_orderdate'],
	location = 's3://amzn-s3-demo-bucket/tpch_iceberg/orders/')
AS
SELECT * FROM blog_qs_athena_tpc_h_db_sql.orders_csv
WHERE O_ORDERDATE BETWEEN '1998-06-01' AND '1998-12-31';
Verify the Iceberg table data:
SELECT * FROM blog_qs_athena_tpc_h_db_sql.orders_iceberg LIMIT 10; 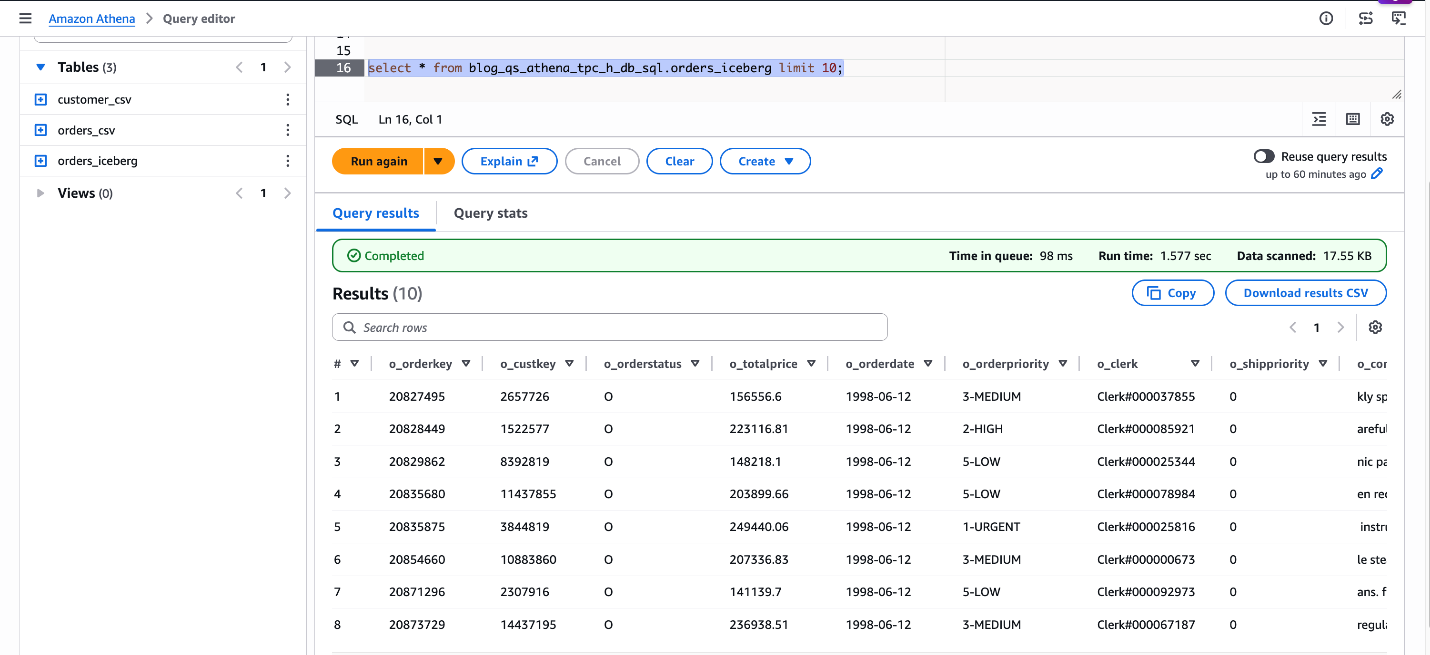
Figure 5: verify blog_qs_athena_tpc_h_db_sql.orders_iceberg
Create an Amazon S3 Table
Amazon S3 Tables are purpose-built, fully managed tables with built-in Apache Iceberg support. It delivers high-performance query throughput without the overhead of managing maintenance operations, such as compaction, snapshot management, and unreferenced file removal. This is a three-step process.
Step1: Create the S3 Table Bucket and Namespace – Navigate to S3 → Table Buckets in the AWS Console to create the bucket blog-qs-athena-tpc-h-db-sql-s3-table-mar-3 and namespace. Alternatively, use the AWS CLI for scripted setup.
Note : You can ignore these steps if you already have an S3 table bucket and namespace available.
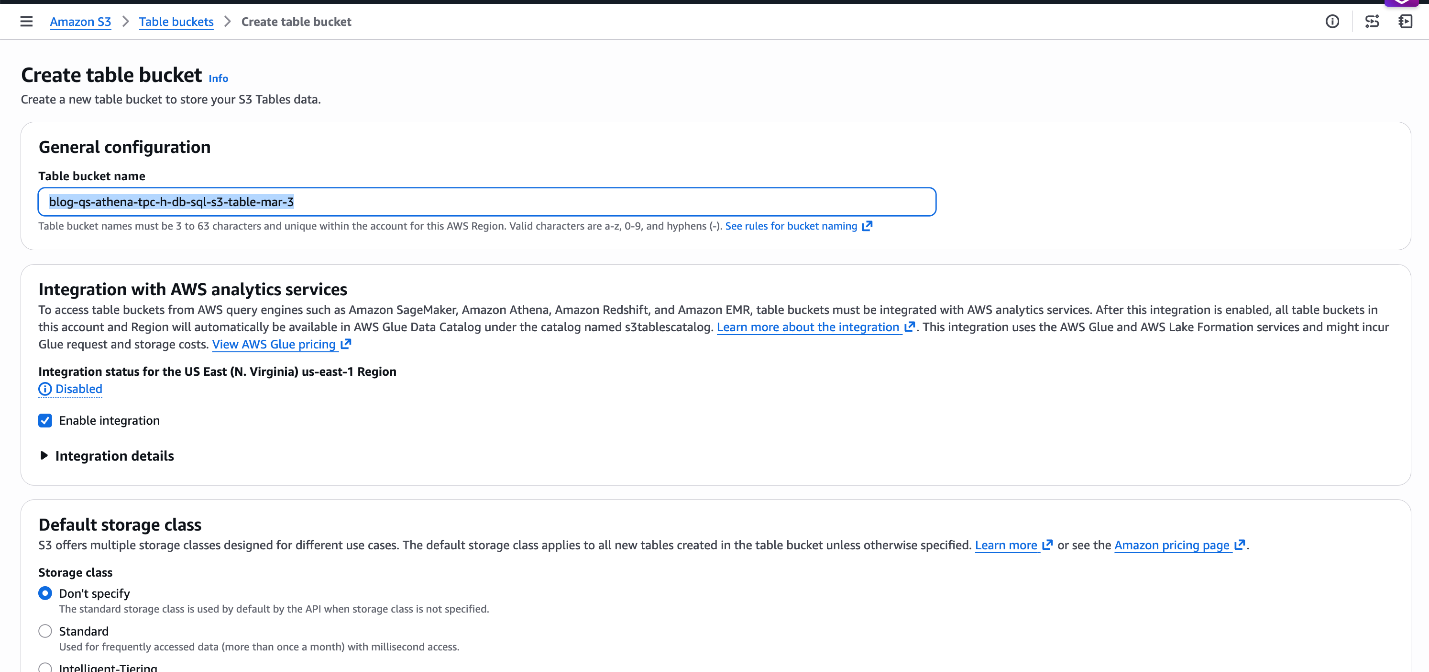
Figure 6: Create S3 Table bucket blog-qs-athena-tpc-h-db-sql-s3-table-mar-3
Now let’s create a namespace blog_qs_athena_tpc_h_namespace associated with above S3 table bucket by clicking on the blog-qs-athena-tpc-h-db-sql-s3-table-mar-3.
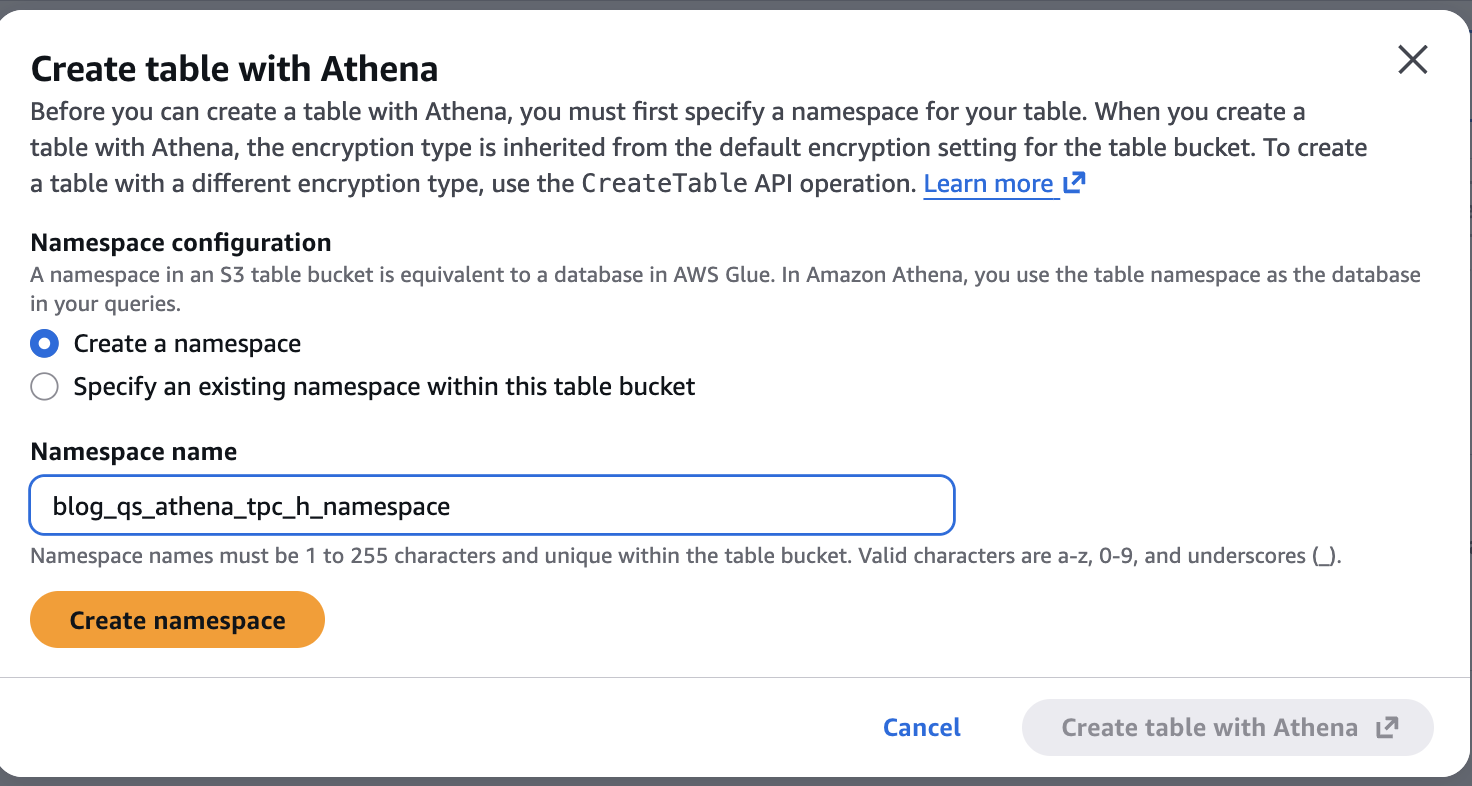
Figure 7: Create S3 table Namespace blog_qs_athena_tpc_h_namespace
Step2: Create an External CSV Table for Line Items – Use Athena to register the TPC-H line items dataset as an external table:
CREATE EXTERNAL TABLE IF NOT EXISTS blog_qs_athena_tpc_h_db_sql.lineitem_csv
(
	L_ORDERKEY BIGINT,
	L_PARTKEY BIGINT,
	L_SUPPKEY BIGINT,
	L_LINENUMBER INT,
	L_QUANTITY DECIMAL(15,2),
	L_EXTENDEDPRICE DECIMAL(15,2),
	L_DISCOUNT DECIMAL(15,2),
	L_TAX DECIMAL(15,2),
	L_RETURNFLAG STRING,
	L_LINESTATUS STRING,
	L_SHIPDATE STRING,
	L_COMMITDATE STRING,
	L_RECEIPTDATE STRING,
	L_SHIPINSTRUCT STRING,
	L_SHIPMODE STRING,
	L_COMMENT STRING
)
ROW FORMAT DELIMITED FIELDS TERMINATED BY '|'
STORED AS TEXTFILE
LOCATION 's3://redshift-downloads/TPC-H/2.18/100GB/lineitem/'
TBLPROPERTIES ('skip.header.line.count' = '0');
Preview the data:
SELECT * FROM blog_qs_athena_tpc_h_db_sql.lineitem_csv LIMIT 10;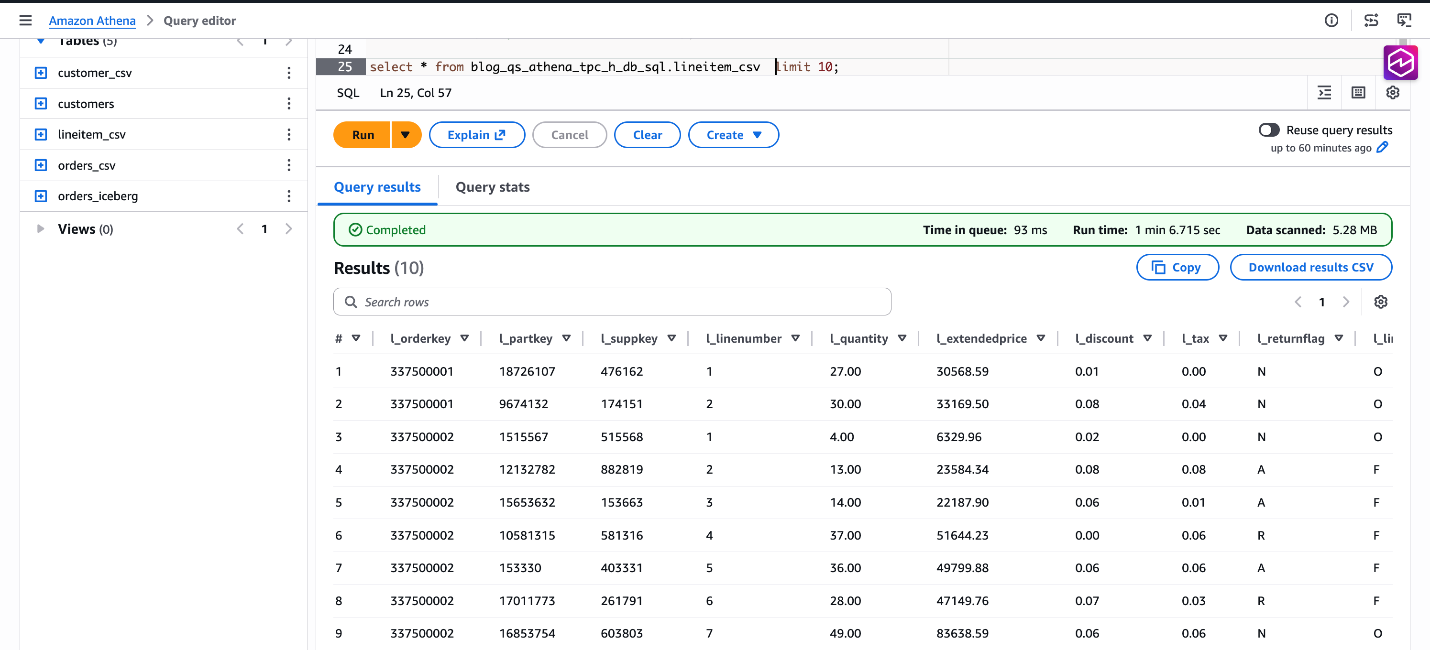
Figure 8: verify data blog_qs_athena_tpc_h_db_sql.lineitem_csv
Step3: Create the S3 Tables Table Using CTAS – Finally, create a Parquet-formatted S3 Tables in your new catalog using CTAS. We filter a sample date range to limit the initial data load based on CAST(L_SHIPDATE AS DATE) BETWEEN DATE(‘1998-06-01’) AND DATE(‘1998-12-31’).
Note: Make sure to use s3tablescatalog to run the following queries as shown in the following screenshot.
CREATE TABLE lineitem_csv_s3_table
WITH ( format = 'PARQUET')
AS
SELECT * FROM AwsDataCatalog.blog_qs_athena_tpc_h_db_sql.lineitem_csv
WHERE CAST(L_SHIPDATE AS DATE) BETWEEN DATE('1998-06-01') AND DATE('1998-12-31');
Verify the result:
SELECT * FROM lineitem_csv_s3_table LIMIT 10;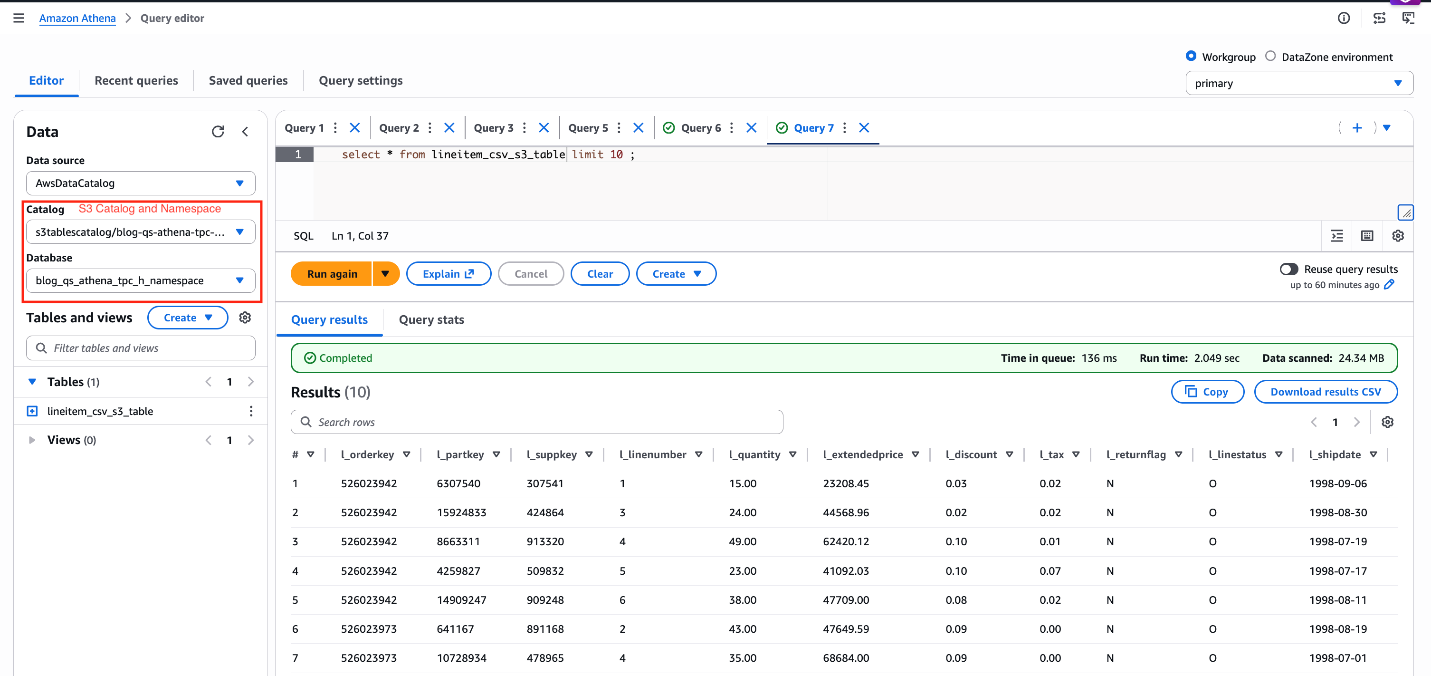
Figure 9: verify data lineitem_csv_s3_table
Dataset Preparation in Amazon Quick
Your Athena tables are registered and queryable. Now it is time to bring that data into Amazon Quick – connecting it, shaping it, and making it speak the language of your business. This section walks through every step: connecting to the Athena data source, creating datasets and importing them into SPICE, joining the three SPICE datasets, configuring a Quick Topic for natural language Q&A, building and publishing a dashboard with Amazon Q, and setting up the Knowledge Base that powers the agentic layer.
Data Source Creation
Before Amazon Quick can query your three tables in your data lake, you create a single Athena data source connection. You can access all three tables — the CSV external table, the self-managed Iceberg Parquet table, and the S3 Tables managed Iceberg table — using the same connection because all three are cataloged in AWS Glue Data Catalog and accessible through the same Athena workgroup.
Steps:
- In Amazon Quick, navigate to Datasets → Data sources →Create data source.
- Select Amazon Athena as the data source type.
- Enter a descriptive name (for example
tpch-lakehouse-athena). - Select the Athena workgroup your team uses for production queries. Using a dedicated workgroup enforces query cost controls and separates Quick query traffic from other workloads.
- Choose Validate connection. Quick confirms it can reach Athena and the Glue Data Catalog.
- Select Create data source.
Dataset Creation and SPICE Ingestion
With the Athena data source created, create one Quick dataset per table. Import each dataset into SPICE — Quick’s Super-fast, Parallel, In-memory Calculation Engine — to deliver sub-second query performance in dashboards and agentic workflows, regardless of how large the underlying S3 data grows.
Lake Formation Permissions
Before creating datasets, make sure the appropriate data access permissions are in place:
- If Lake Formation is not enabled: Permissions are managed at the Quick service role level via standard IAM-based S3 access control. Make sure the Quick service role (for example,
aws-quicksight-service-role-v0) has the read IAM permissions for the relevant S3 buckets and Athena resources. No additional Lake Formation configuration is required. - If Lake Formation is enabled: Lake Formation acts as the central authorization layer, overriding standard IAM-based S3 permissions. Grant permissions directly to the Amazon Quick author or IAM role:
- Open the AWS Lake Formation console.
- Choose Permissions → Data permissions → Grant.
- Select the SAML users and groups.
- Enter Quick user ARN
- Choose Named Data Catalog resources
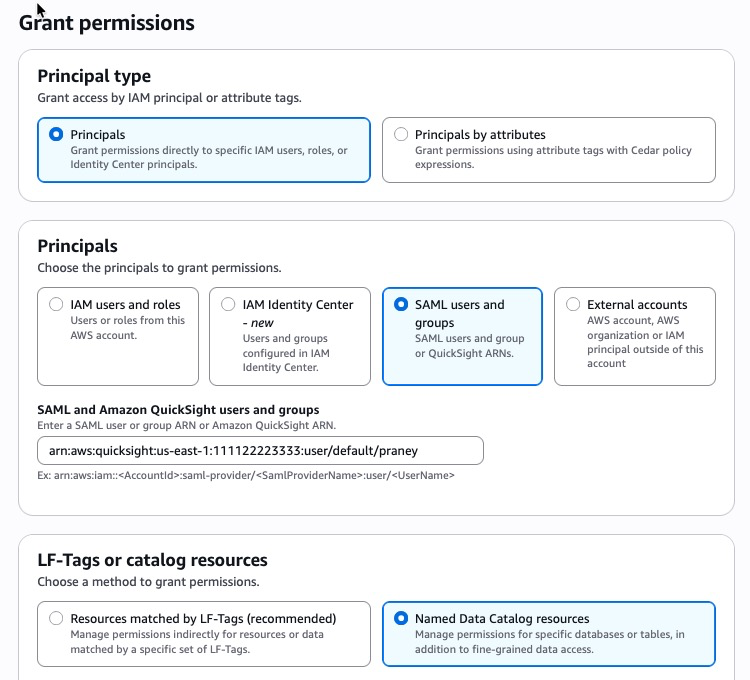
Figure 10: Lake Formation permissions
-
- Choose the required databases, tables, and columns.
- Grant SELECT at minimum; add DESCRIBE for dataset creation.
- Repeat for each user or role that requires access.
For step-by-step instructions, see Securely analyze your data with AWS Lake Formation and Amazon Quick Sight, and Accessing Amazon S3 Tables through Amazon Quick with AWS Lake Formation Permissions.
For S3 Tables specifically, the Quick service role also requires an additional glue:GetCatalog inline policy to access the non-default s3tablescatalog catalog — see Visualizing S3 table data with Amazon Quick for the exact policy statement.
Dataset 1 — CSV External Table (customer_csv)
- From the Athena data source, choose Create dataset.
- Select the Glue database and choose the table (for example
customer_csv). - Select Edit/Preview data to open the data preparation experience.
- Verify column data types and make changes as needed. Note: If you are using the new data preparation experience, click the Preview tab to review the data before proceeding.
- Set Query mode to SPICE.
- Name the dataset
TPC-H Customer (CSV)and select Save & publish.
Dataset 2 — Self-Managed Iceberg Parquet (orders_iceberg)
- From the same Athena data source, choose Create dataset.
- Select the Glue database and choose the table (for example
orders_iceberg). - Select Edit/Preview data to open the data preparation experience.
- Verify column data types and make changes as needed. Note: If you are using the new data preparation experience, click the Preview tab to review the data before proceeding.
- Set Query mode to SPICE.
- Name the dataset
TPC-H Orders (Iceberg)and select Save & publish.
Dataset 3 — S3 Tables Managed Iceberg (lineitem_csv_s3_table)
S3 Tables are stored in a non-default AWS Glue catalog (s3tablescatalog), not in the standard AWSDataCatalog. Because of this, the Quick visual table browser cannot display S3 Tables — they do not appear in the “Choose your table” pane. You must use Custom SQL to query S3 Tables data and create a Quick dataset from it.
- From the same Athena data source, choose Create dataset.
- Select Use custom SQL.
- Select Edit/Preview data to open the data preparation experience.
- Enter an Athena SQL query referencing the S3 Tables catalog using the
“s3tablescatalog/<table-bucket-name>”.”<namespace>”.”<table-name>”syntax:
SELECT * FROM "s3tablescatalog/blog-qs-athena-tpc-h-db-sql-s3-table-mar-3"."blog_qs_athena_tpc_h_namespace"."lineitem_csv_s3_table"- Choose Apply. Quick executes the query through Athena and previews the result set.
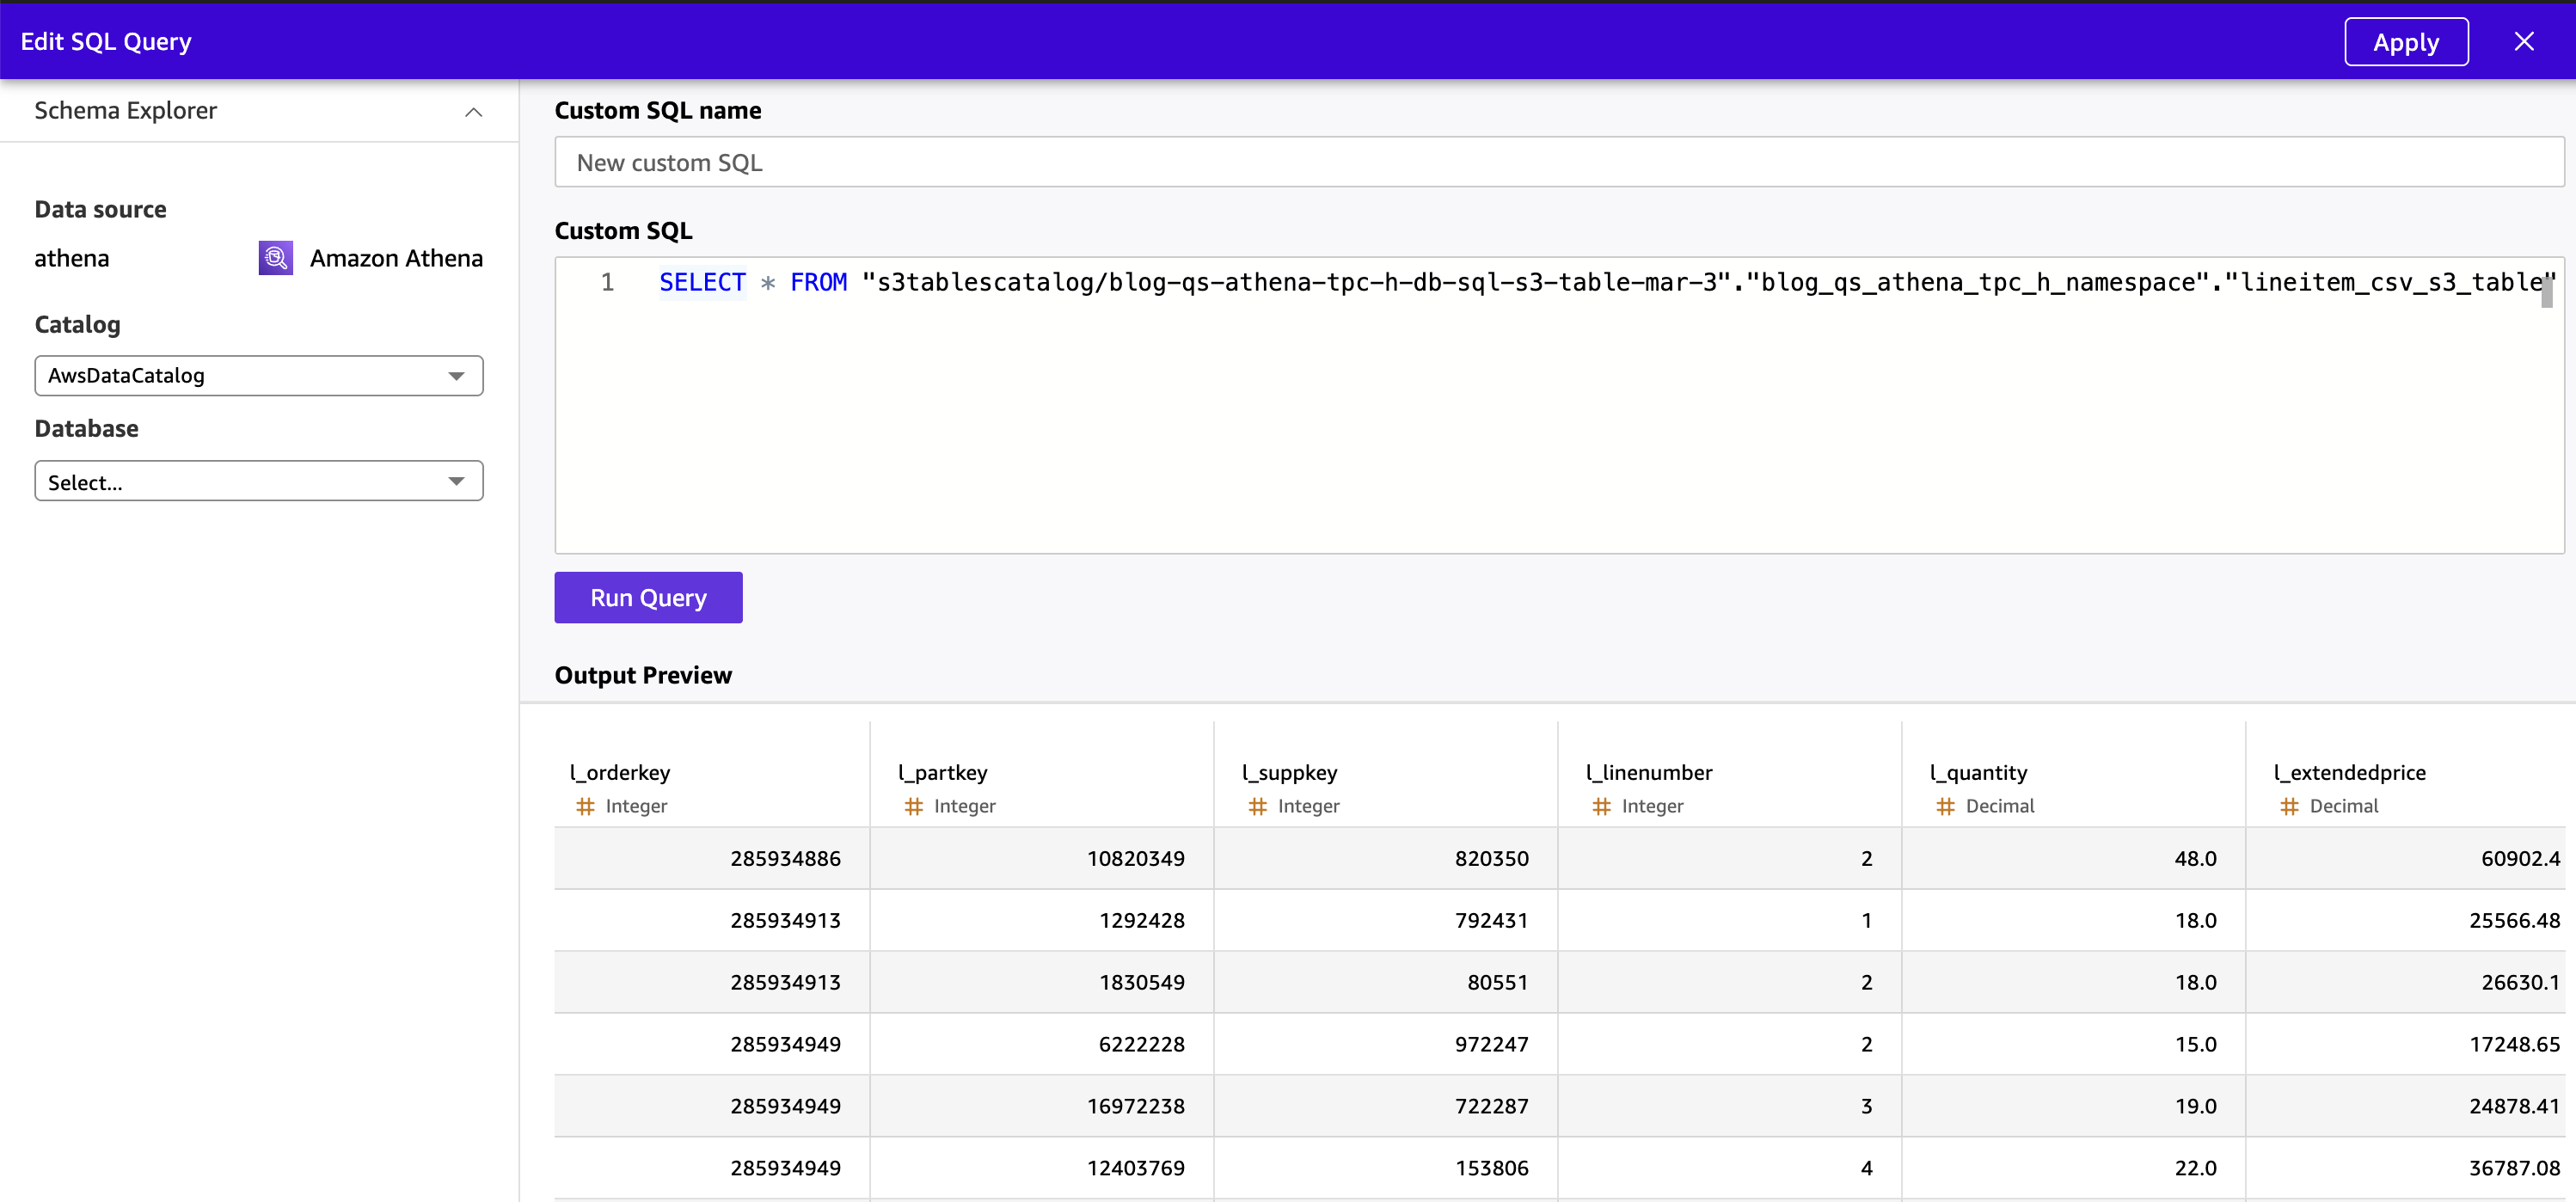
Figure 11: Preview S3 Table data from Quick
- Verify column data types and make changes as needed.
- Set Query mode to SPICE.
- Name the dataset
TPC-H Lineitem (S3 Tables)and select Save & publish.
Note: This custom SQL requirement applies specifically to S3 Tables because they reside in a child Glue catalog registered separately from the default AWSDataCatalog. The CSV and Iceberg tables in the standard catalog are visible in the table browser and do not require custom SQL.
Joining Datasets
The TPC-H schema is a star schema by design, and Amazon Quick’s visual data preparation experience supports joining datasets directly in the UI. In this solution, we will pre-join all three tables in Athena using Custom SQL and ingest the unified result directly into SPICE as a single flat dataset. This removes Quick’s secondary table size constraint entirely and delegates the join to Athena, which handles tables of varying scale.
Note on the cross-source JOIN limit: If your secondary tables (orders_iceberg + customer_csv) are small enough to fit under 1 GB combined, you can perform the join inside Quick’s visual data preparation experience by opening the largest table first (making it the primary) and adding the smaller tables as secondary joins. For large TPC-H scale factors where the lineitem table dominates, the Athena pre-join approach below is the recommended path.
Steps:
- From the Athena data source, choose Create dataset.
- Select Use custom SQL.
- Select Edit/Preview data to open the data preparation experience.
- Enter the following Athena SQL query, which joins all three tables across the default Glue catalog (
blog_qs_athena_tpc_h_db_sql) and the S3 Tables non-default catalog (s3tablescatalog):
SELECT
	c.c_custkey,
	c.c_name,
	c.c_mktsegment,
	c.c_nationkey,
	o.o_orderkey,
	o.o_orderdate,
	o.o_orderstatus,
	o.o_totalprice,
	o.o_orderpriority,
	l.l_linenumber,
	l.l_partkey,
	l.l_suppkey,
	l.l_quantity,
	l.l_extendedprice,
	l.l_discount,
	l.l_shipmode,
	l.l_returnflag
FROM "s3tablescatalog/blog-qs-athena-tpc-h-db-sql-s3-table-mar-3"."blog_qs_athena_tpc_h_namespace"."lineitem_csv_s3_table" l
INNER JOIN "blog_qs_athena_tpc_h_db_sql"."orders_iceberg" o
	ON l.l_orderkey = o.o_orderkey
INNER JOIN "blog_qs_athena_tpc_h_db_sql"."customer_csv" c
	ON o.o_custkey = c.c_custkey;
The query joins the three tables using the TPC-H foreign key relationships:
lineitem_csv_s3_table.l_orderkey = orders_iceberg.o_orderkey(Lineitem → Orders)orders_iceberg.o_custkey = customer_csv.c_custkey(Orders → Customer)
Tip: Use explicit double quotes around both the database and table names in Athena SQL — this helps prevent parse errors caused by hyphens or other special characters in identifier names, particularly for S3 Tables catalog paths.
- Choose Apply. Quick executes the query through Athena and previews the unified result set.
- Verify column data types and make changes as needed. Hide internal key columns (
c_custkey,o_custkey,o_orderkey,l_orderkey) that business users do not need to see in dashboards or Q&A.
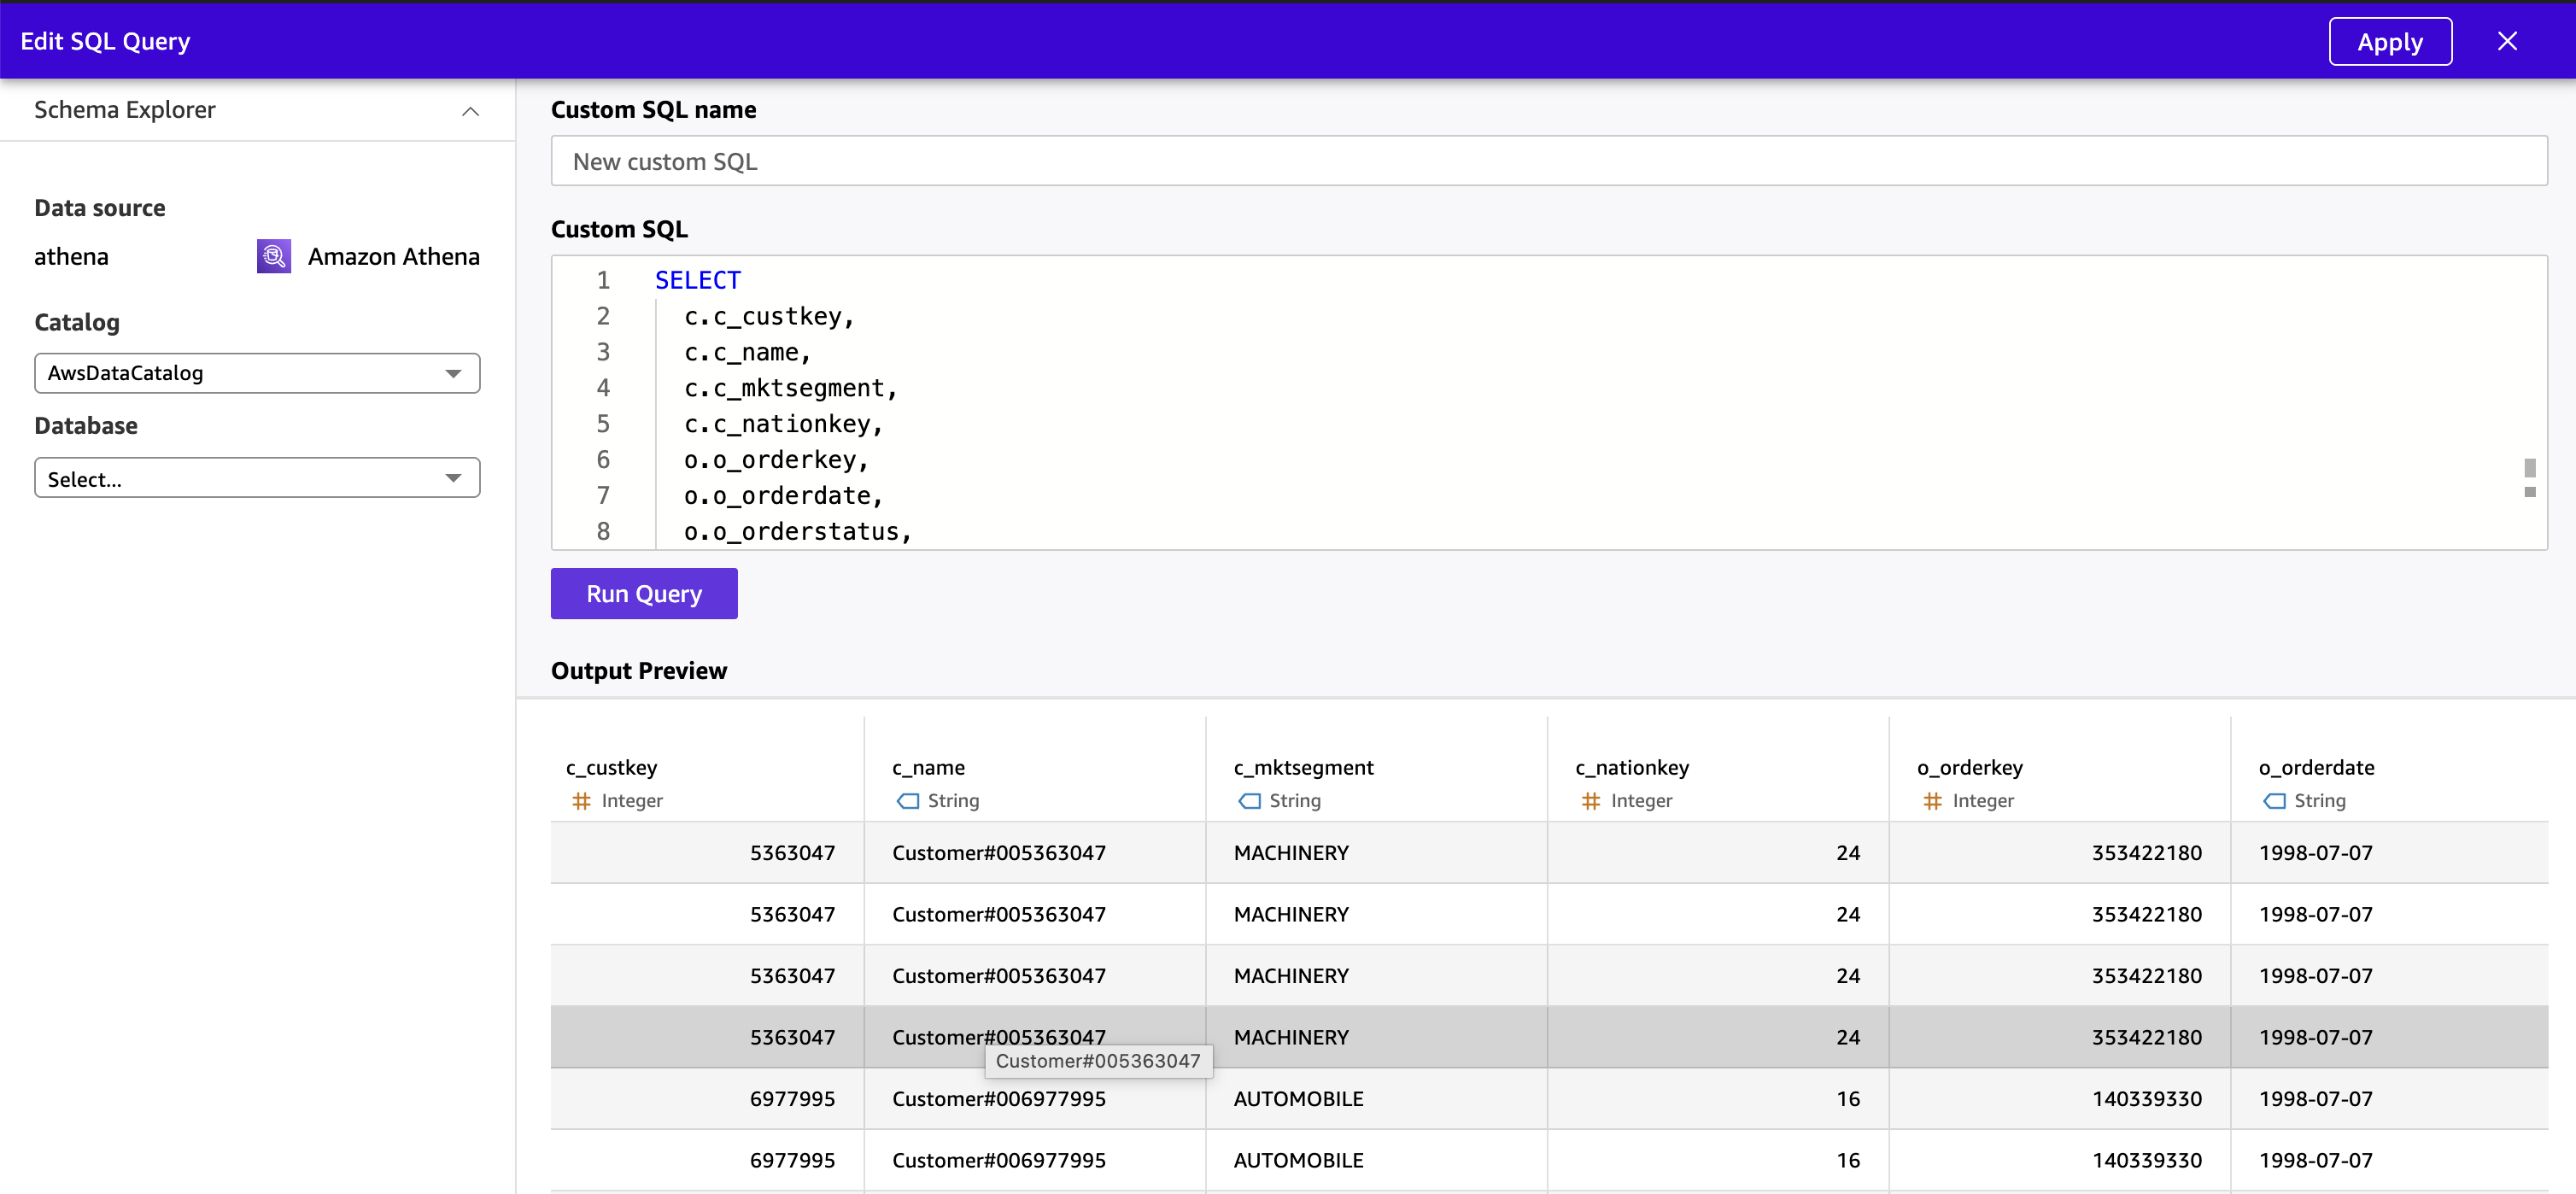 Figure 12 : Preview denormalized data from Quick
- Set Query mode to SPICE.
- Name the dataset
TPC-H Unified (Joined)and select Save & publish and wait for the SPICE dataset status change to “Ready” (expected time 2-3 mins)
The joined dataset is now a single, denormalized SPICE dataset combining customer, order, and line item data across all three table formats — CSV external, self-managed Iceberg Parquet, and S3 Tables managed Iceberg — ready for both dashboard authoring and natural language Q&A.
Quick Topic Configuration
A Quick Topic is the semantic layer that translates column names into business concepts. When a user asks “What was total revenue last quarter by customer segment?”, the Topic maps revenue to l_extendedprice, “last quarter” to a date filter on o_orderdate, and customer segment to c_mktsegment. Without a well-configured Topic, natural language queries return generic or incorrect results. With one, they return precise, cited answers in seconds.
Steps:
- In Amazon Quick, navigate to Topics → Create topic.
- Enter a name
TPC-H Analyticsand a plain-language description: “Customer, order, and line item data from the TPC-H benchmark dataset, covering revenue, pricing, discounts, order status, and customer market segments.” - Select the
TPC-H Unified(Joined) dataset as the data source. - Quick analyzes the dataset and auto-generates field configurations (expected time to complete 8-10 min). Review each field on the Data tab:
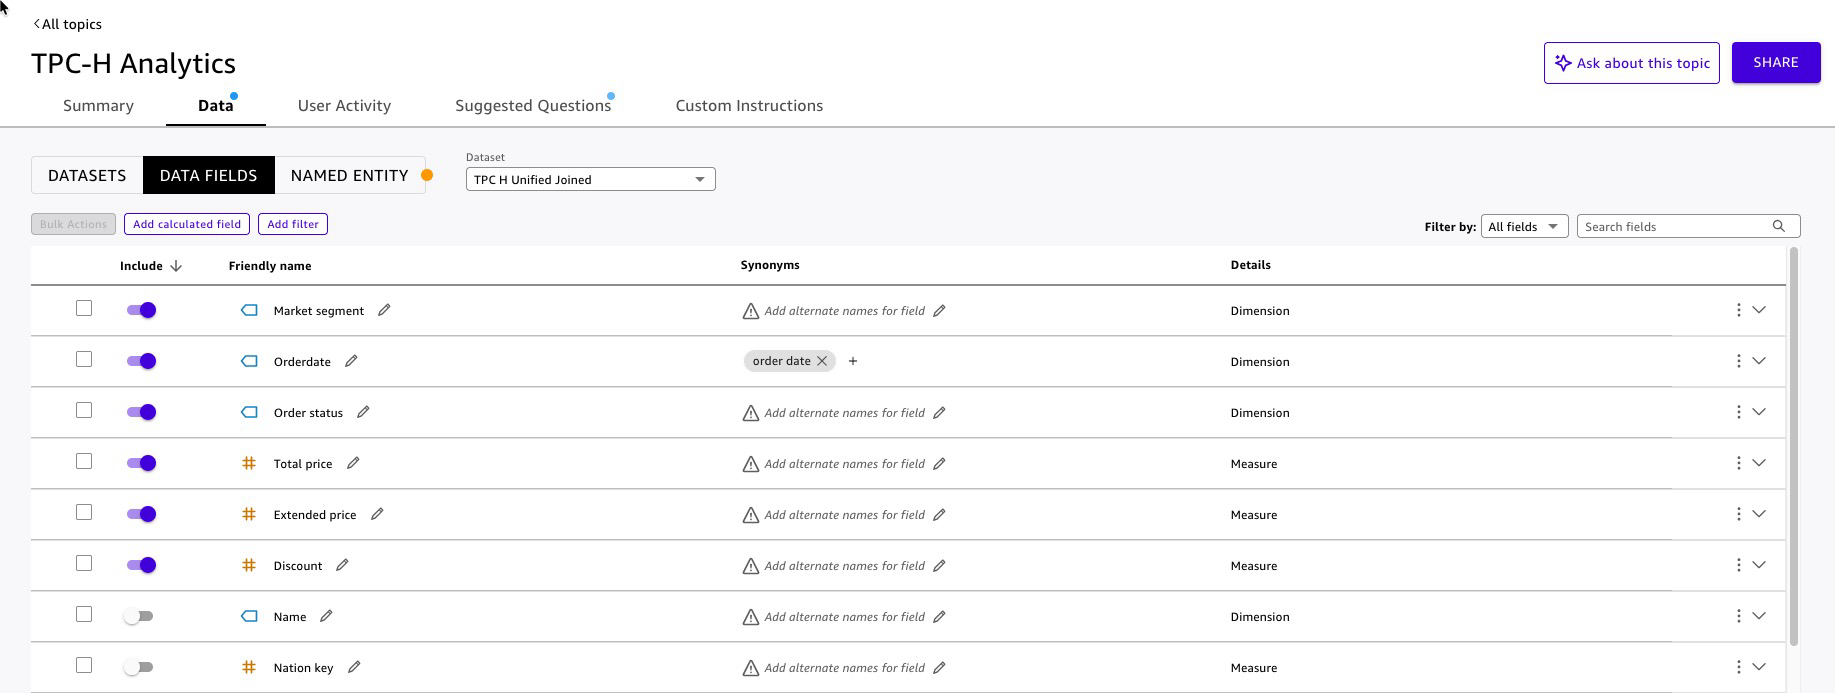 Figure 13: Quick Topic enhancement
- Add named entities for common business groupings.
- Add suggested questions to guide first-time users:
- “What is total revenue by order status this year?”
- “Which customer segments placed the most orders last quarter?”
- “Show me the top 10 orders by total price last month.”
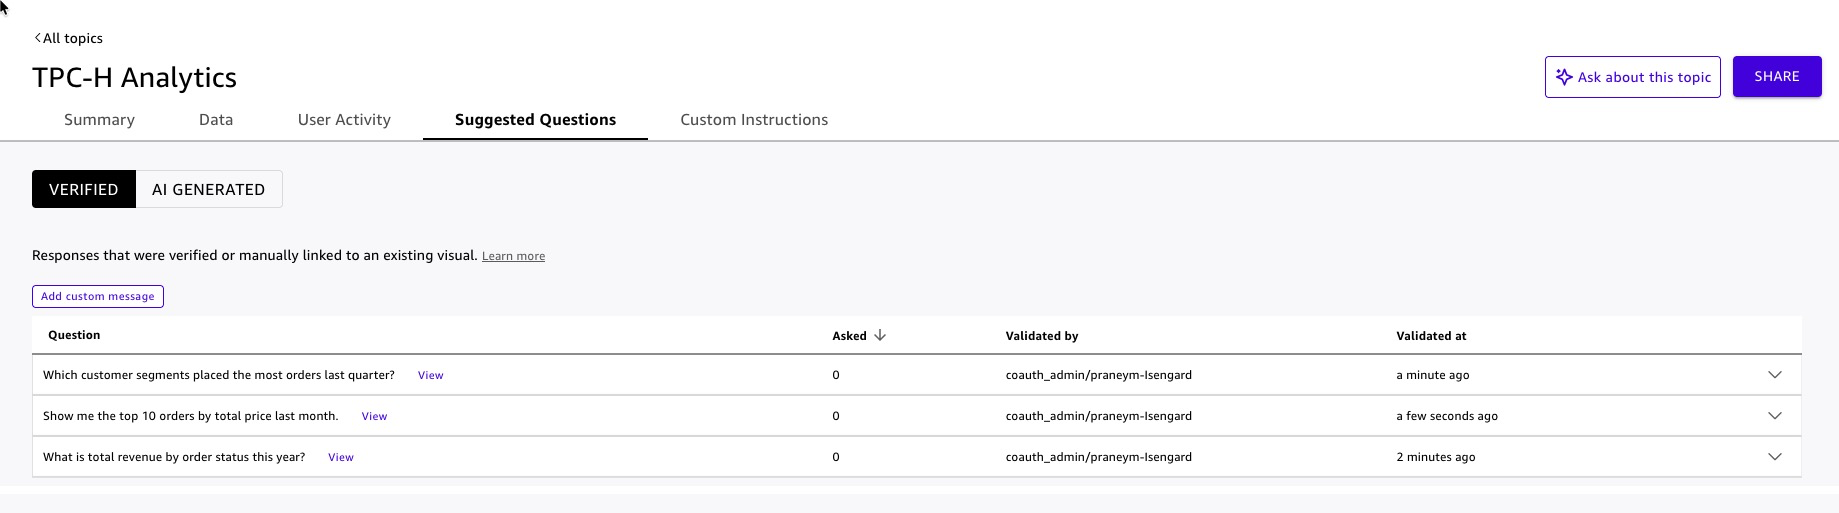 Figure 14: Quick Topic suggested questions
Dashboard Build and Publish with Amazon Q
Amazon Q in Quick lets authors build dashboards using natural language — describe the visual you want, and Q generates it. This accelerates dashboard development from days to minutes and keeps the focus on business storytelling rather than chart configuration.
Steps:
- In Amazon Quick, navigate to Analyses → Create analysis.
- Select the
TPC-H Unified (Joined)dataset. - Open the Amazon Q panel .
- Use natural language prompts to build each visual and Add to Analysis:
- “Show a KPI card for total revenue.”
- “Add a bar chart showing extended revenue by order status.”
- “Create a scatter plot of discount rate versus extended revenue by customer segment.”
- For each generated visual, review the field mappings and adjust titles, axis labels, and color encoding to match your organization’s style guide.
- Add a filter control on
o_orderdateso dashboard viewers can scope the data to a time range of their choice without requesting a new report. - Click Manage Q&A to choose radio button and select
TPC-H Analyticstopic for enabling Dashboard Q&A. This embeds a natural language query bar directly in the published dashboard, allowing viewers to ask follow-up questions without leaving the dashboard. Quick automatically extracts semantic information from the dashboard visuals to power the Q&A experience. - Select Publish, name it
TPC-H Lakehouse Analytics. - Optionally, Quick allows to share dashboard.
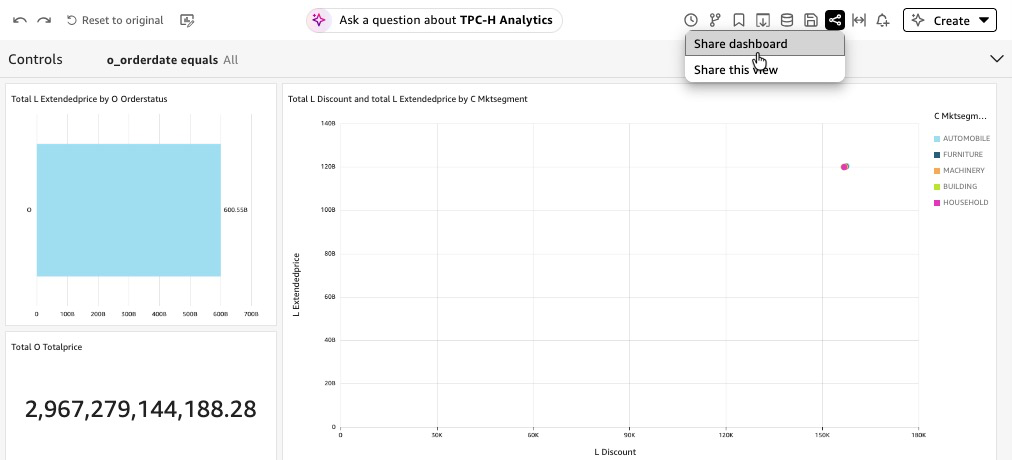
Figure 15: Share Dashboard
Agentic AI Integration with Amazon Quick
Your SPICE datasets are loaded, your Topic is published, and your dashboard is live. Each of these is valuable on its own. Together, unified inside a Quick Space, surfaced through a custom Chat Agent and indexed Knowledge Base, they become something qualitatively different: an agentic AI system that answers questions, retrieves context, and drives action — all from a single conversational interface.
Knowledge Base Configuration
The Knowledge Base gives the Chat Agent access to unstructured context that structured data alone cannot answer — data dictionaries, schema documentation, business rules, and domain reference material. For this solution, the Knowledge Base is built from TPC-H unstructured data: the official TPC-H specification document describing how your organization maps TPC-H fields to business concepts.
Steps:
- In Amazon Quick, navigate to Integrations → Knowledge bases → Webcrawler.
- Add TPC-H specification (PDF) document content URL : https://www.tpc.org/tpc_documents_current_versions/pdf/tpc-h_v2.17.1.pdf.
- Name the knowledge base
TPC-H Reference Knowledge Base. - Select Create.
Quick indexes the document and makes it searchable by the Chat Agent at query time. The agent retrieves relevant passages — not entire document — so responses stay grounded and concise.
Best practice: Keep each document focused on a single topic. A 5-page data dictionary is more useful to the agent than a 200-page combined specification, because the agent retrieves by relevance — smaller, focused documents produce more precise retrievals.
Space Creation
A Quick Space is the organizational layer that abstracts your data assets — Topics, Knowledge Bases, dashboards, and datasets — into a single, governed context boundary. The Chat Agent you build in the next step does not query Topics and Knowledge Bases directly. It queries the Space. This design gives you one place to manage what the agent knows, who can access it, and what it is allowed to surface.
Steps:
- In Amazon Quick, navigate to Spaces → Create space.
- Name the space
TPC-H Lakehouse Analytics Space. - Add resources to the space:
Add the Topic:
- Select Add knowledge → Topics.
- Choose
TPC-H Analytics(the Topic configured in the Quick Topic Configuration section). - The agent can now answer structured data questions — revenue, orders, customer segments — by querying the Topic through the Space.
Add the Knowledge Base:
- Select Add knowledge → Knowledge bases.
- Choose
TPC-H Reference Knowledge Base(the Knowledge Base configured in the Knowledge Base Configuration section). - The agent can now retrieve unstructured context from the TPC-H specification document — including the business intent of all 22 benchmark queries, query definitions, and the conceptual data model. When a user asks “What is TPC-H Query 3 designed to measure?” or “What does the TPC-H specification say about order priority?”, the agent retrieves the relevant passage from the specification and cites it in the response.
Add the Dashboard:
- Select Add knowledge → Dashboards.
- Choose
TPC-H Lakehouse Analytics(the dashboard configured in the Dashboard Build and Publish with Amazon Q section) - The agent can reference dashboard visuals and direct users to specific views when answering questions.
The Space now encapsulates everything the Chat Agent needs: structured data through the Topic, unstructured context through the Knowledge Base, and visual references through the Dashboard. The agent queries the Space; the Space enforces the boundaries. Quick enforces the same security rules from the underlying knowledge inside the Space — users in the Space see only the data their role permits, regardless of how they ask the question.
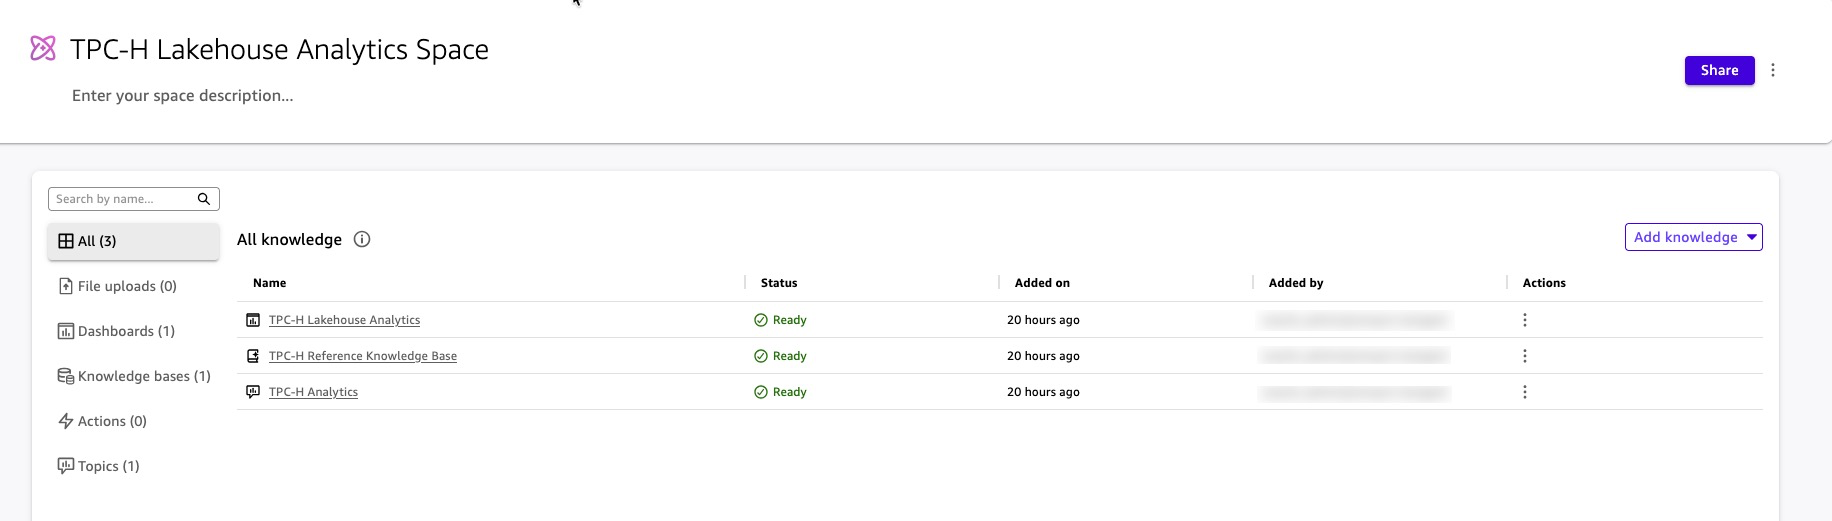 Figure 16: Artifacts in Space
Custom Chat Agent Creation
The Chat Agent is the interface your business users interact with. It is not a generic assistant — it is a purpose-built, governed AI teammate scoped to TPC-H Lakehouse Analytics Space. Users ask questions in plain English. The agent reasons over the Space, retrieves the right combination of structured data and unstructured context, and returns grounded, cited answers.
Steps:
- In Amazon Quick, navigate to Chat agents → Create chat agent.
- Write the persona instructions in plain language:
“You are the TPC-H Analytics Agent for [Your Organization]. You help business analysts and data engineers answer questions about order revenue, supplier performance, line item pricing, and inventory availability using the TPC-H lakehouse dataset. Always ground your answers in data from the TPC-H Lakehouse Analytics Space. When a user asks a question that requires a chart or table, retrieve the answer from the Topic and present it clearly. When a user asks about schema definitions, query logic, or data dictionary terms, retrieve the answer from the Knowledge Base. Do not speculate. If you cannot find a grounded answer, say so and suggest a follow-up question.”
- Enter a name:
TPC-H Analytics Agent. - Attach the Space: Quick can identify and attach
TPC-H Lakehouse Analytics Space. Optionally, you add the space with the following steps.- Under Knowledge sources, select Link spaces.
- Choose
TPC-H Lakehouse Analytics Space. - The agent now has access to the Topic, Knowledge Base, and Dashboard through the Space — no direct dataset connections are needed.
- Configure customization options:
- Welcome message: Add a custom greeting that appears when users first open the chat agent (e.g., “Hello! I’m your TPC-H Analytics Agent. Ask me about order revenue, customer segments, or line item pricing.”)
- Suggested prompts: Add 3-5 starter questions to guide users on what the agent can answer (e.g., “What was total revenue last quarter?”, “Show me top customers by order volume”, “Explain the Shipping Priority Query”)
- These customization options help users understand the agent’s capabilities immediately and reduce the learning curve for first-time interactions.
- Preview and test the agent using the built-in preview panel on the right side of the configuration page before publishing. Test with questions that span both data sources:
- “What was total revenue for fulfilled orders last quarter?” — retrieves from the Topic and Dashboard (structured data).
- “What does the l_shipmode field represent?” — retrieves from the Knowledge Base (TPC-H specification).
- “Show me the top 5 customer segments by order volume.” — retrieves from the Topic and returns a ranked result.
- “What business question does the Shipping Priority Query answer?” — retrieves from Section 2.4.3 of the TPC-H specification in the Knowledge Base.
- Select Launch chat agent to save and publish the changes.
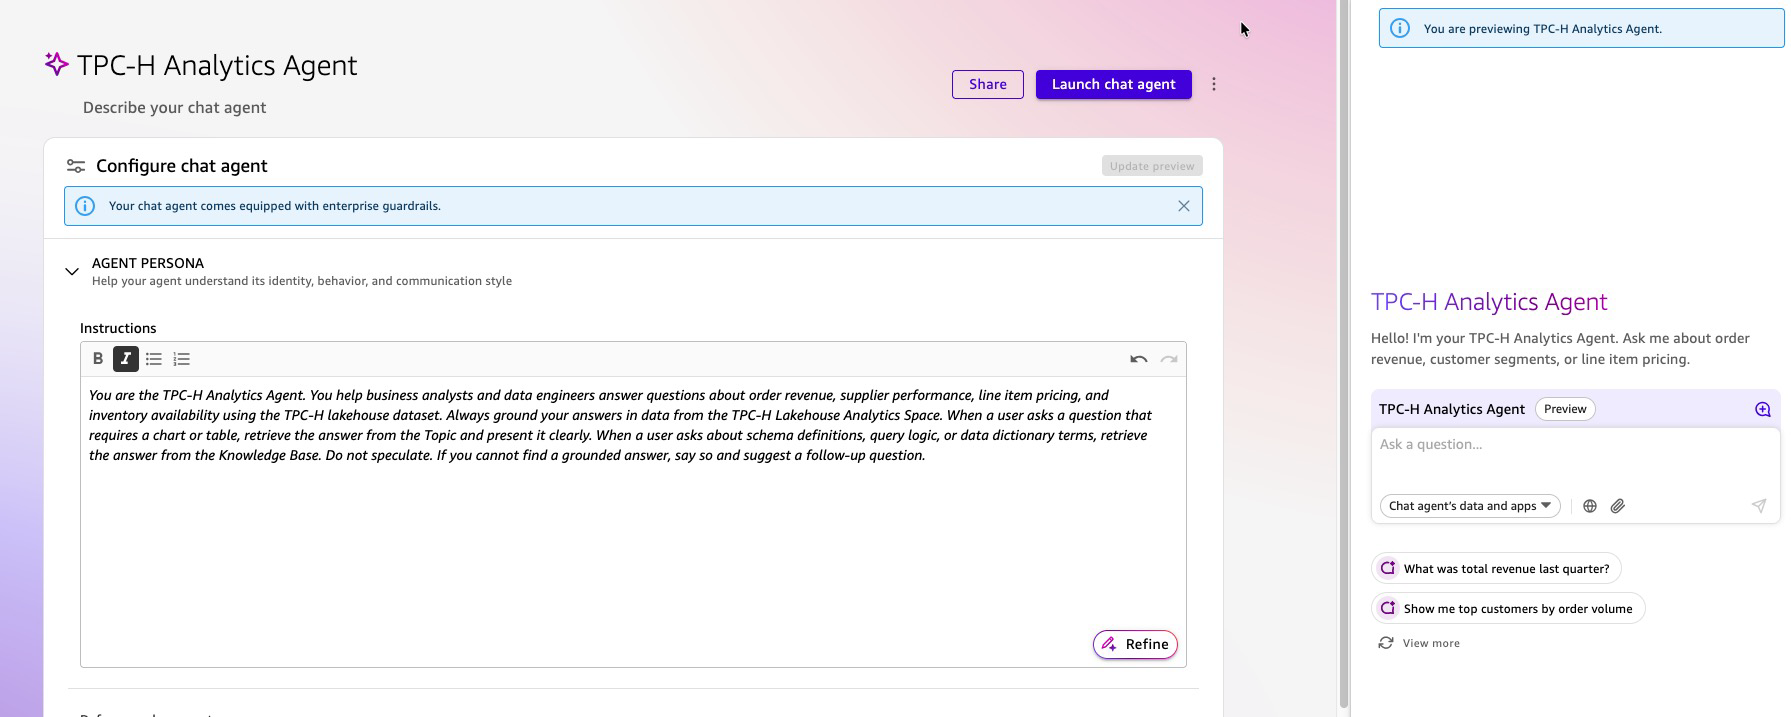 Figure 17: Interact with Agent
What Your Users Experience
A business analyst opens the TPC-H Analytics Agent and types:
“Which customer segment drove the most revenue last month, and what does ‘market segment’ mean in the TPC-H schema?”
The agent:
- Queries the
TPC-H AnalyticsTopic through the Space for revenue byc_mktsegmentfiltered to last month — returning a ranked result from SPICE. - Simultaneously retrieves the definition of
c_mktsegmentfrom the TPC-H data dictionary in the Knowledge Base. - Returns a single, unified answer: the ranked revenue result with a citation to the SPICE dataset, followed by the schema definition with a citation to the specification document.
No SQL. No dashboard navigation. No ticket to the data team. The answer arrives in one response, grounded in two sources, with every claim traceable to its origin.
Cleanup
Run following steps to remove the artifacts created by this blog post
Lakehouse / Data Lake Artifacts
Run following steps using Athena console
Drop Tables
DROP TABLE blog_qs_athena_tpc_h_db_sql.customer_csv;
DROP TABLE blog_qs_athena_tpc_h_db_sql.orders_csv;
DROP TABLE blog_qs_athena_tpc_h_db_sql.orders_iceberg;
DROP TABLE blog_qs_athena_tpc_h_db_sql.lineitem_csv;
DROP TABLE lineitem_csv_s3_table; --(use S3 catalog configuration)
Drop Databases
DROP DATABASE blog_qs_athena_tpc_h_db_sql; Drop S3 Table bucket
- To delete
lineitem_csv_s3_tabletable, use the AWS CLI, AWS SDKs, or Amazon S3 REST API. Learn more - To delete namespace
blog_qs_athena_tpc_h_namespace, use the AWS CLI, AWS SDKs, or Amazon S3 REST API. Learn more - To delete
blog-qs-athena-tpc-h-db-sql-s3-table-mar-3table bucket, use the AWS CLI, AWS SDKs, or Amazon S3 REST API. Learn more
Drop S3 bucket
Use S3 console to remove S3 bucket amzn-s3-demo-bucket.
Quick Artifacts
Delete the Custom Chat Agent
- In Amazon Quick, navigate to Agents.
- Select
TPC-H Analytics Agentand choose Delete. - Confirm the deletion.
Delete the Space
- Navigate to Spaces.
- Select
TPC-H Lakehouse Analytics Spaceand choose Delete. - Confirm the deletion. This removes the Space but does not delete the underlying Topics, Knowledge Bases, or Dashboards — those must be deleted separately.
Delete the Dashboard
- Navigate to Dashboards.
- Select
TPC-H Lakehouse Analyticsand choose Delete. - Confirm the deletion.
Delete the Topic
- Navigate to Topics.
- Select
TPC-H Analyticsand choose Delete. - Confirm the deletion.
Delete the Knowledge Base
- Navigate to Integrations → Knowledge bases.
- Select
TPC-H Reference Knowledge Baseand choose Delete knowledge base. - Confirm the deletion. This removes the Knowledge Base and the indexed documents.
Delete the Datasets
- Navigate to Datasets.
- Select each of the following datasets and choose Delete:
TPC-H Unified (Joined)TPC-H Customer (CSV)TPC-H Orders (Iceberg)TPC-H Lineitem (S3 Tables)
- Confirm each deletion. This removes the SPICE data and frees the associated SPICE capacity.
Delete the Data Source
- Navigate to Datasets → Data sources.
- Select
tpch-lakehouse-athenaand choose Delete. - Confirm the deletion.
Conclusion
This architecture demonstrates how Amazon Quick’s agentic AI transforms enterprise data analytics from a technical bottleneck into an accessible self-service capability. By integrating Amazon S3, AWS Glue Data Catalog, Amazon Athena, and Amazon Lake Formation with Amazon Quick’s conversational AI agents and dashboards, business users can now query complex lakehouse data through natural language interfaces without requiring SQL or BI expertise. The solution seamlessly combines structured TPC-H datasets across multiple storage formats (S3 Table, Iceberg, Parquet) with unstructured data from knowledge bases, enabling richer contextual insights. This democratization of data access accelerates decision-making across industries while maintaining enterprise-grade security, governance, and scalability for modern data-driven organizations.
Next steps
Reference Getting started tutorial for additional use cases using B2B, revenue, sales, marketing, and HR datasets. To dive deeper in Lake Formation permission with Quick reference AWS documentation “Using AWS Lake Formation with Quick“ and blog post – “Securely analyze your data with AWS Lake Formation and Amazon Quick Sight”. Join Amazon Quick Community to find answers to your questions, learning resources, and events in your area.
For additional read reference following links –
Modernize Business Intelligence Workloads Using Amazon Quick
Best practices for Amazon Quick Sight SPICE and direct query mode
Accessing Amazon S3 Tables through Amazon Quick with AWS Lake Formation Permissions AWS security in Quick.