Getting Started with AWS Local Zones
Overview
In this tutorial, you will learn how to deploy workloads using AWS Local Zones—infrastructure deployments that extend core services, such as compute, storage, networking, analytics, AI/ML, and database, to more metros worldwide.
Whether your goals include achieving single-digit millisecond latency, meeting data residency requirements, supporting AI/ML inference and training workloads, or accelerating hybrid and migration use cases, AWS Local Zones enable you to do so while maintaining consistent AWS APIs, tools, and services with AWS Regions.
This guide walks you through how to identify the lowest-latency Local Zone for your location, opt in to access it, extend your Amazon VPC to that Local Zone, and deploy an Amazon EC2 instance within the Local Zone. Finally, you will deploy a lightweight, browser-based speed test application to measure latency and compare it against the AWS latency test portal, giving you hands-on experience with the performance benefits AWS Local Zones deliver.
What you will accomplish
In this guide, you will learn how to:
- Identify the lowest-latency AWS Local Zone for your location using the latency test portal
- Opt-in to a Local Zone from the AWS Management Console
- Extend your Amazon VPC from the AWS Region to your chosen Local Zone
- Launch an EC2 instance within your Local Zone
- Deploy a browser-based speed test application to measure latency and throughput
- Clean up your resources
Prerequisites
Before you begin, ensure you have:
- An active AWS account
- Access to the AWS Management Console
- An SSH client on your local machine (or PuTTY for Windows)
- Familiarity with basic AWS networking concepts (VPC, subnets, security groups)
- Services used: Amazon EC2 , Amazon VPC
- AWS experience: Intermediate
- Time to complete: 20-30 minutes
- Cost to complete: This tutorial provisions EC2 t3.micro instances on AWS Local Zones. Cost depends on how long the t3.micro instance runs and which Local Zone you select.
Identify the AWS site with the lowest latency to your location
To identify the site in the global AWS infrastructure with the lowest latency, you can use this Latency test portal, which measures latency from your location to AWS Regions and Local Zones, then highlights the site with the lowest response time. The portal runs 120 seconds of performance tests against endpoints located across AWS Regions and Local Zones and measures latency readings in milliseconds. To get the most accurate measurement, wait for the tests to finish. The portal will highlight in green the best AWS site to deploy your latency-sensitive workloads based on your location. If you need to compare the results with the availability of services in every location, see the AWS services availability table on the AWS Local Zones features page or the AWS regional services page for service availability by Region.
Note: To complete this tutorial, identify the Local Zone with the shortest latency to you (be sure to select a Local Zone and not a Region). You should capture the Local Zone ID and its Parent Region from the latency test portal, because both will be required to complete this guide.
Example: Latency test results
Implementation
Step 1: Opt in to an AWS Local Zone
In this step, you enable an AWS Local Zone in your account. By default, Local Zones are disabled.
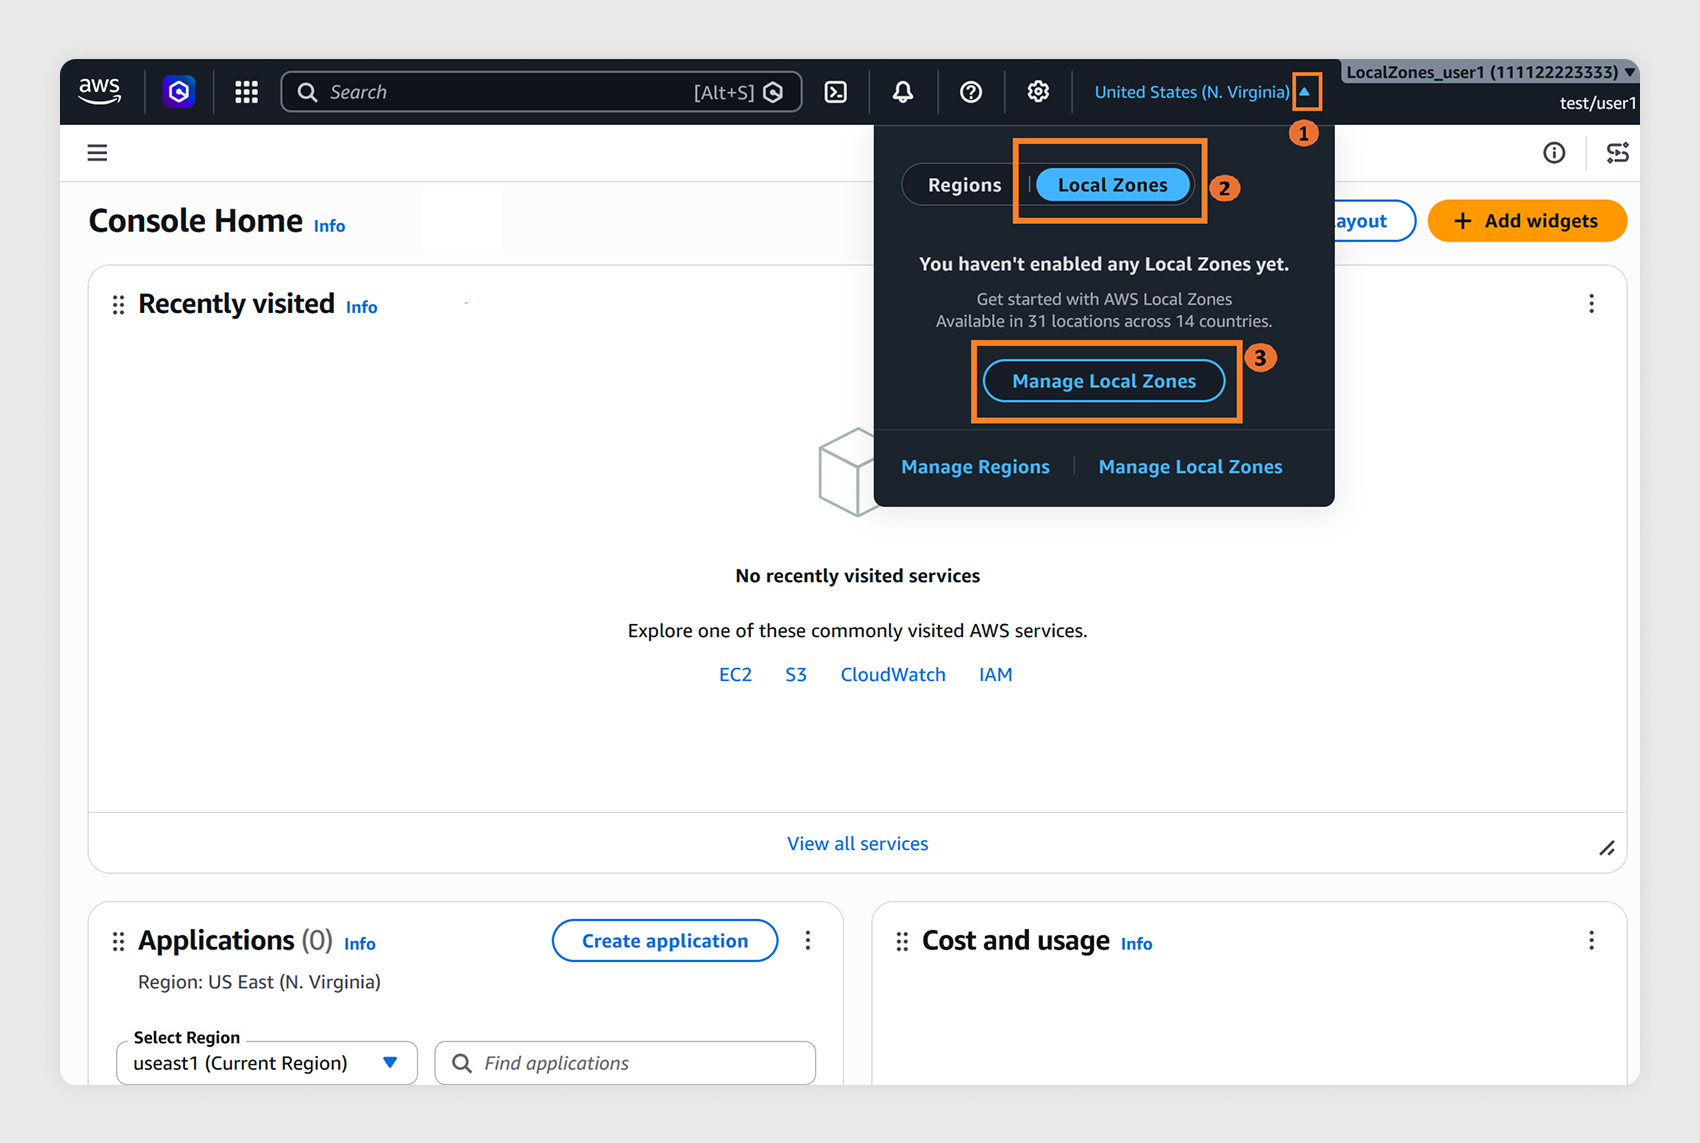
1.1
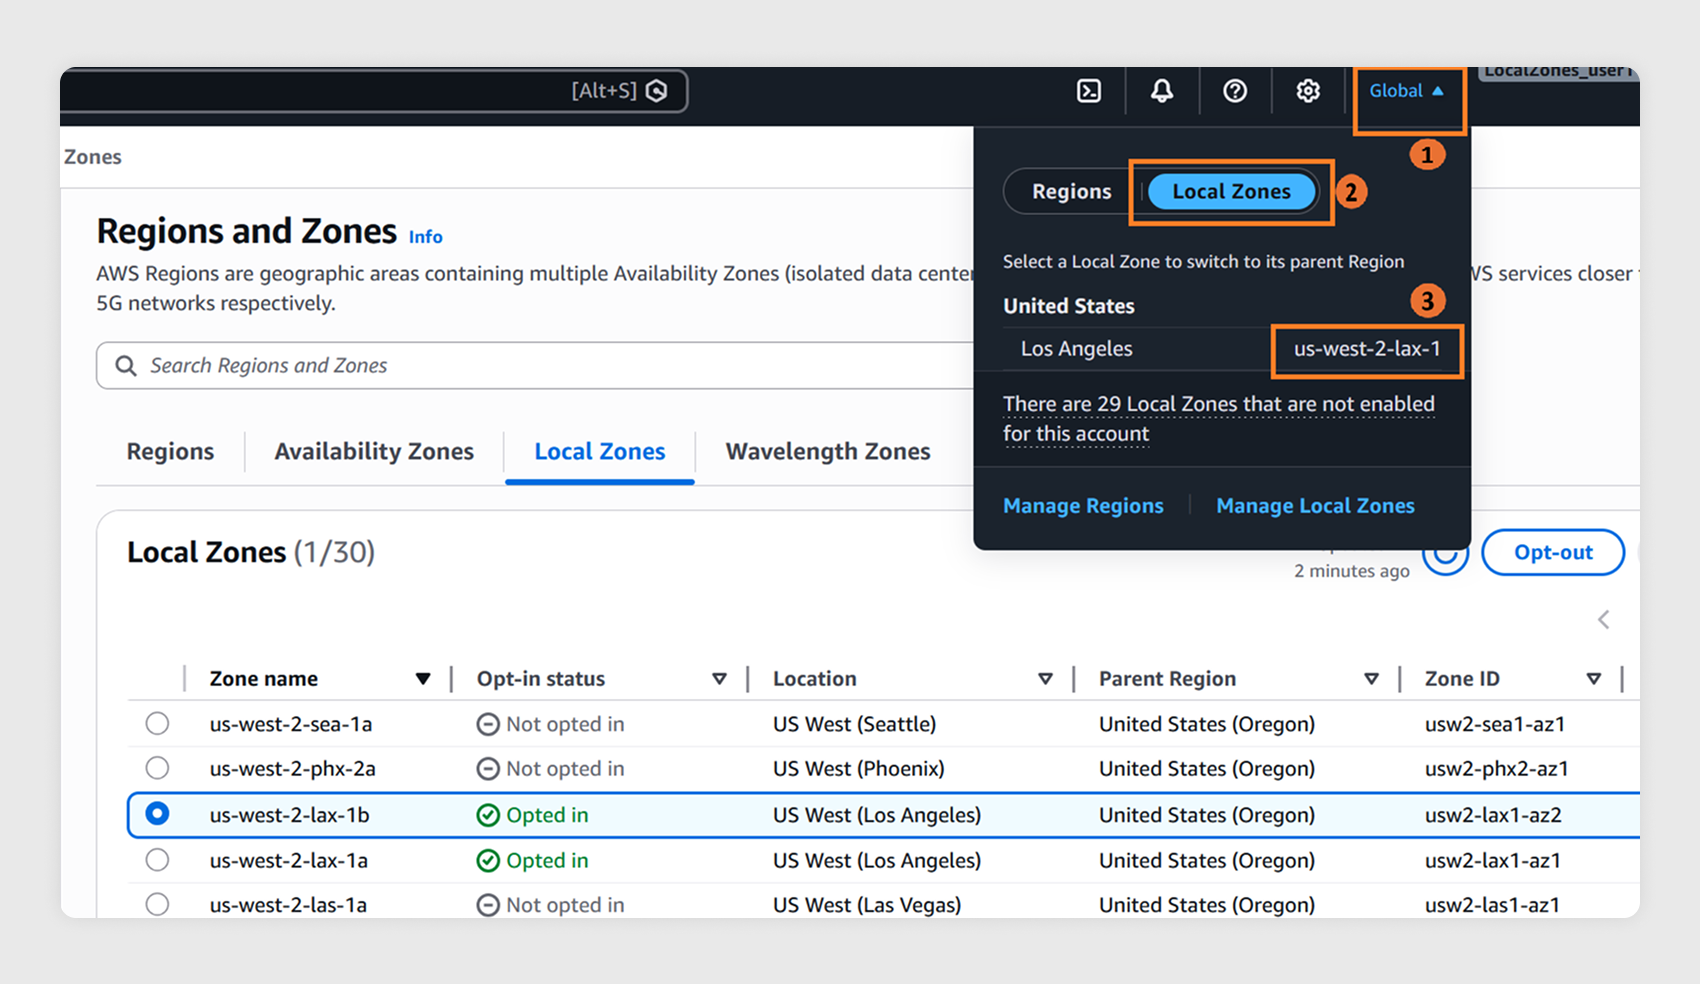
Sign in to the AWS Management Console. Next to the Region selector, choose the Local Zones selector tab, and then choose Manage Local zones to open the AWS Global View where you can see all available Local Zones.
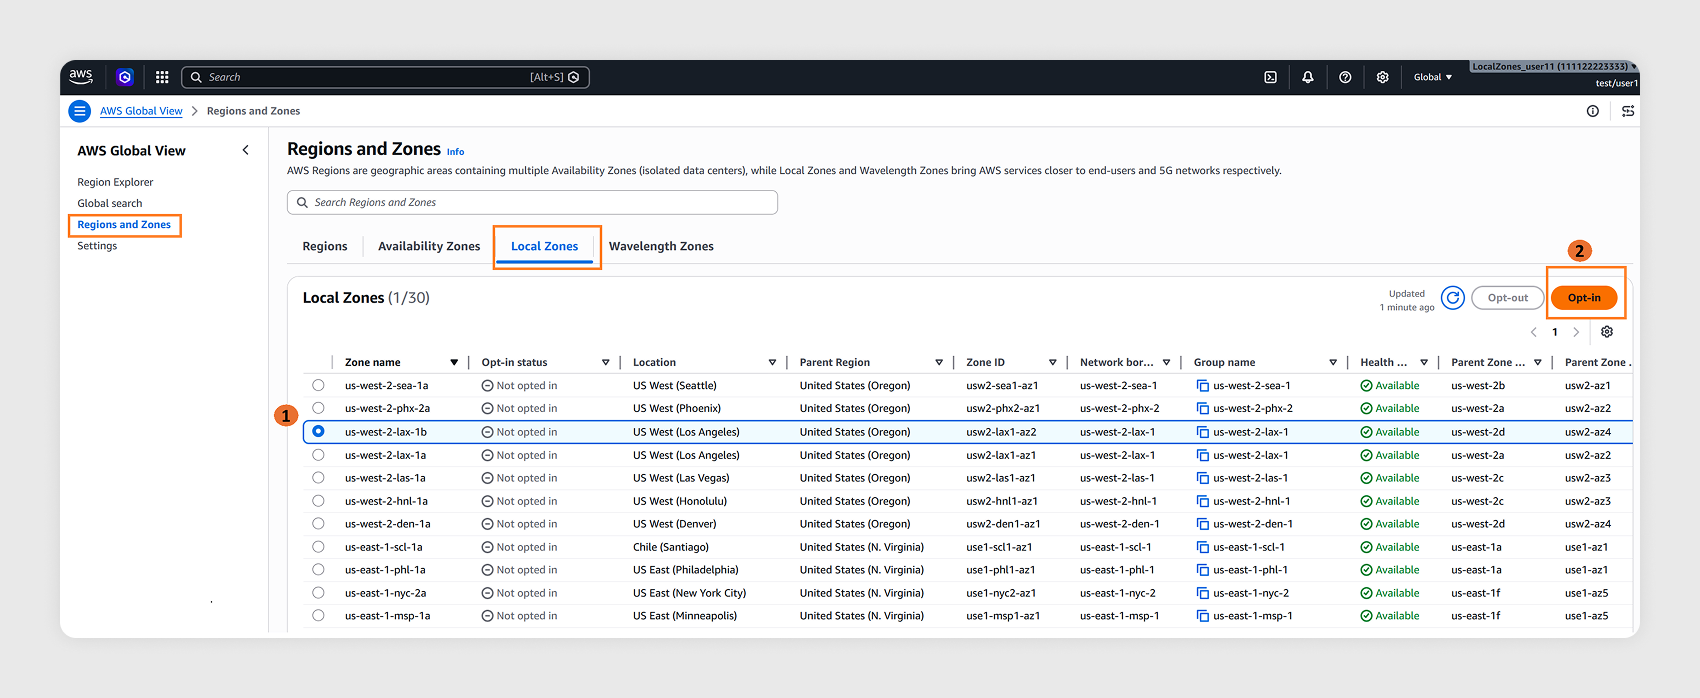
1.2
Select the Local Zone you want to enable and choose Opt-in.
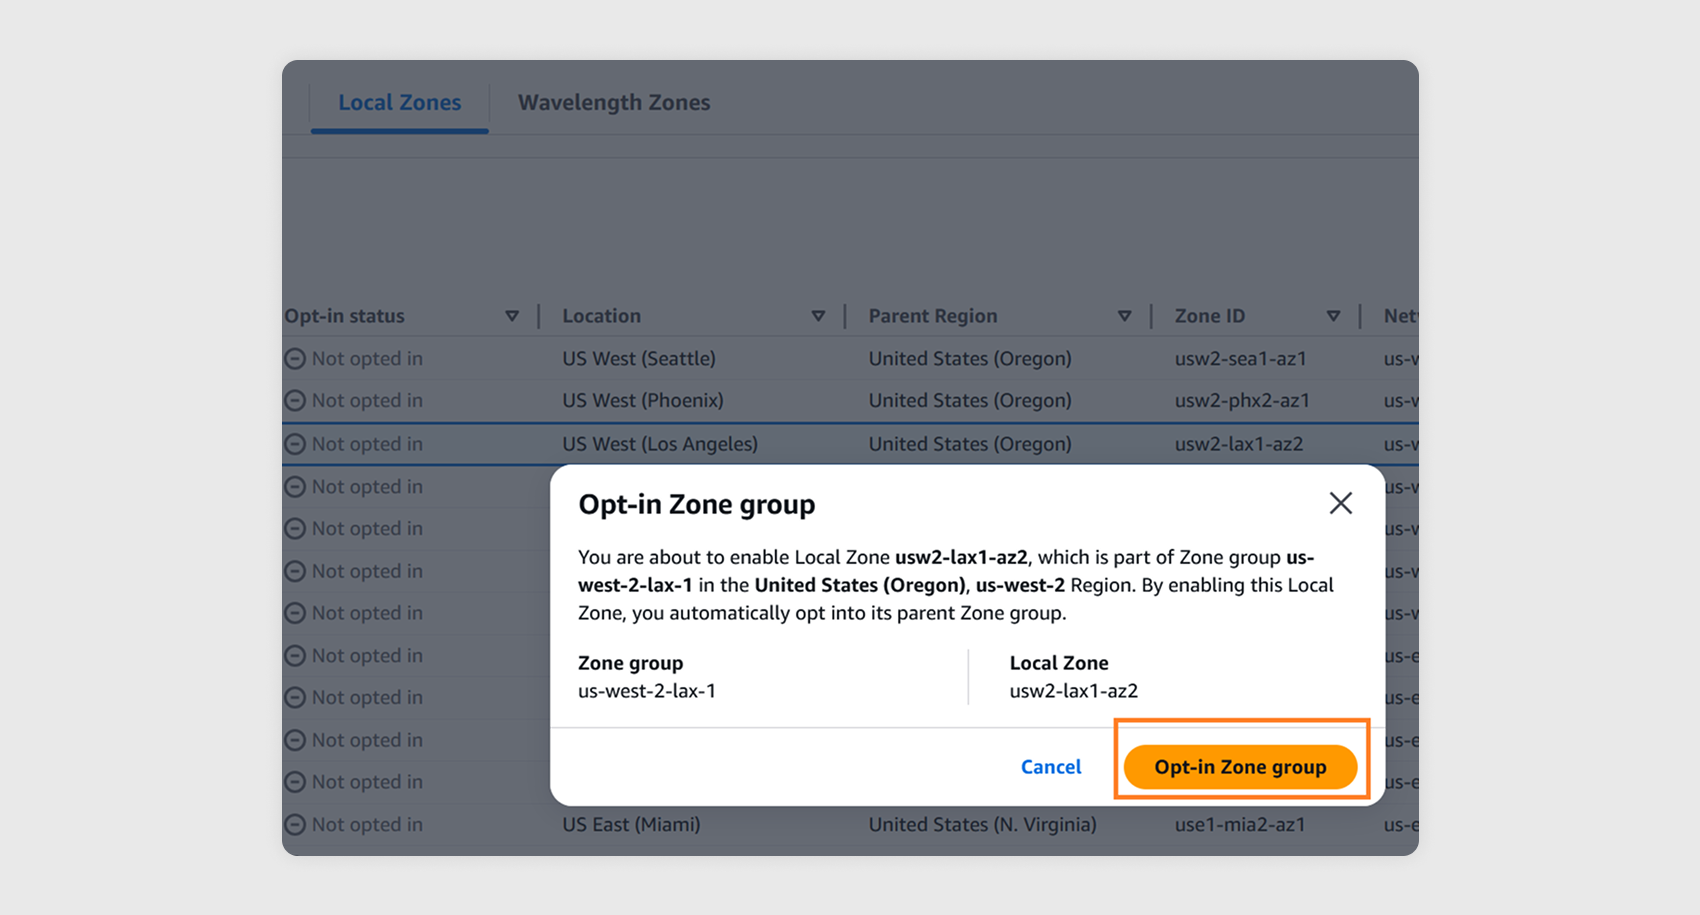
1.3
Confirm by choosing Opt-in Zone group.
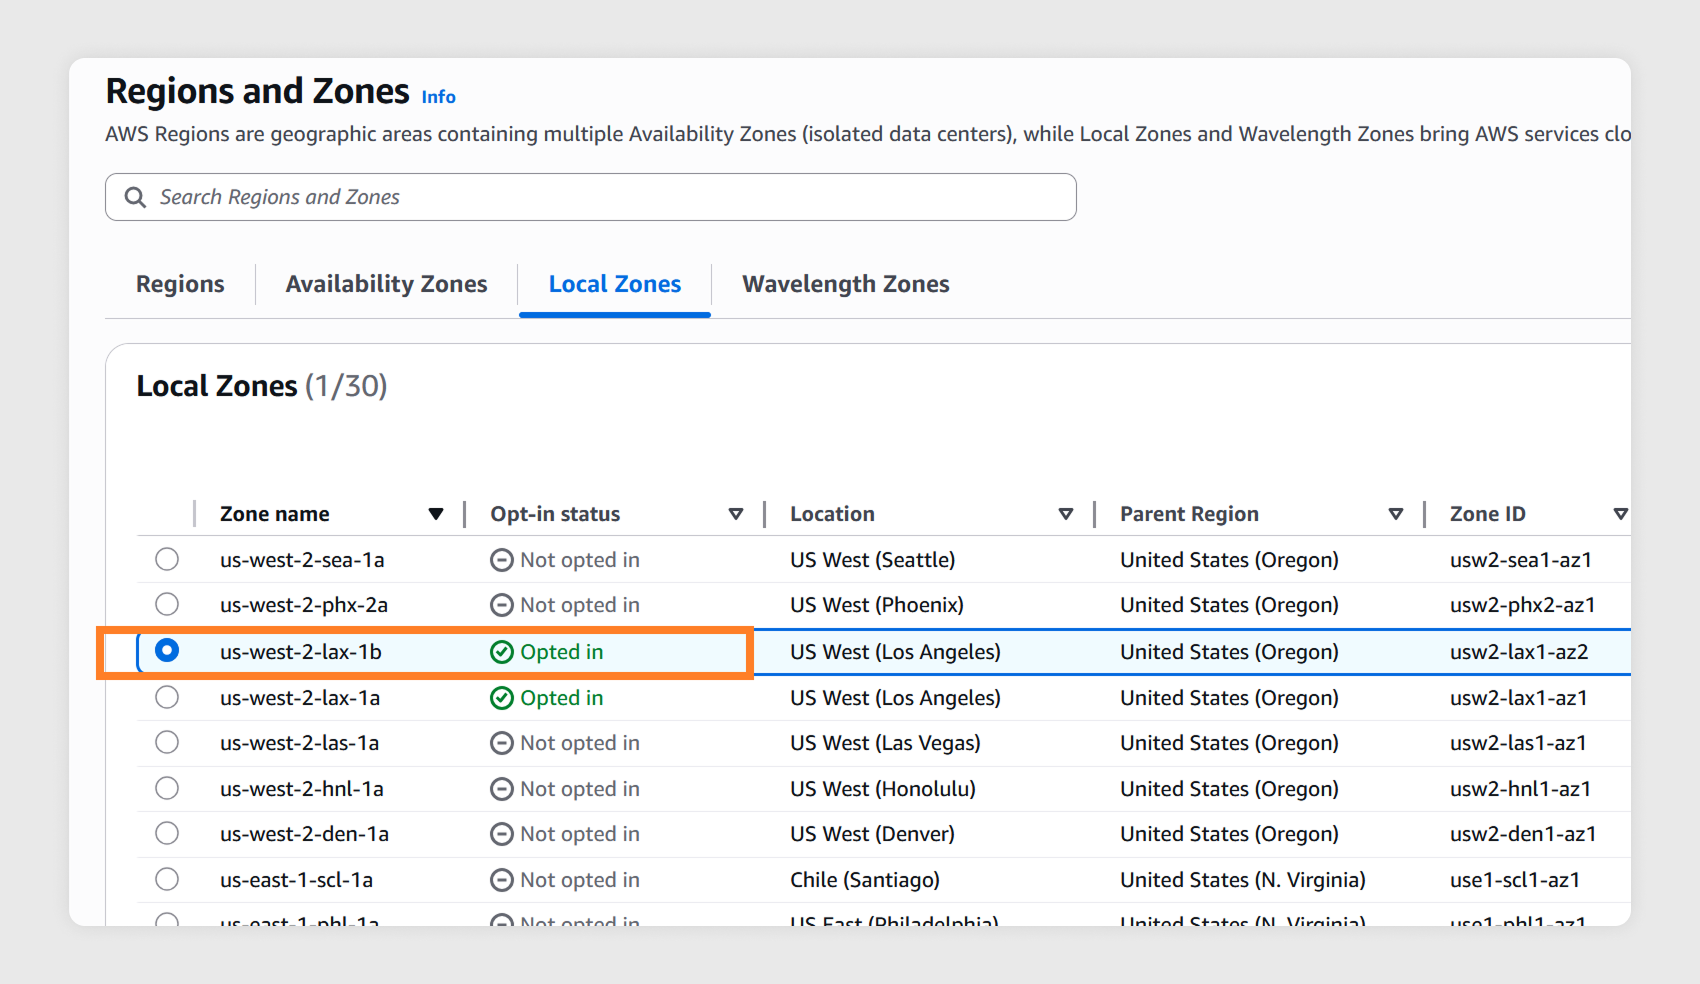
1.4
Wait a few minutes. The selected Local Zone will be enabled in your account and show as Opted in.
1.5
From the Local Zones selector pane, select the Local Zone to navigate to its parent Region. For more info about Local Zones architecture, refer to this document.
Step 2: Extend your Amazon VPC to the Local Zone
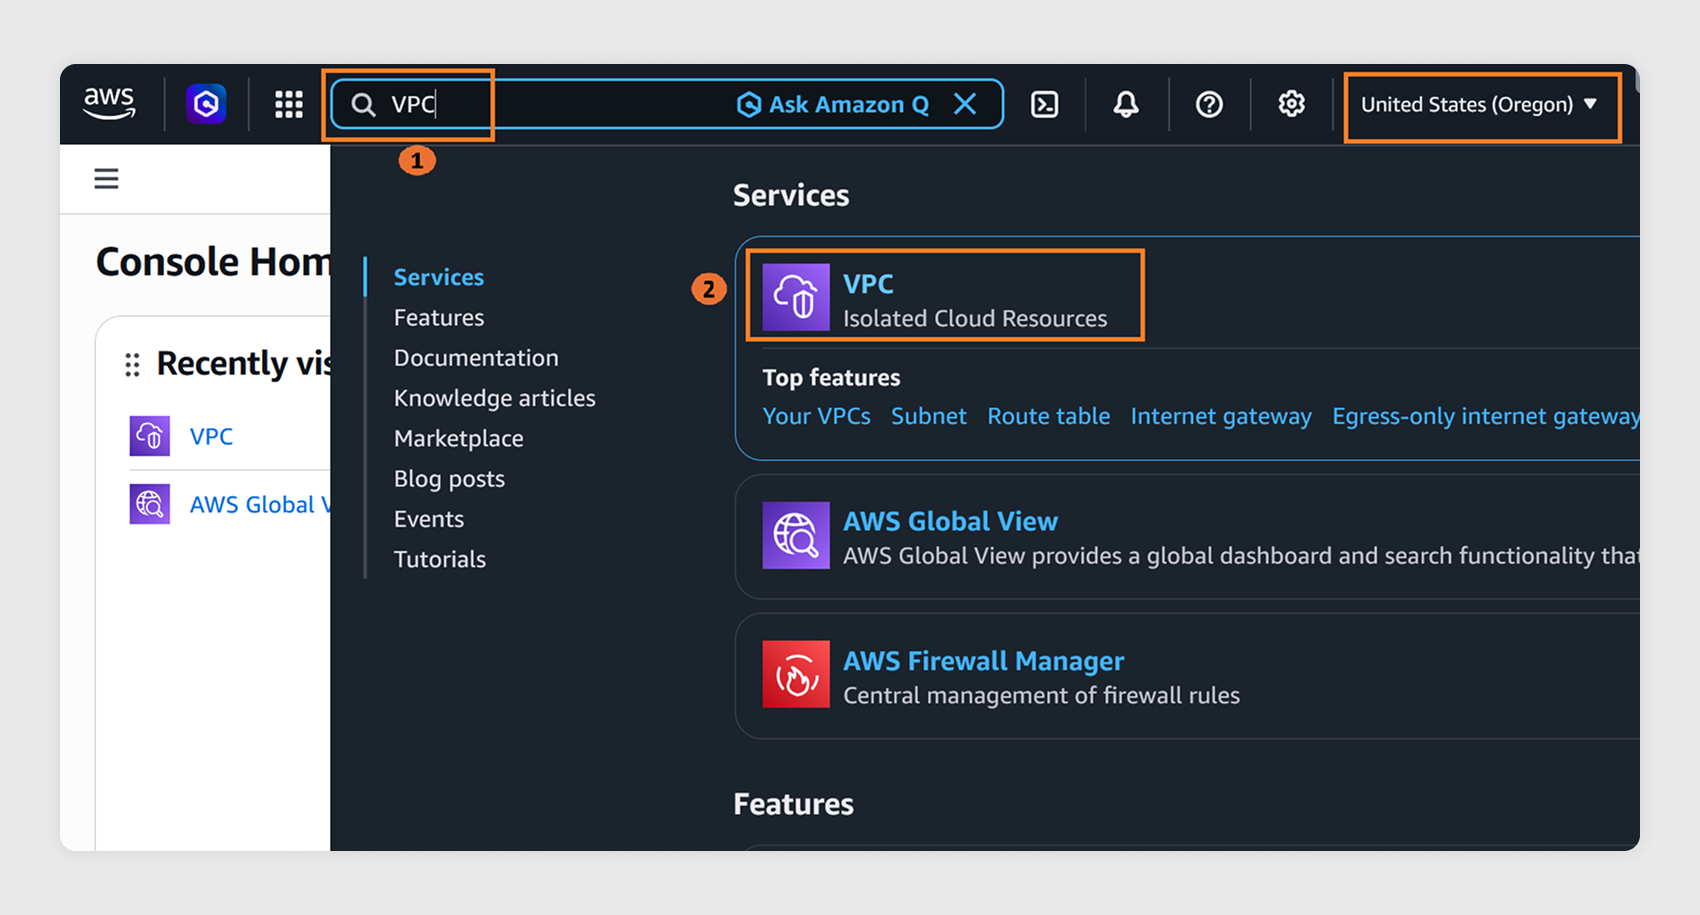
2.1
Ensure the parent Region of your Local Zone is selected in the console. In the search bar, enter VPC and select it from the displayed results.
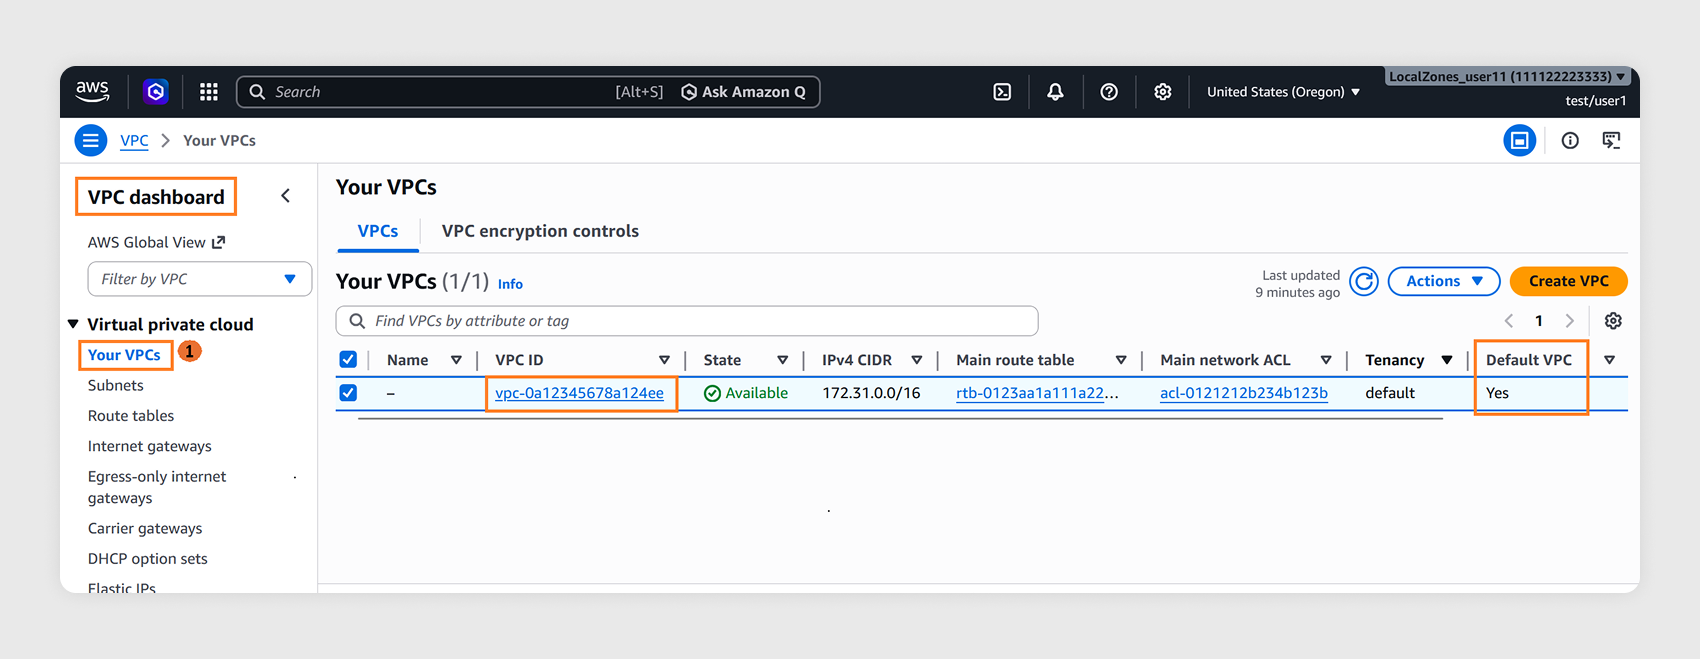
2.2
Confirm that you have a default VPC. The Default VPC column should display Yes.
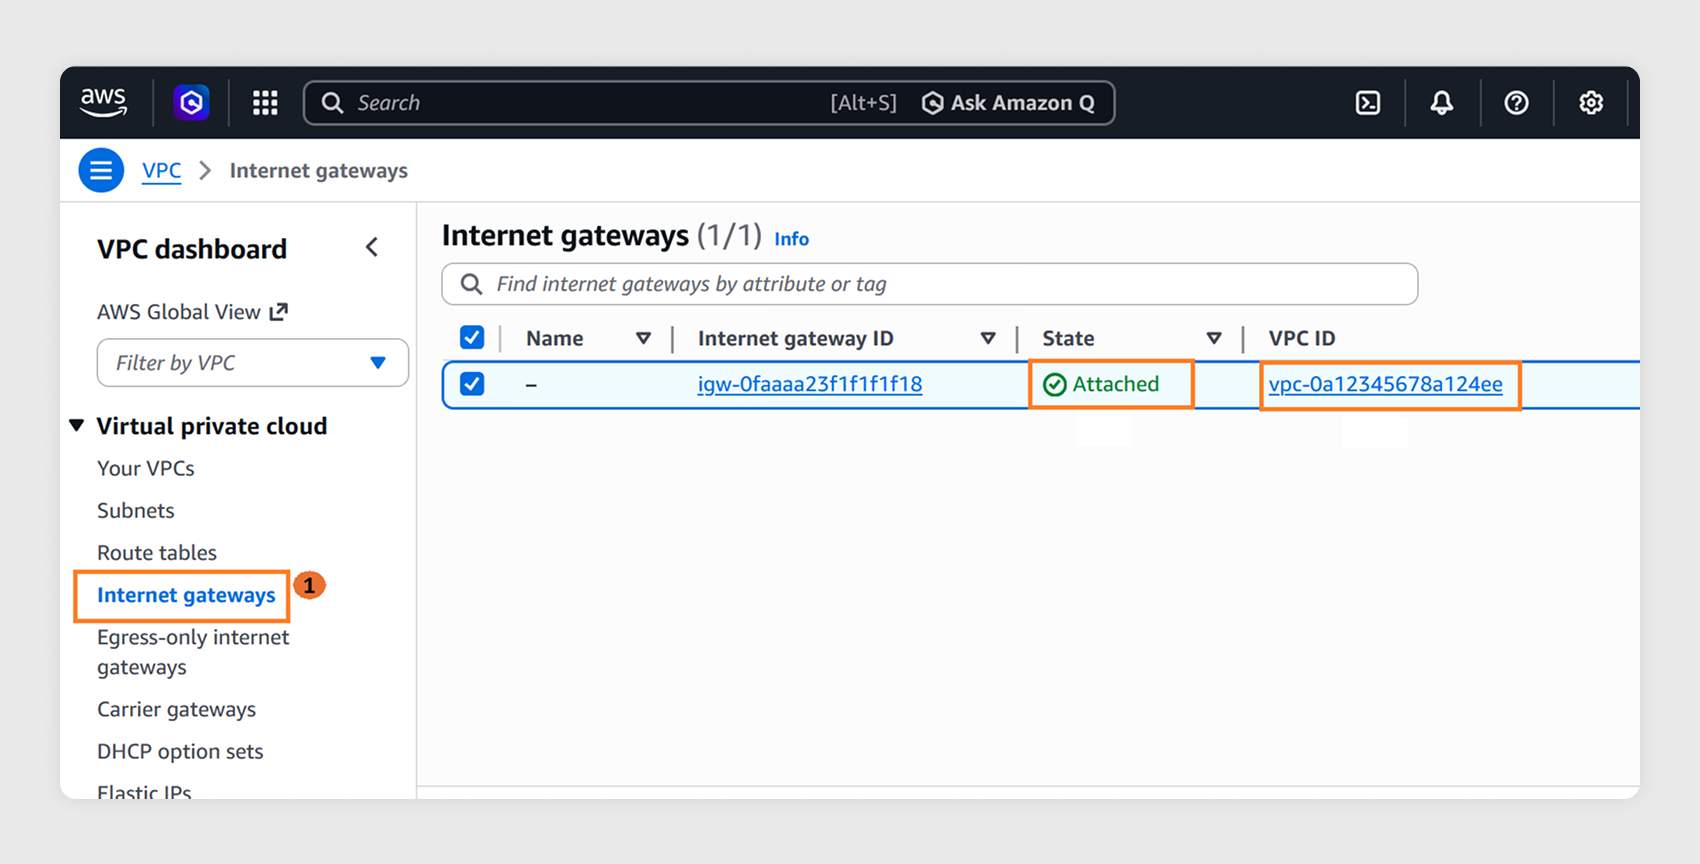
2.3
Confirm that an internet gateway (IGW) is attached to the default VPC. In the left navigation pane, select Internet gateways and verify that an IGW is attached to the same VPC ID from step 2.2.
2.4
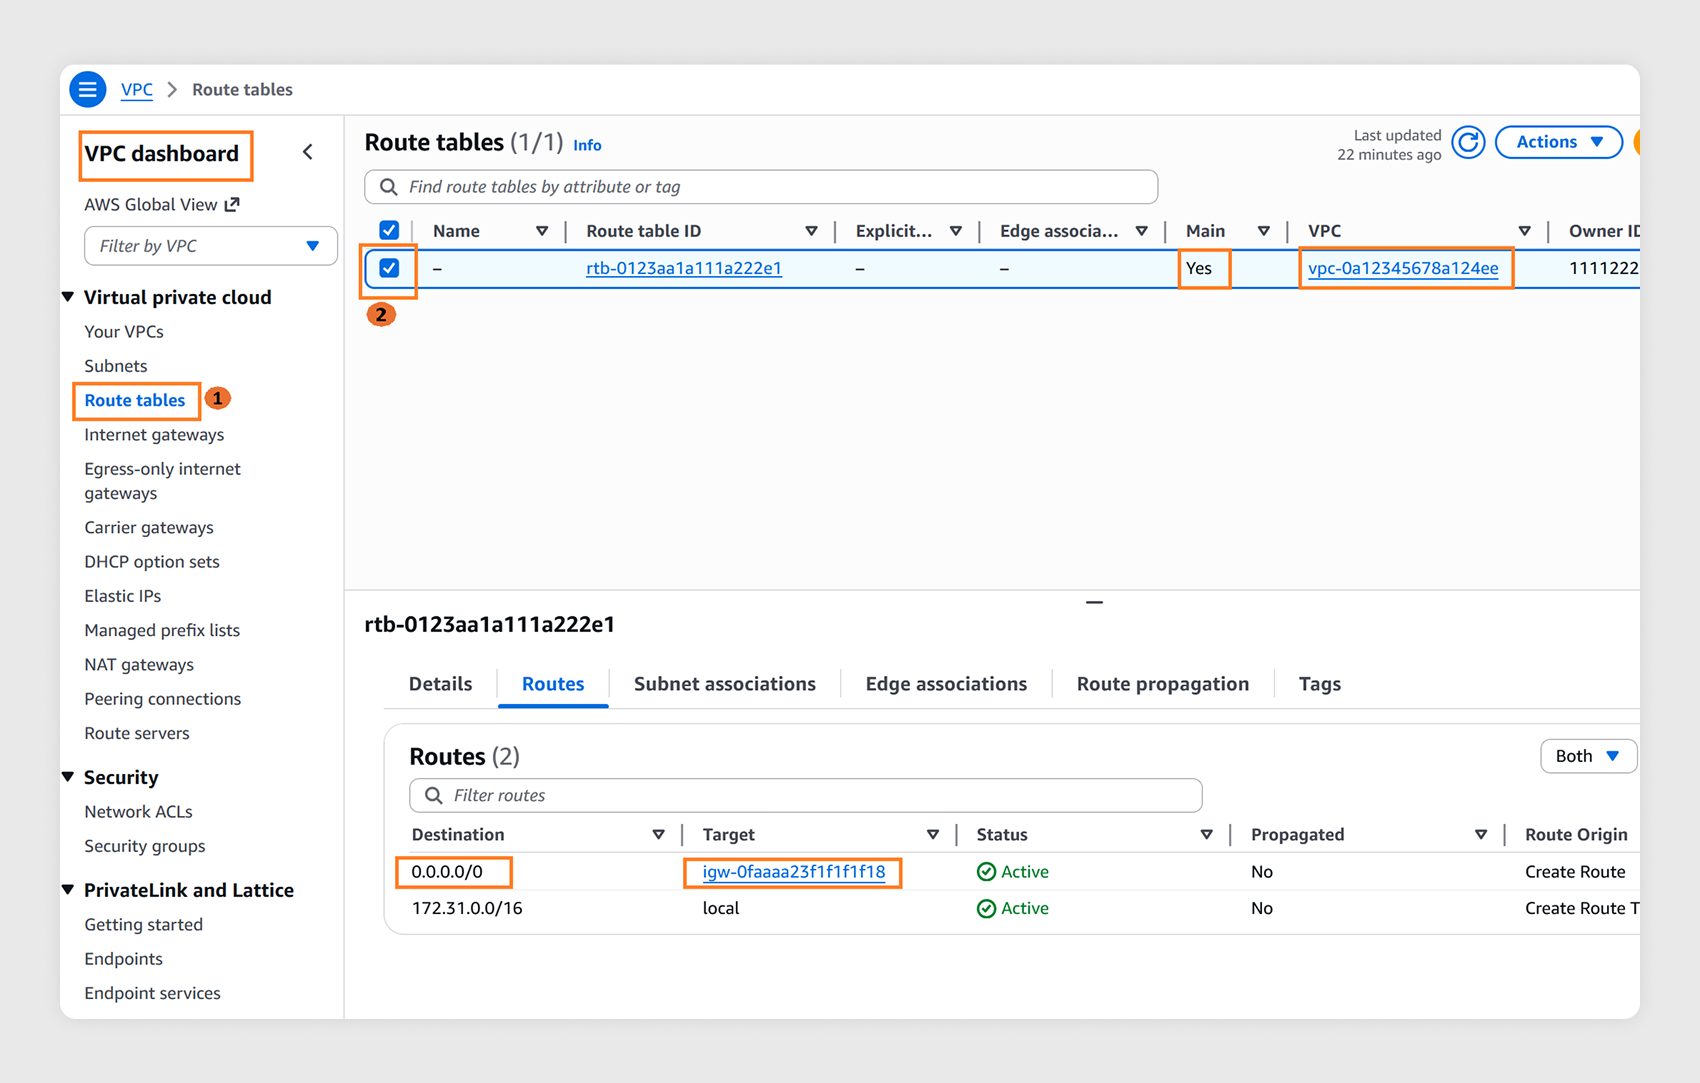
Verify that the default route table (RTB) attached to the VPC has a default route to the internet gateway:
- Under VPC in the left navigation pane, select Route tables.
- The Main column should display Yes. Select this RTB (checkbox in the first column) and navigate to the Routes tab in the bottom pane.
- Confirm there is a default route (0.0.0.0/0) with IGW ID from step 2.3 as the Target.
2.5
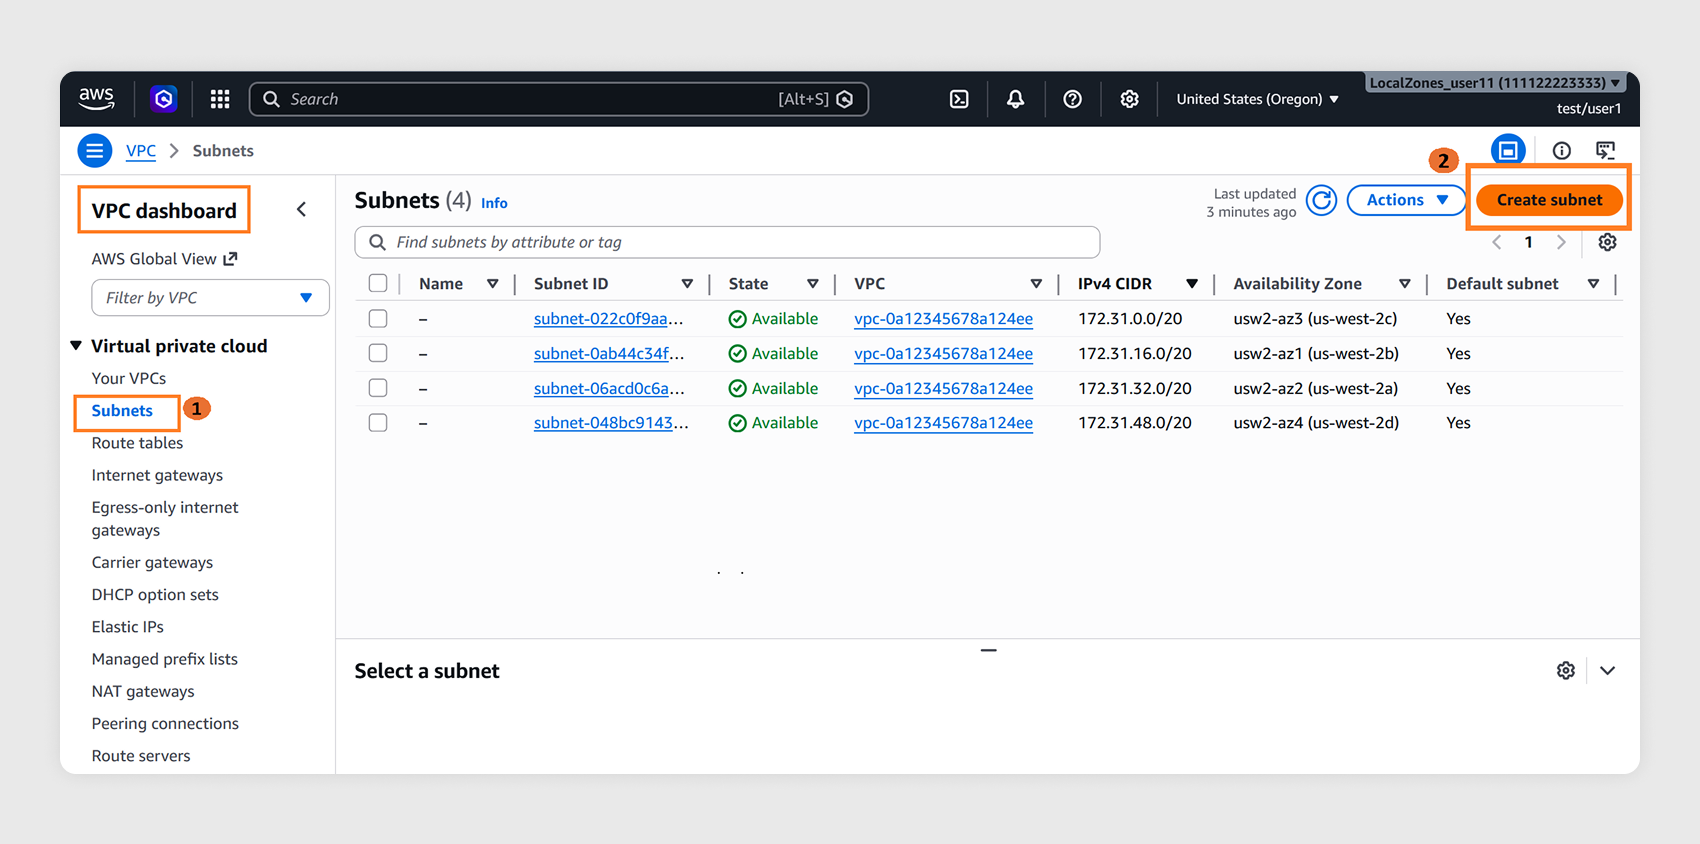
Your default VPC has default subnets only in the parent Region’s Availability Zones. Create a subnet mapped to the Local Zone you enabled in step 1.3:
- In the left navigation pane, select Subnets and choose Create subnet.
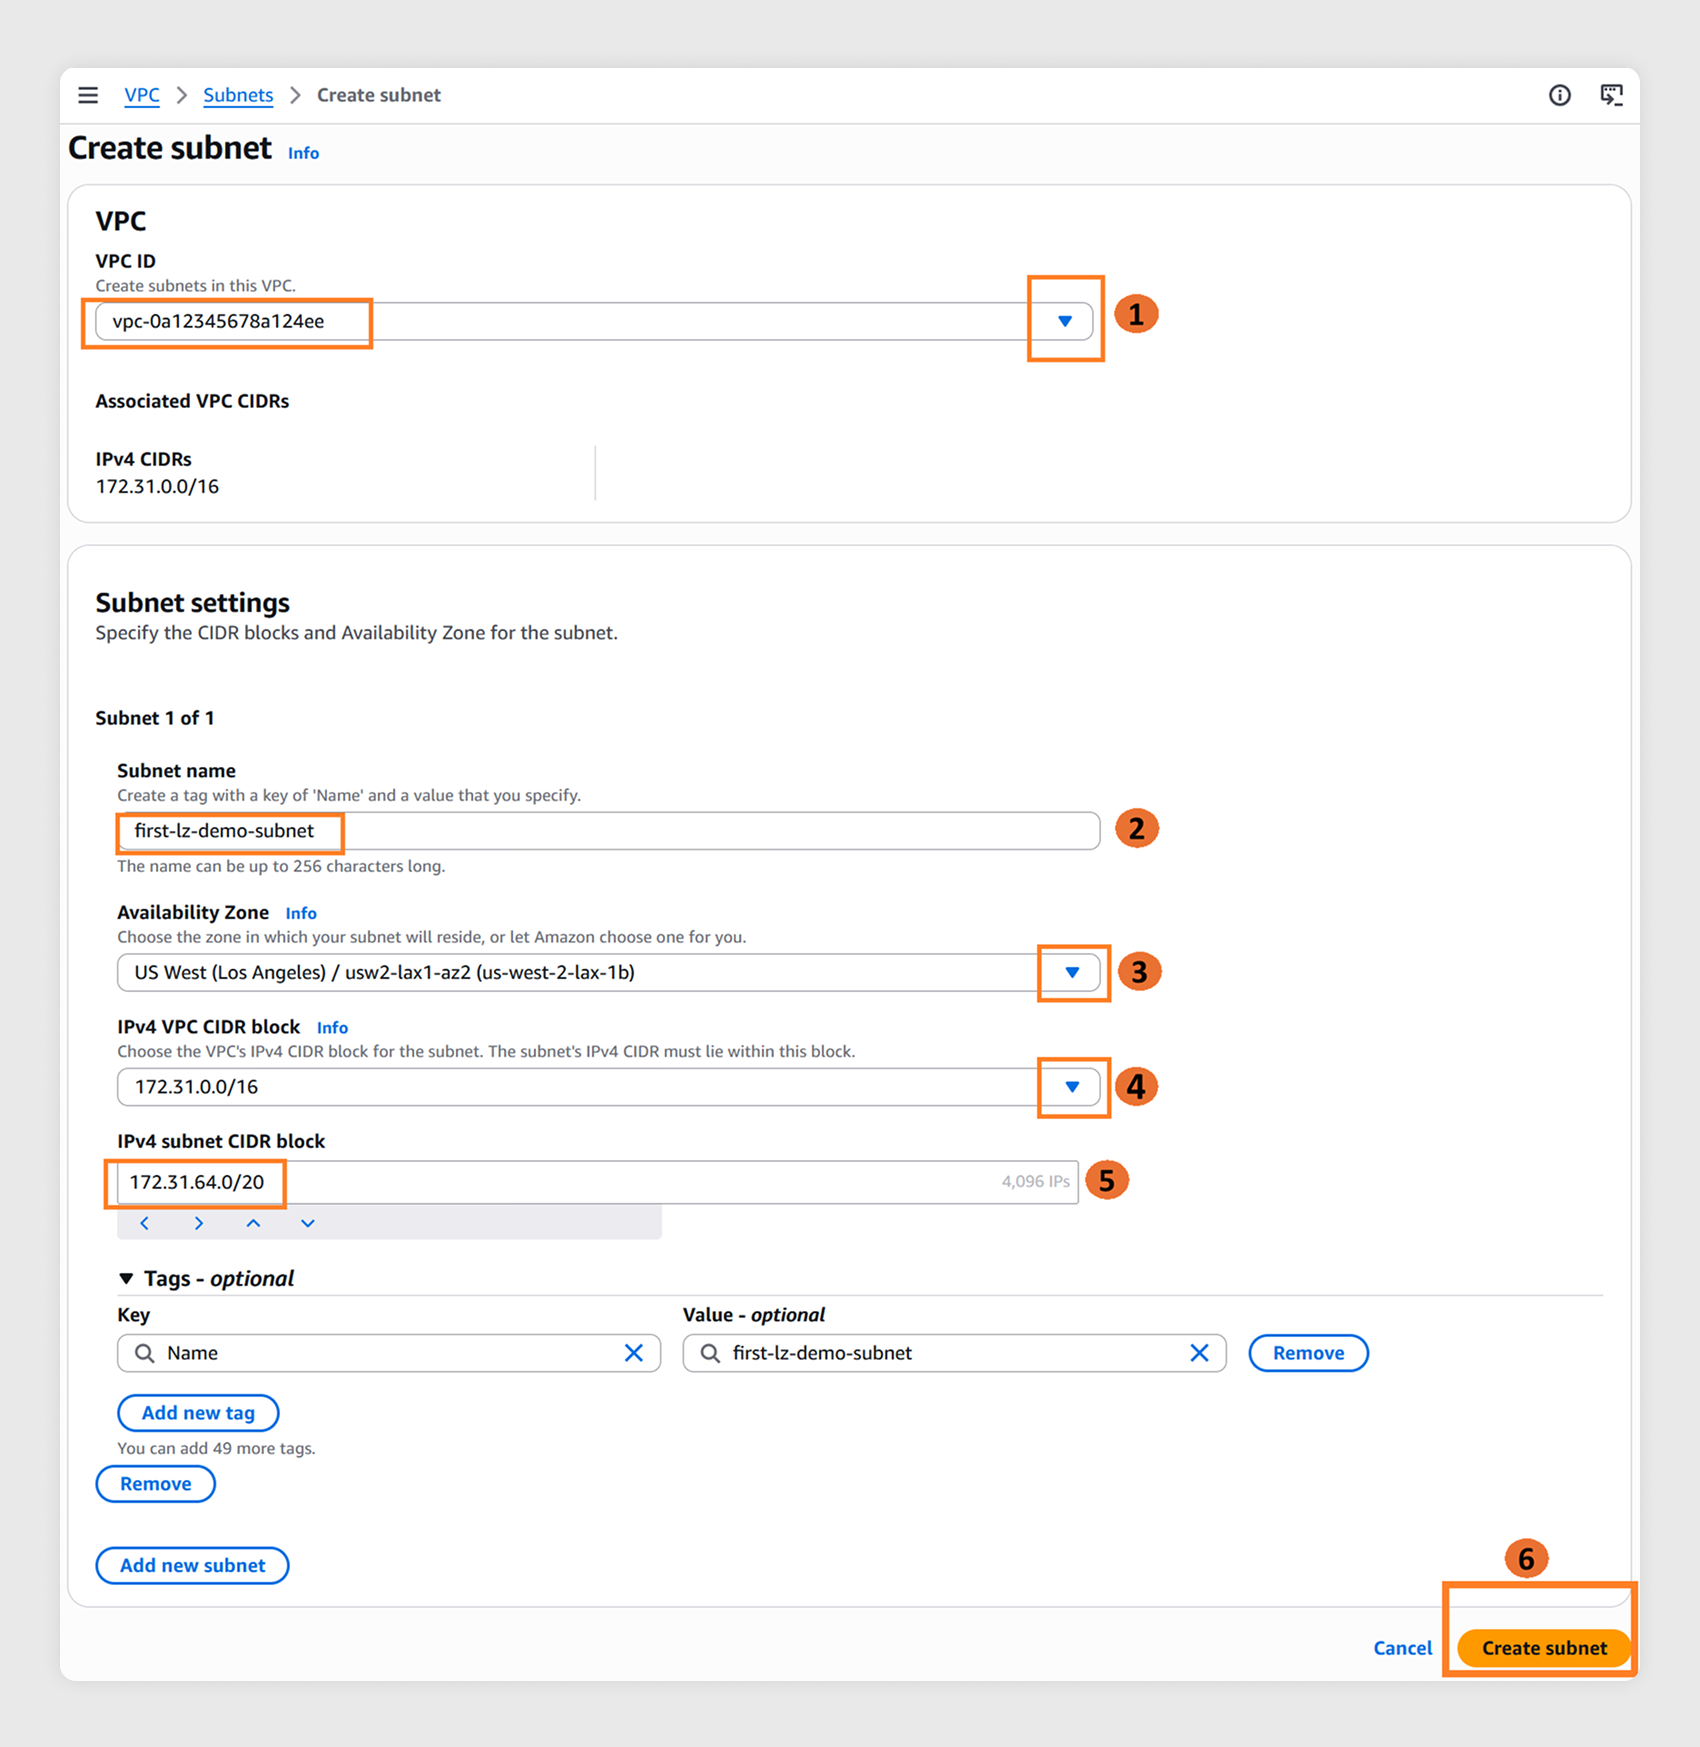
- From the VPC ID dropdown, select the VPC ID noted in step 2.2.
- In the Subnet name field, enter a descriptive name.
- From the Availability Zone dropdown, select the Local Zone enabled in step 1.3.
- From the IPv4 VPC CIDR block dropdown, select the VPC’s CIDR address.
- In the IPv4 subnet CIDR block field, enter a non-overlapping subnet address.
- Choose Create subnet.
2.6
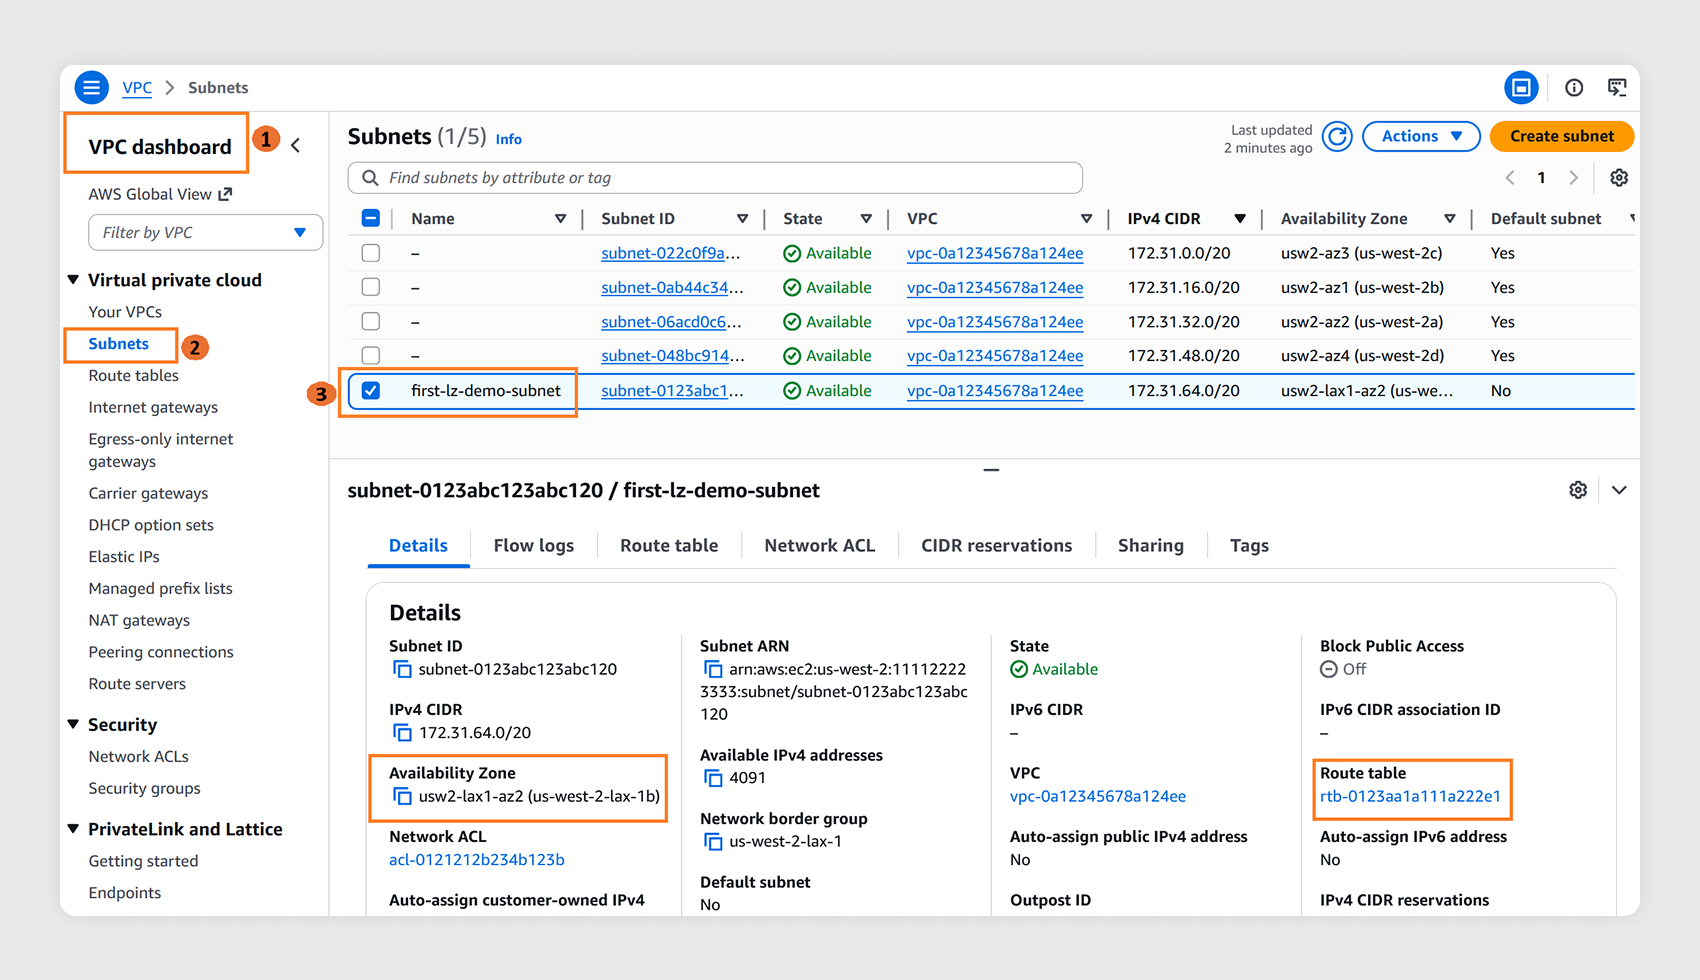
Navigate to the VPC dashboard and select Subnets in the left navigation pane. Select the newly created subnet and verify it is in the correct Local Zone by checking the zone name under the Availability Zone field. Also, confirm it has the main route table verified in step 2.4.
Step 3: Launch an Amazon EC2 instance in the Local Zone
3.1
While staying in the same parent Region console, navigate to EC2 in the AWS Management Console and choose Launch instance.
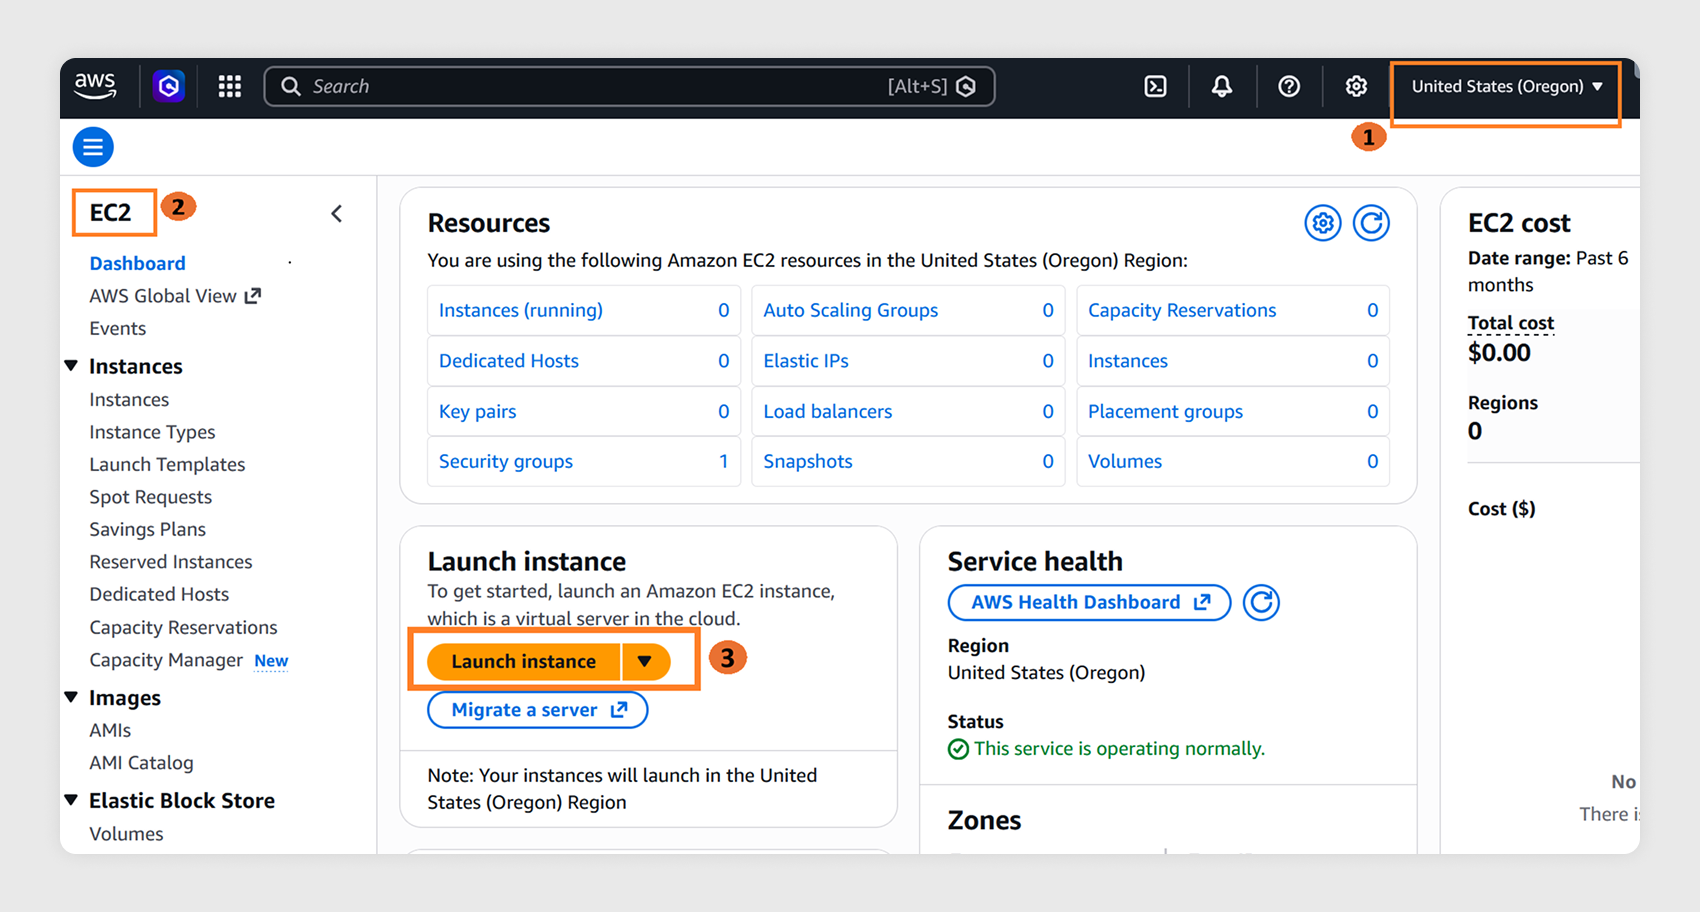
3.2
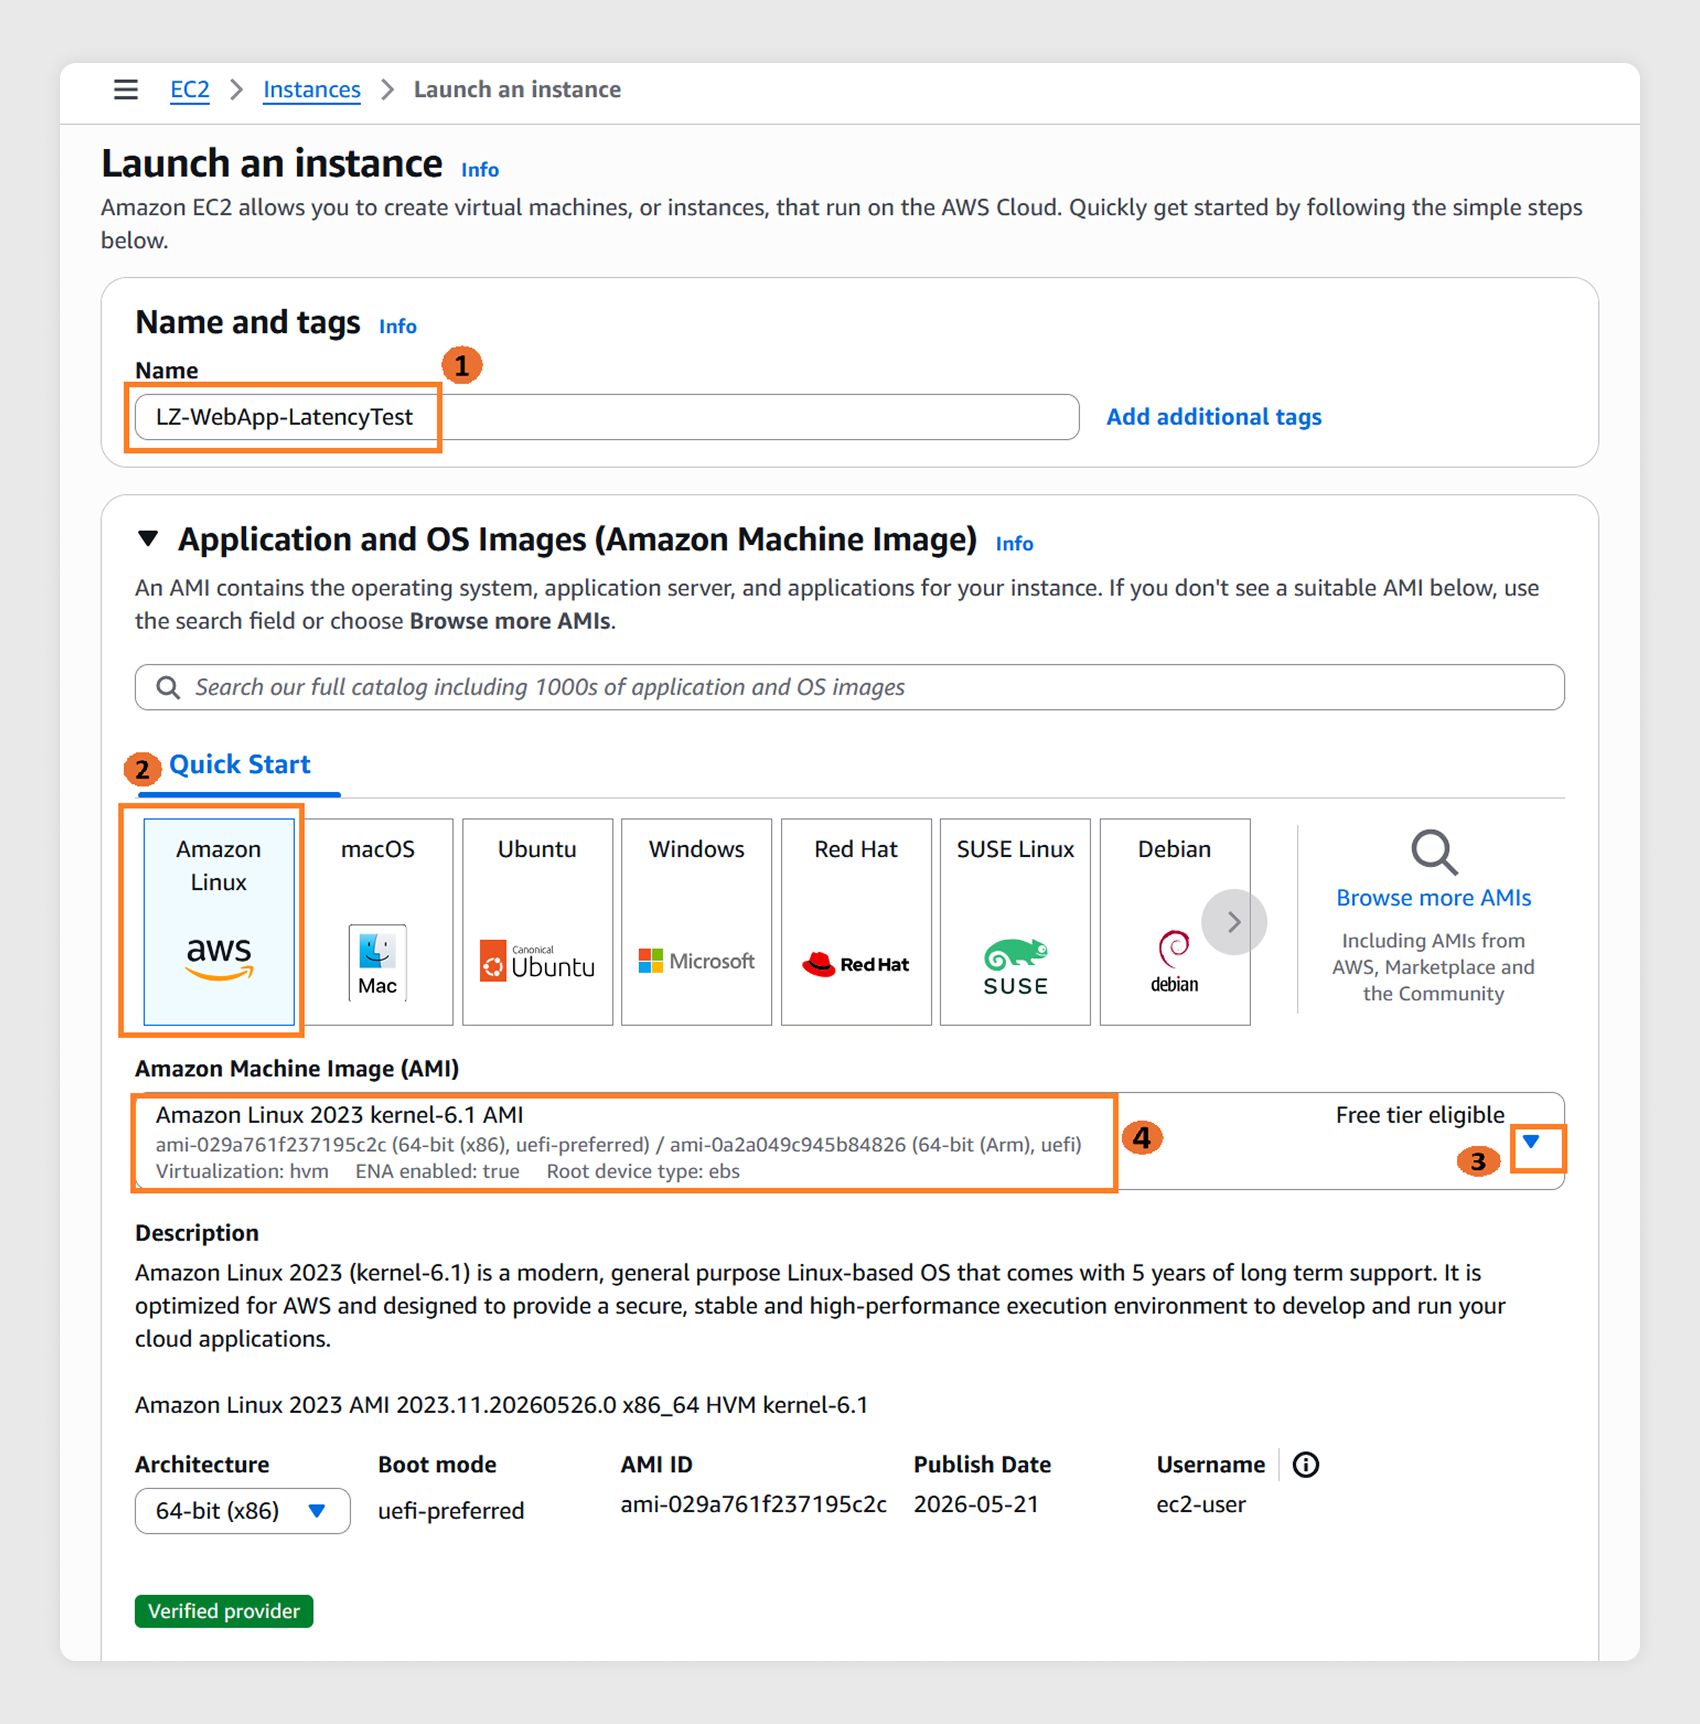
In the Launch an Instance window:
- Enter a Name for the EC2 instance.
- Under AMI, select Quick Start, then choose Amazon Linux 2023 AMI.
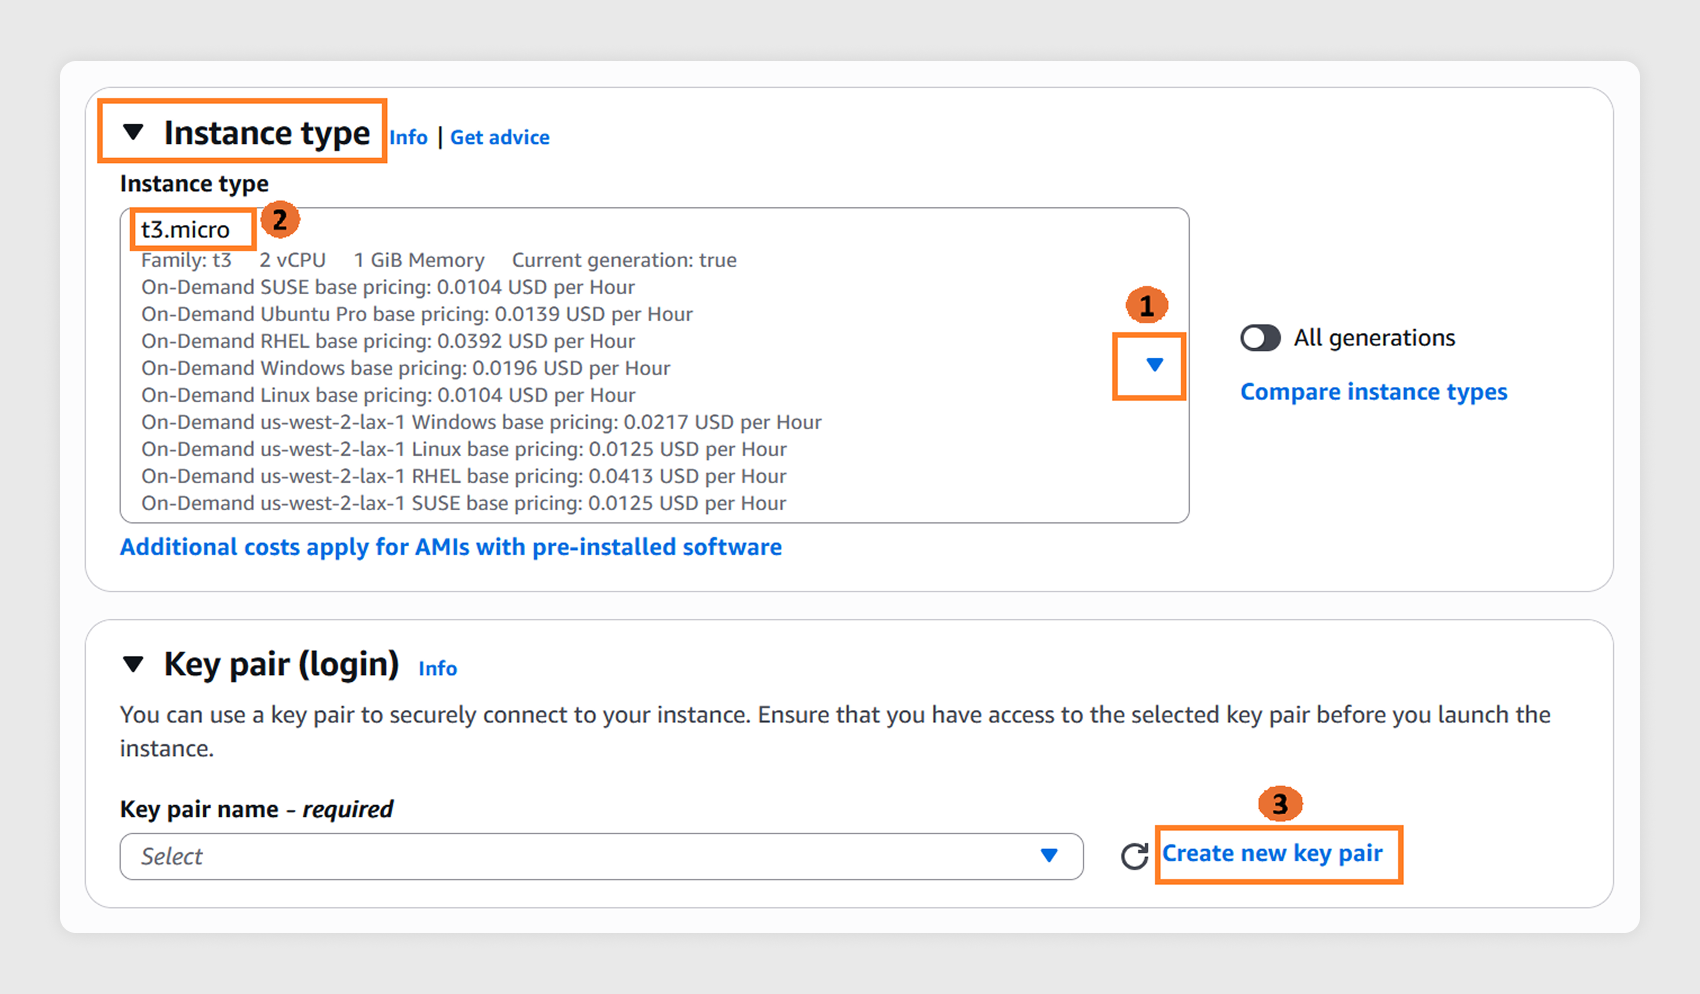
- Under Instance type, select t3.micro from the dropdown.
Note: This tutorial uses a T3 instance and an Amazon Linux 2023 AMI as an example. Instance type availability varies by Local Zone. If T3 is not available in your selected Local Zone, choose another available instance type from the Local Zones features page and proceed with the remaining steps.
3.3
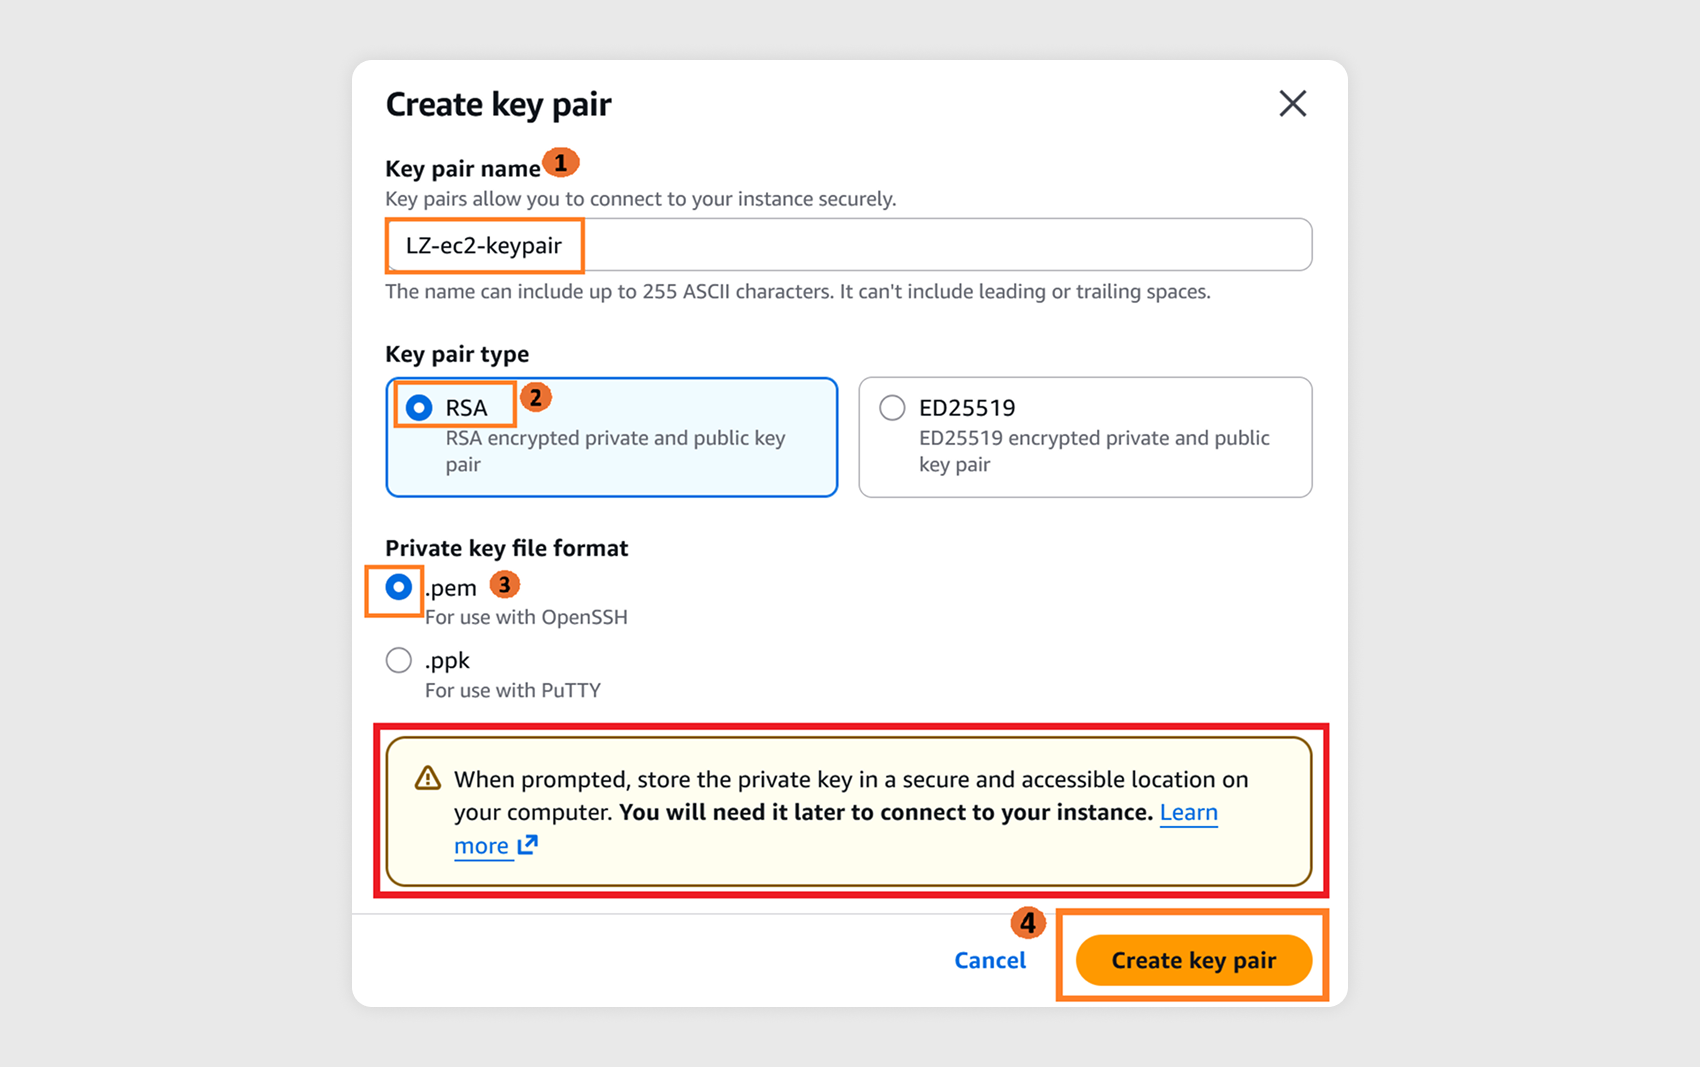
Create a key pair to connect to your EC2 instance securely:
- Choose Create a new key pair.
- Enter a name in the Key pair name field.
- Select RSA as key pair type.
- Select .pem as the private key file format (If you plan to connect using PuTTY, select .ppk instead).
- Choose Create key pair to download the file automatically.
- Save the .pem or .ppk file in an accessible folder on your local machine. You will need this to access the EC2 instance in a later step.
Important Note: Loss of key pair will inhibit your SSH access to EC2 instance.
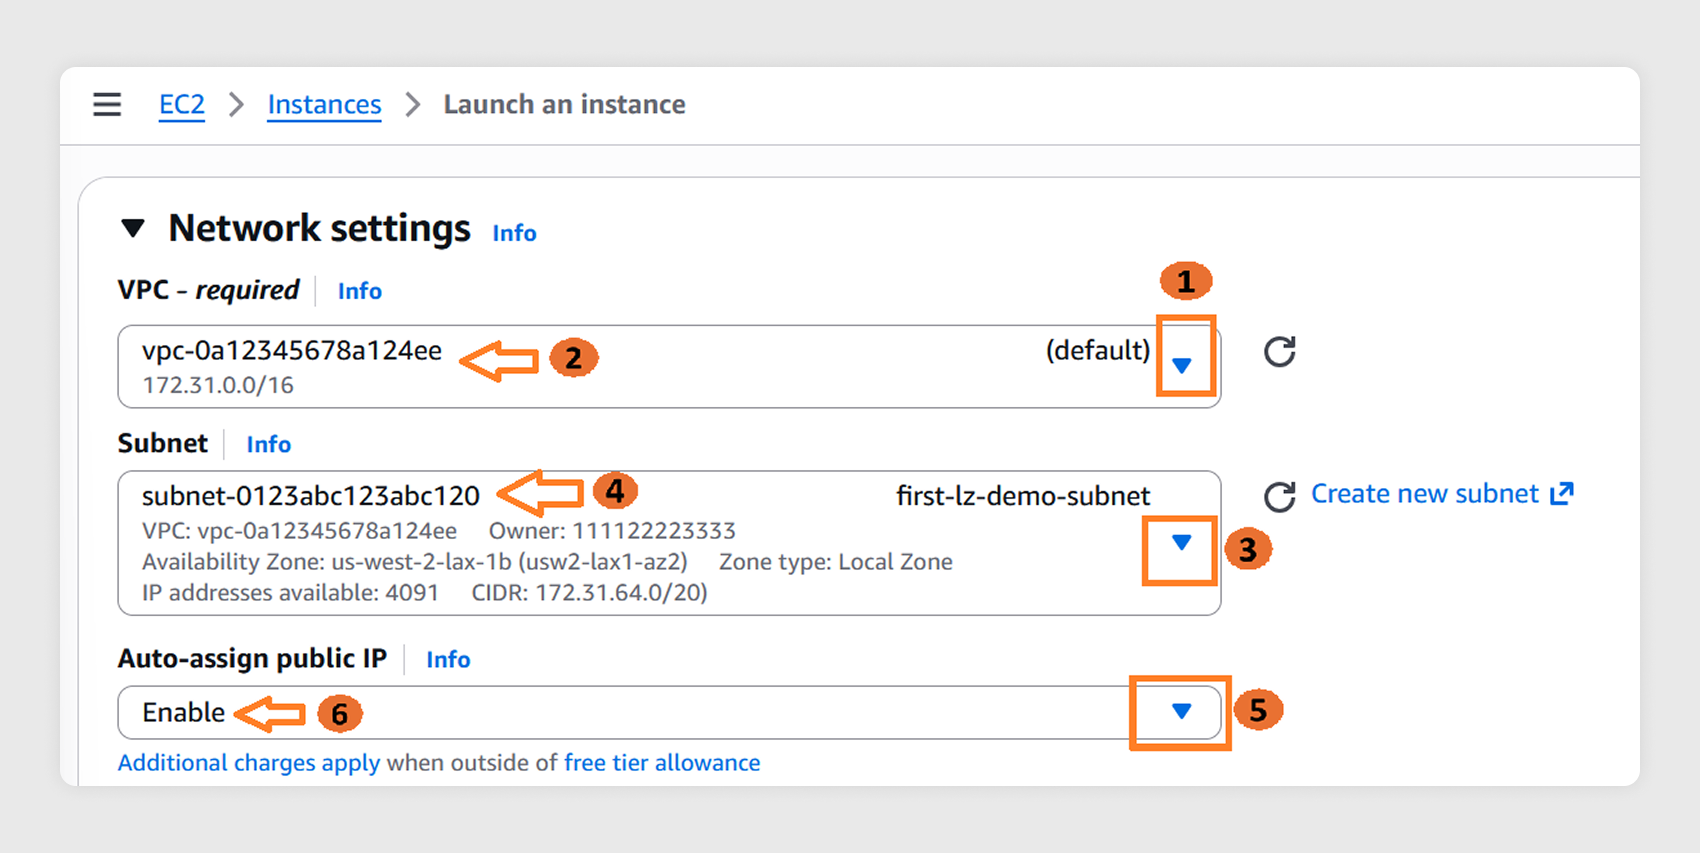
3.4
In Network settings, choose Edit:
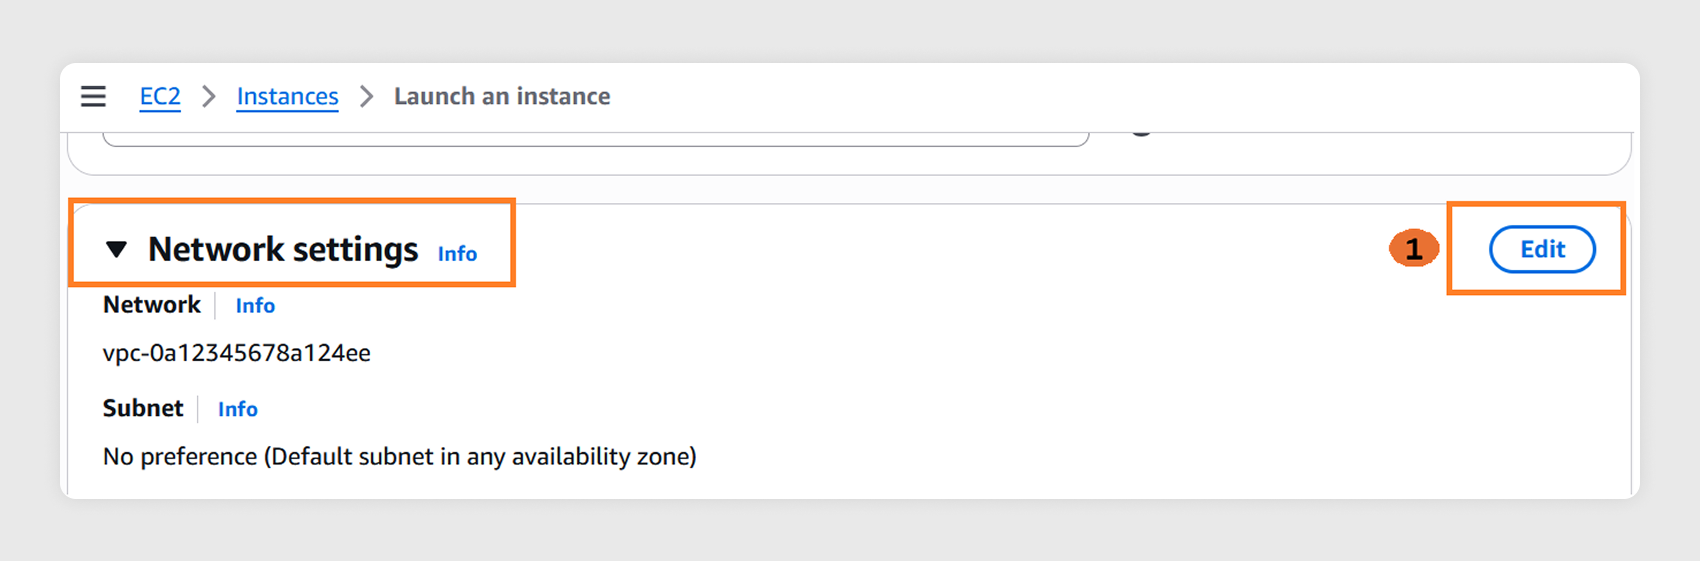
- From the VPC dropdown, select the VPC ID noted in step 2.2.
- From the Subnet dropdown, select the Local Zone subnet created in step 2.6.
- Set Auto-assign public IP to Enable.
3.5
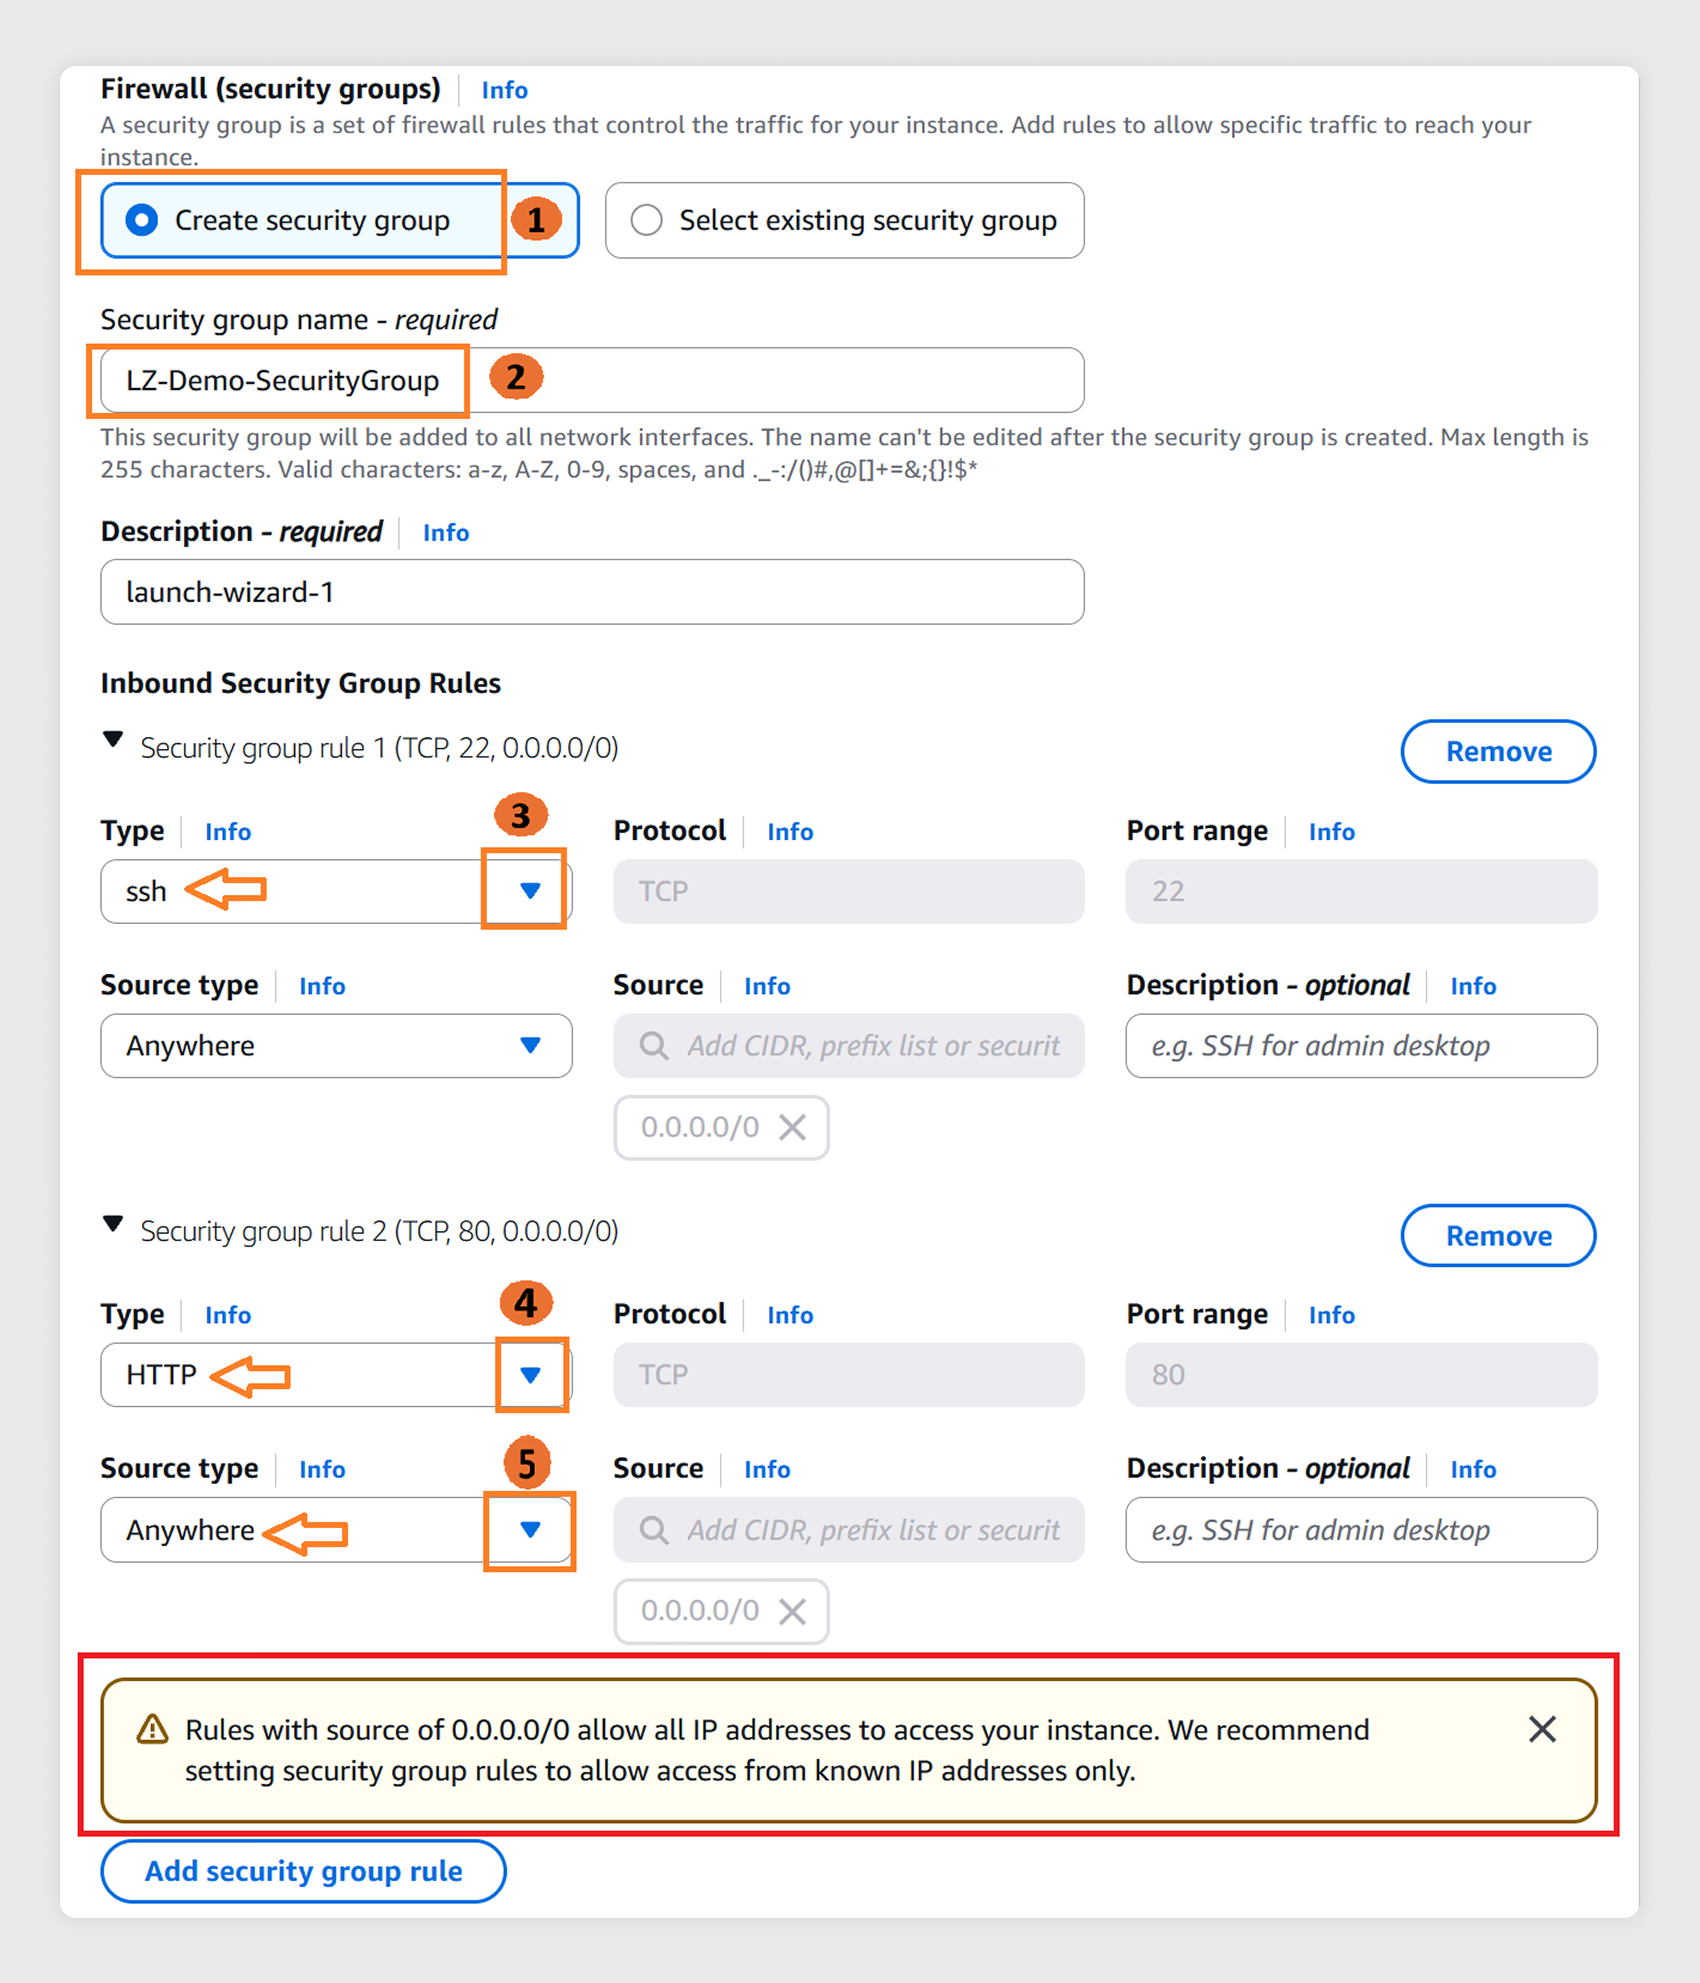
Create a security group to allow access to specific ports on EC2 instance:
- Allow port 22 (SSH) — required to connect to your instance.
- Allow port 80 (HTTP) — required for the speed test application.
Note: Rules with source of 0.0.0.0/0 allow all IP addresses to access your instance. For better security, restrict access to known IP addresses only. You will delete this security group in Step 5.
3.6
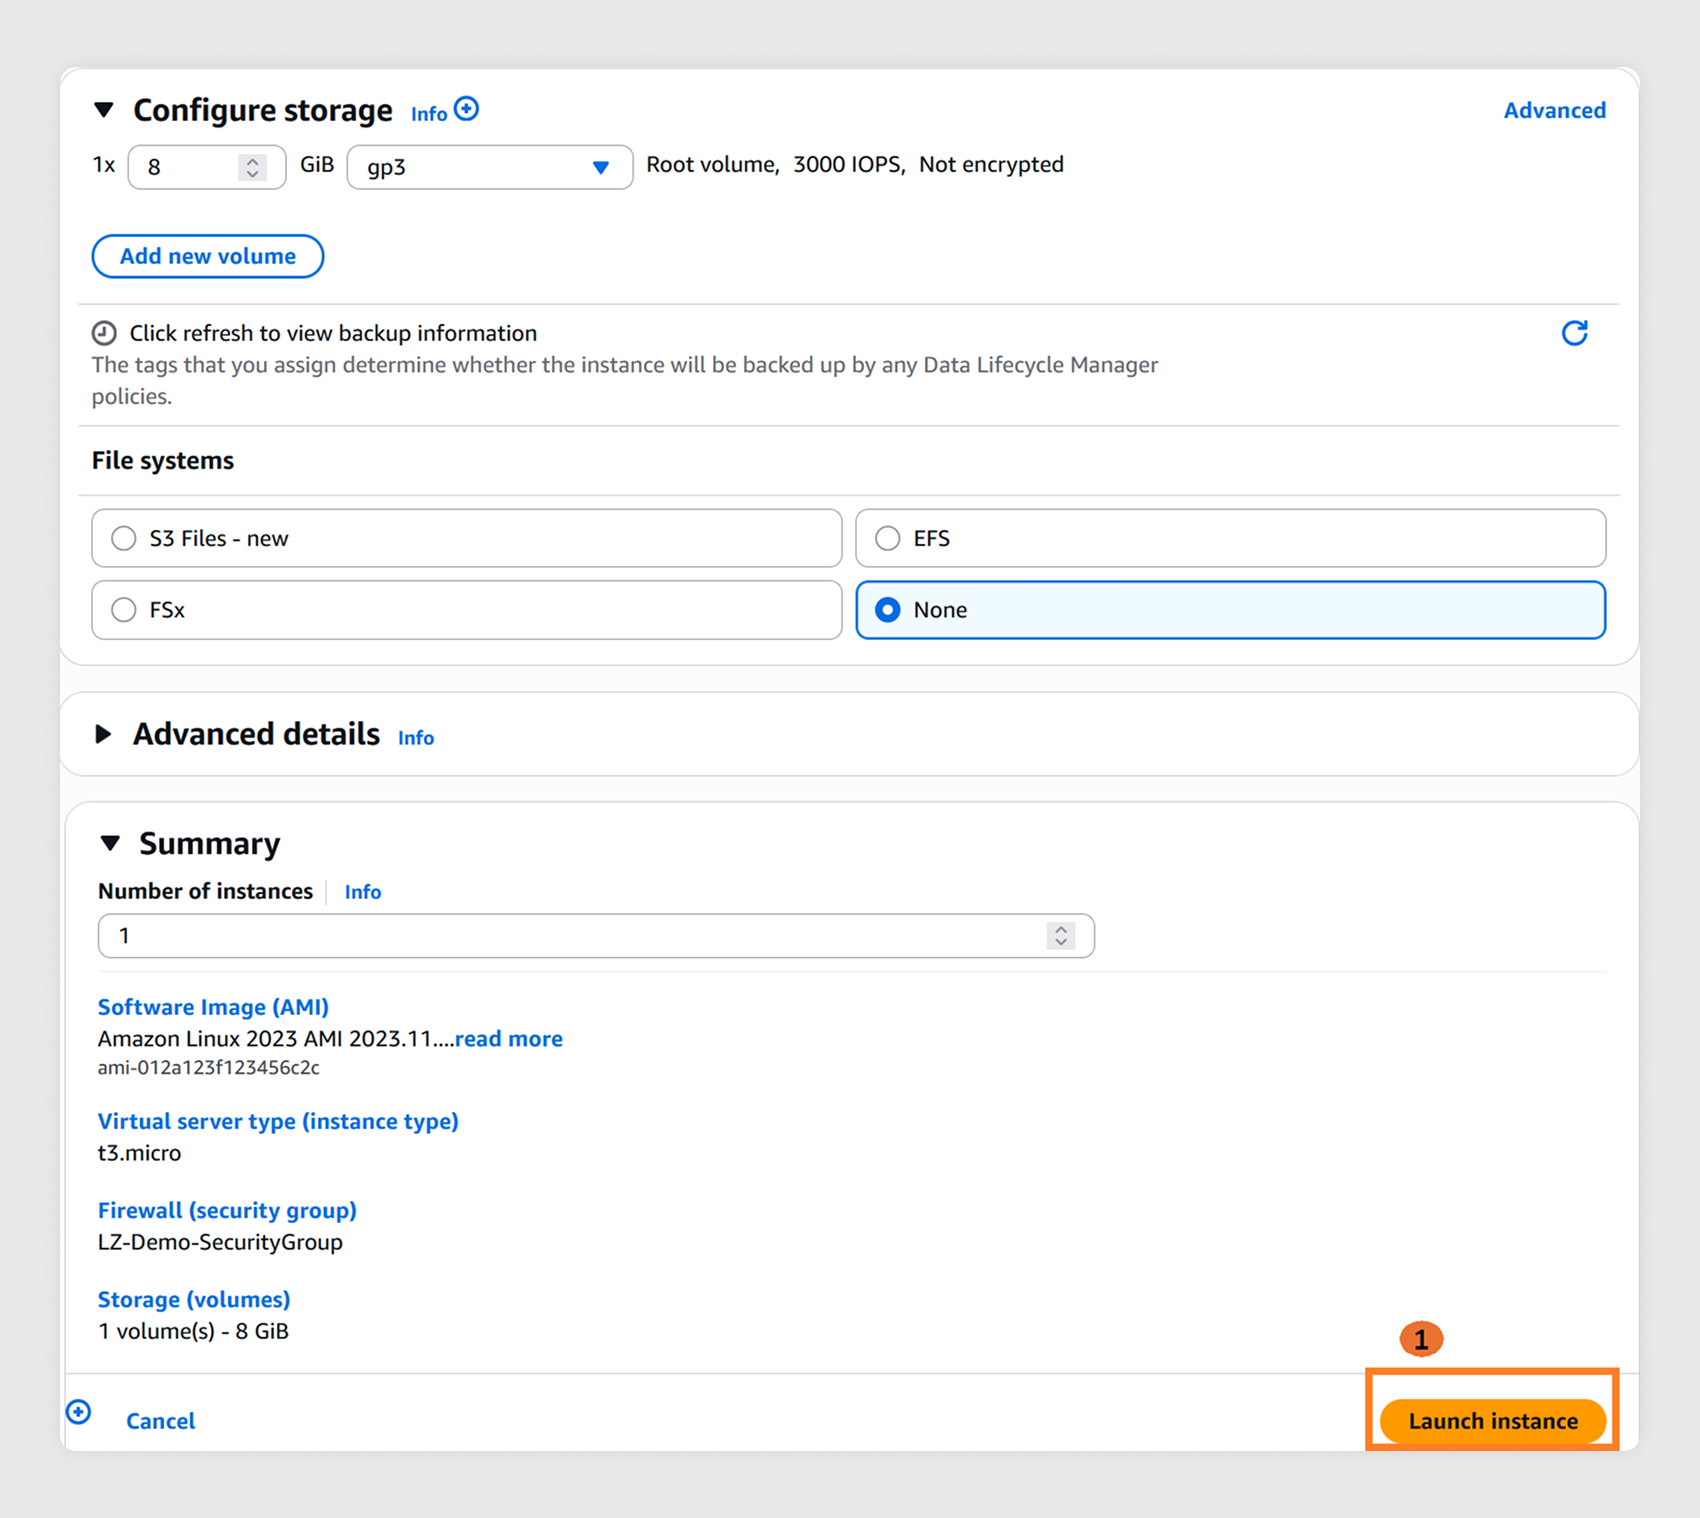
Leave the remaining values as default under Configure storage and choose Launch instance.
Step 4: Install a speed test and test your latency
4.1
Verify that the EC2 Instance state is running and 2/2 status checks passed.
Note the Public IP address—you'll need it to connect via SSH.

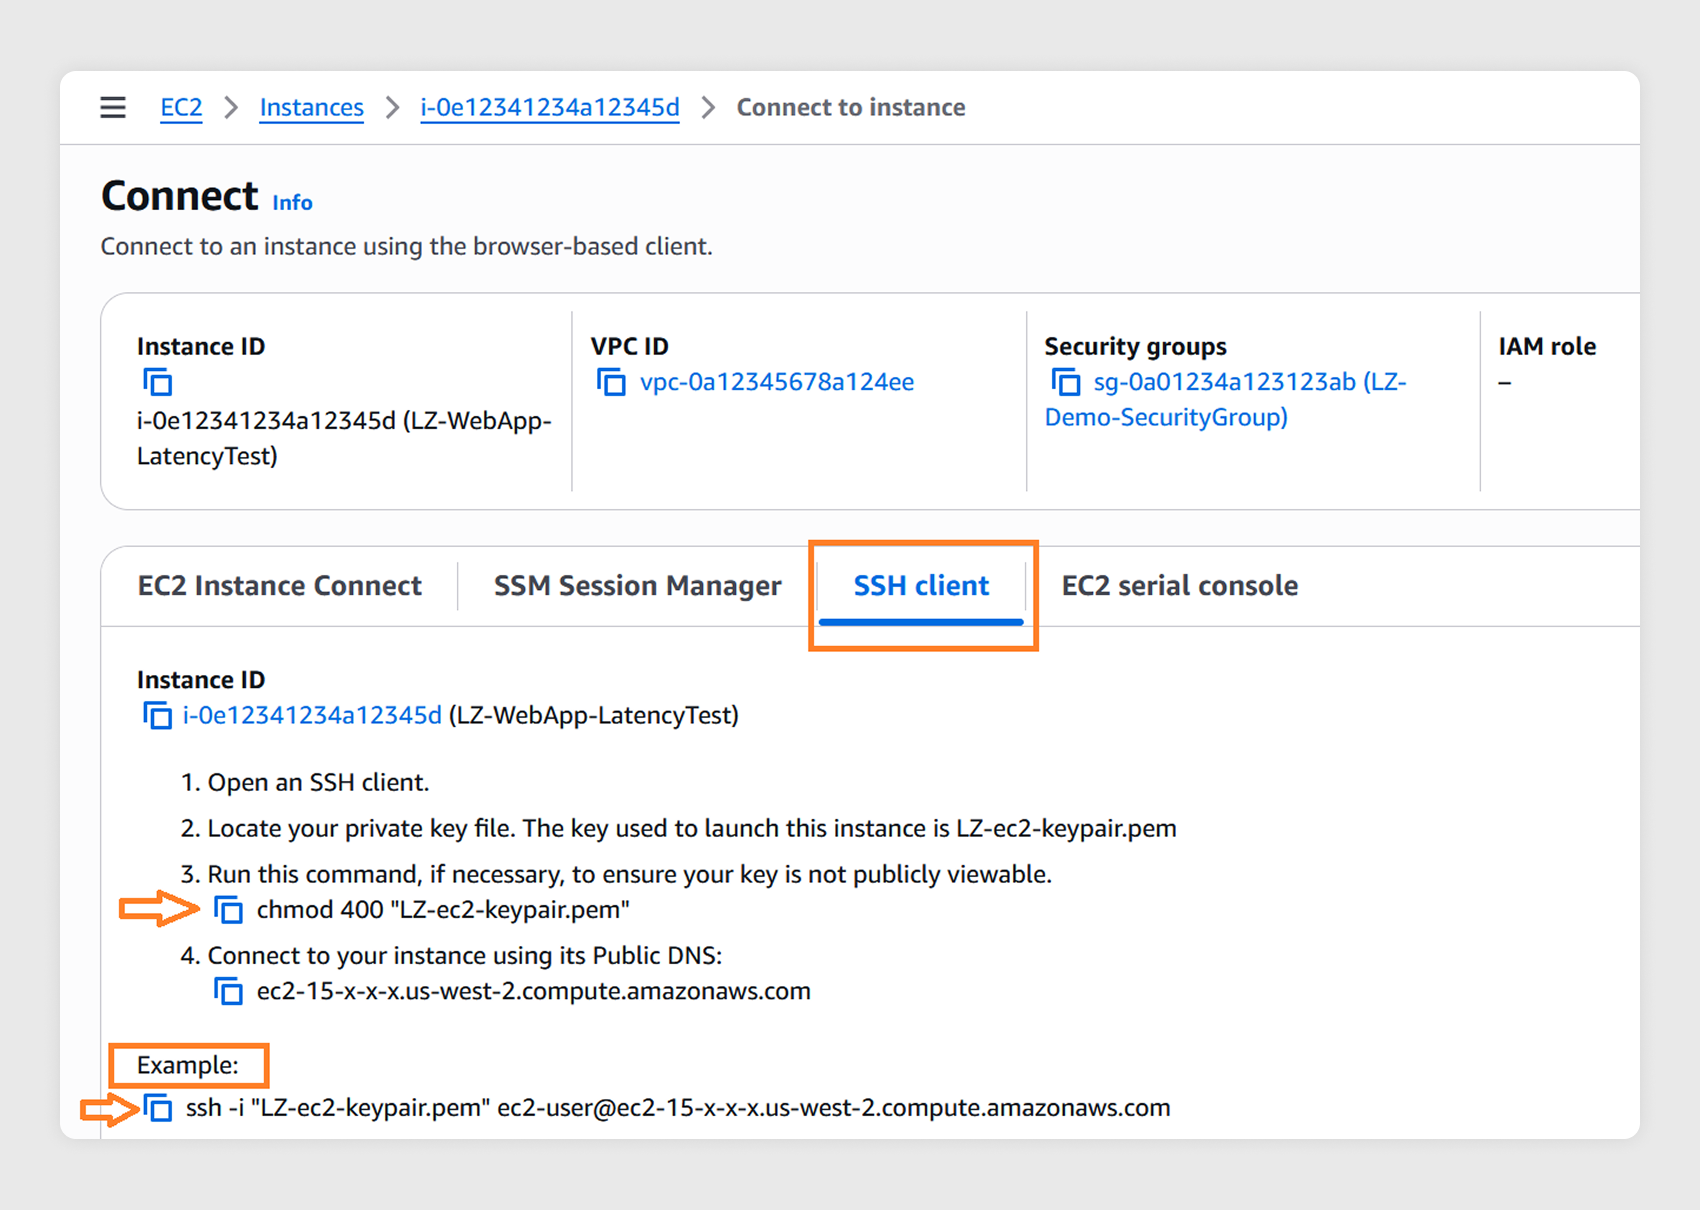
4.2
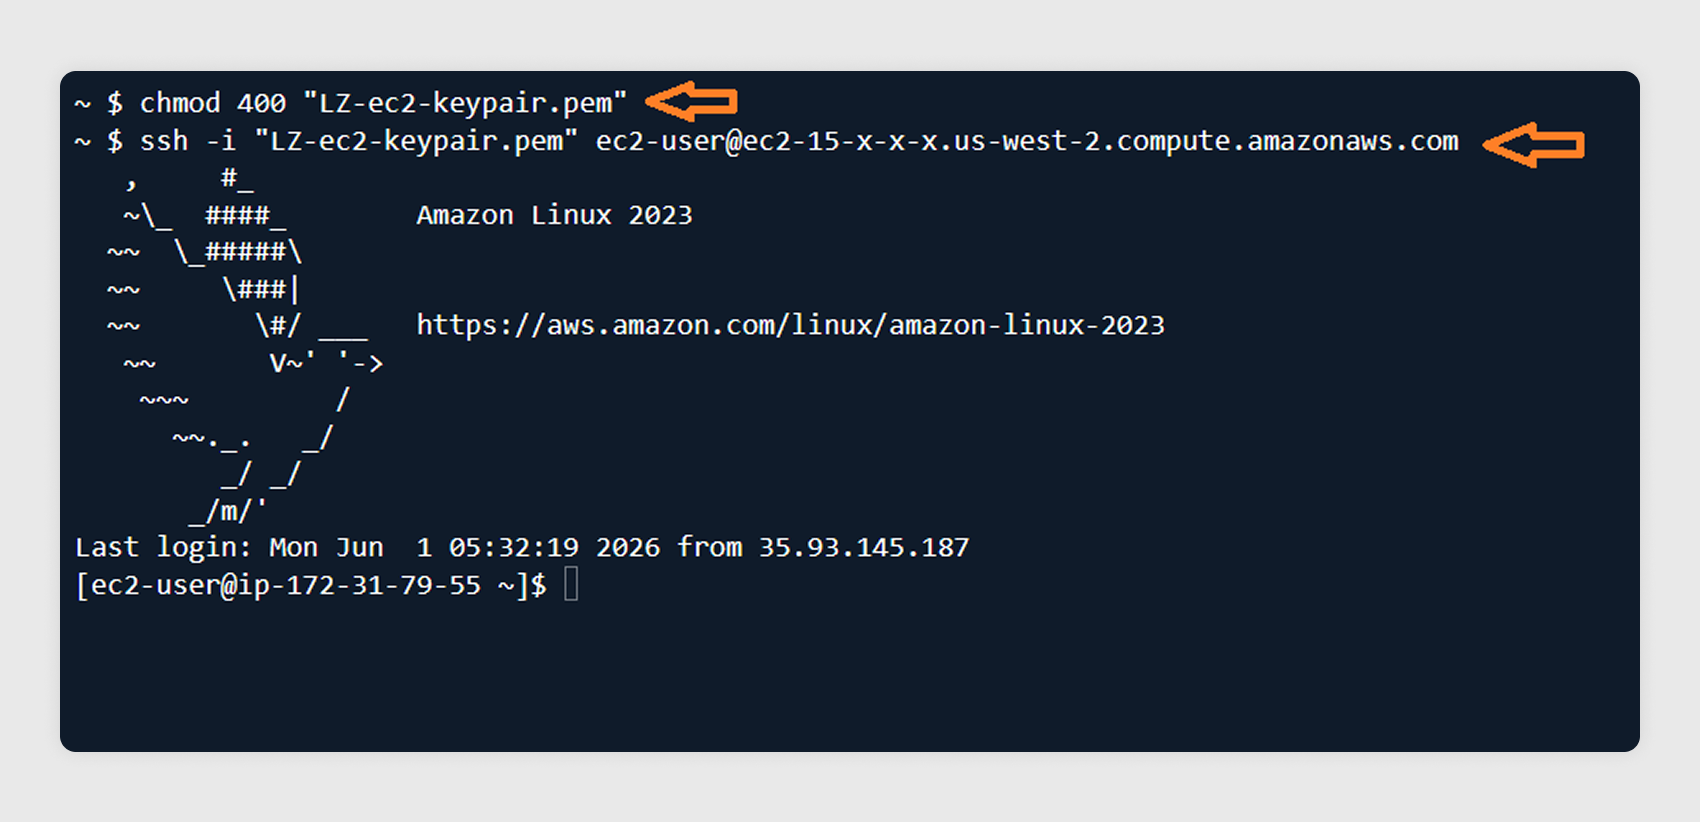
Choose Connect, select the SSH client tab, and copy the example SSH command. On your local machine, open a terminal, navigate to the folder where you saved the key pair file in step 3.3, and run the command.
4.3
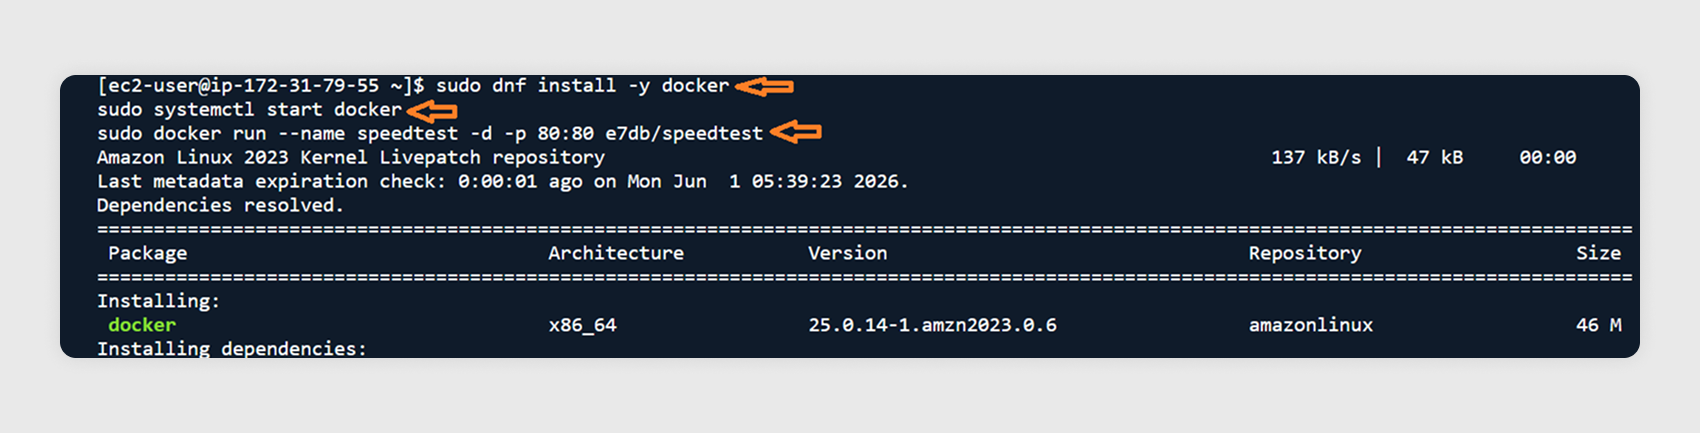
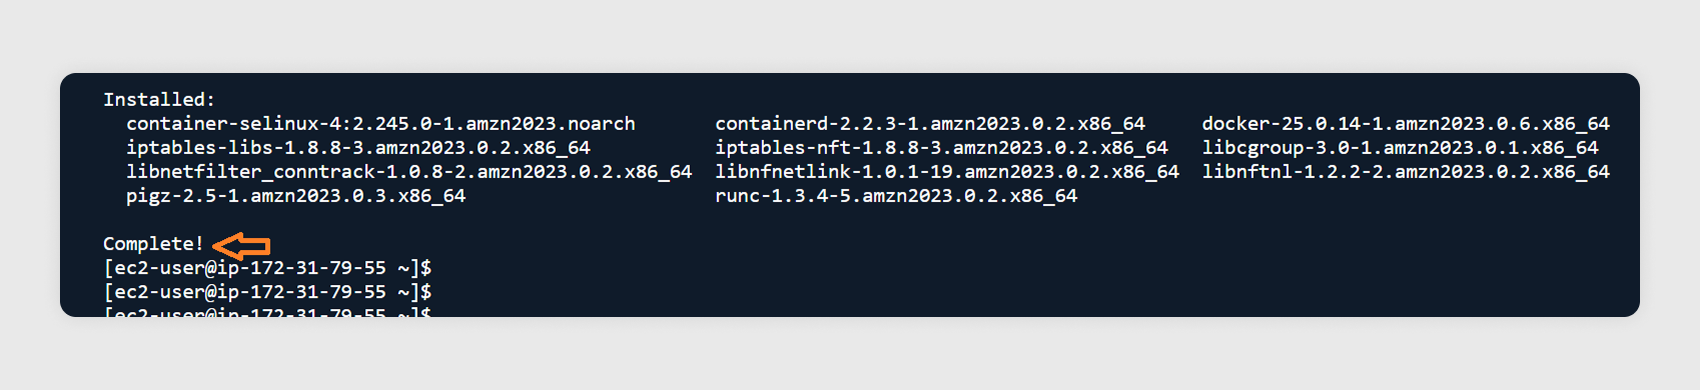
After logging into the EC2 instance, install Docker container and a lightweight speed test application by running the following commands.
- Install Docker container: sudo dnf install -y docker
- Start Docker: sudo systemctl start docker
- Verify Docker is installed correctly: sudo docker info
- Run a lightweight speed test application: sudo docker run --name speedtest -d -p 80:80 e7db/speedtest
4.4
On your local machine, open a browser and go to:
http://<insert your ec2 public ip here>
Choose the Start button to begin the test. Once complete, you will see results for latency, jitter, download speed, and upload speed from your local machine to the EC2 instance in the Local Zone.

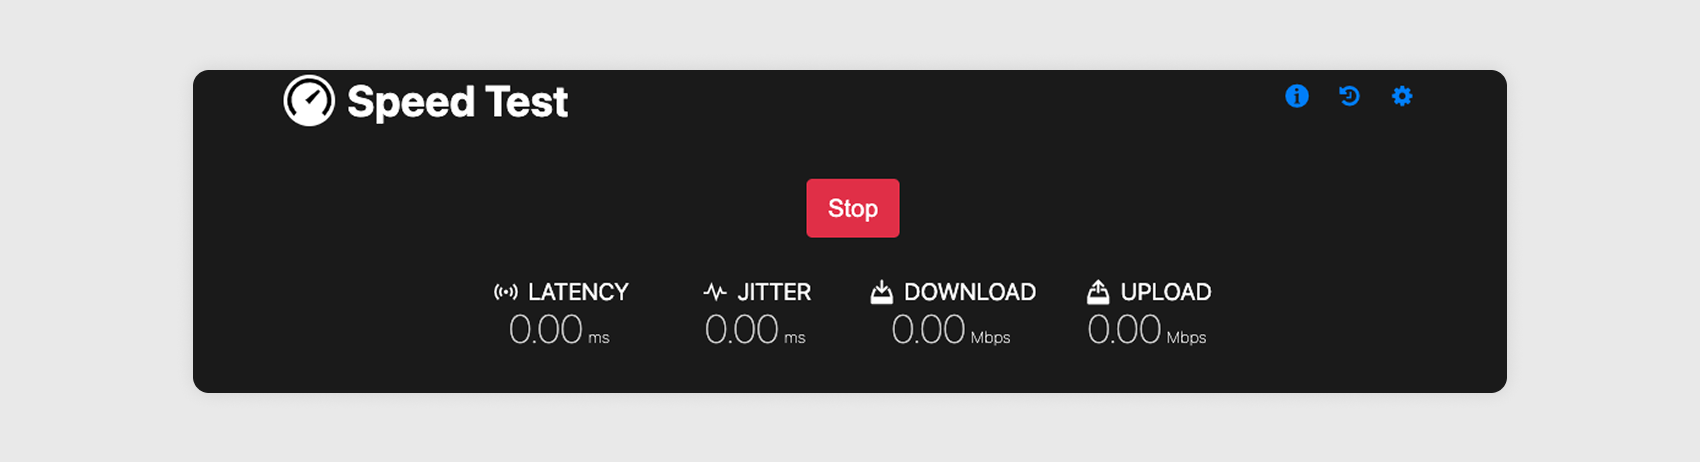
Compare these results with those from the latency test portal for your selected Local Zone. If you also run this test against an instance in the parent Region, you will typically see lower latency from the Local Zone instance because the traffic routes directly to the Local Zone’s Network Border Group rather than traversing to the parent Region’s Availability Zones.
This confirms the AWS infrastructure location that provides you the lowest latency from your physical location.
Step 5: Clean up resources
After completing the tutorial, delete the resources you created to stop incurring costs.
5.1
Terminate the EC2 instance:
- In the EC2 console left navigation pane, under Instances, select Instances.
- Select the instance created in step 3.6.
- From the Instance state dropdown, choose Terminate instance.
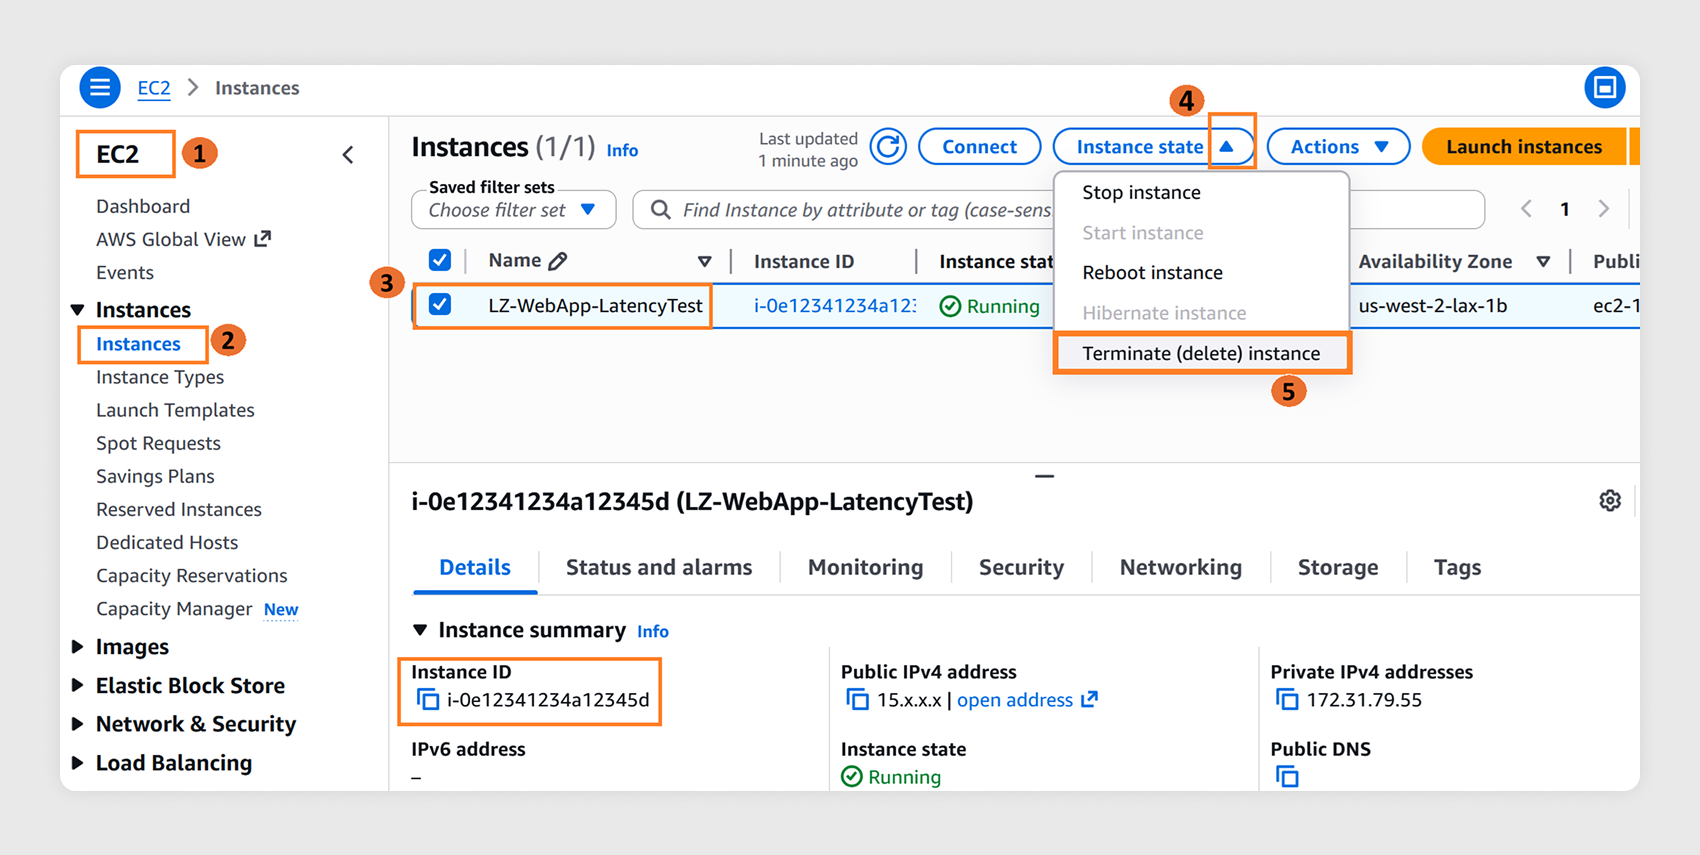
5.2
Wait for instance termination to complete:
In the instances list, wait until the instance state shows “Terminated”. This releases the associated network interface and security group dependencies.
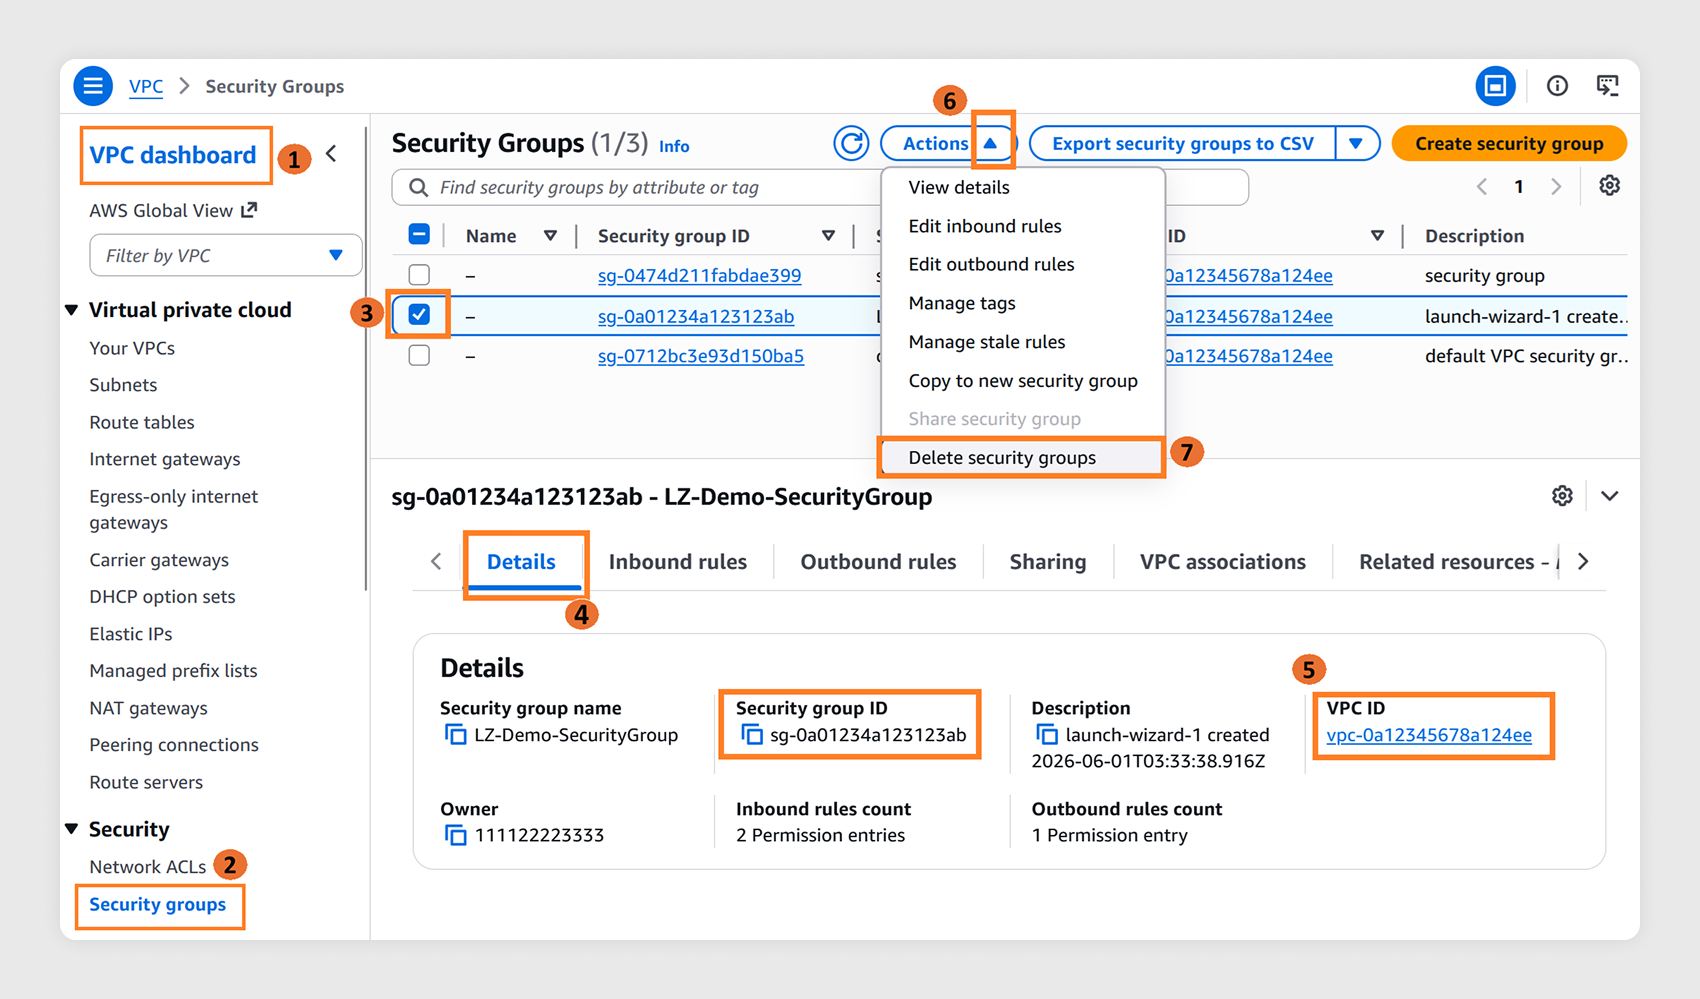
5.3
Delete the security group:
- In the VPC console left navigation pane, select Security groups.
- Select the security group name created in step 3.5.
- In the Details tab, verify the correct security group is selected.
- From the Actions dropdown, choose Delete security groups.
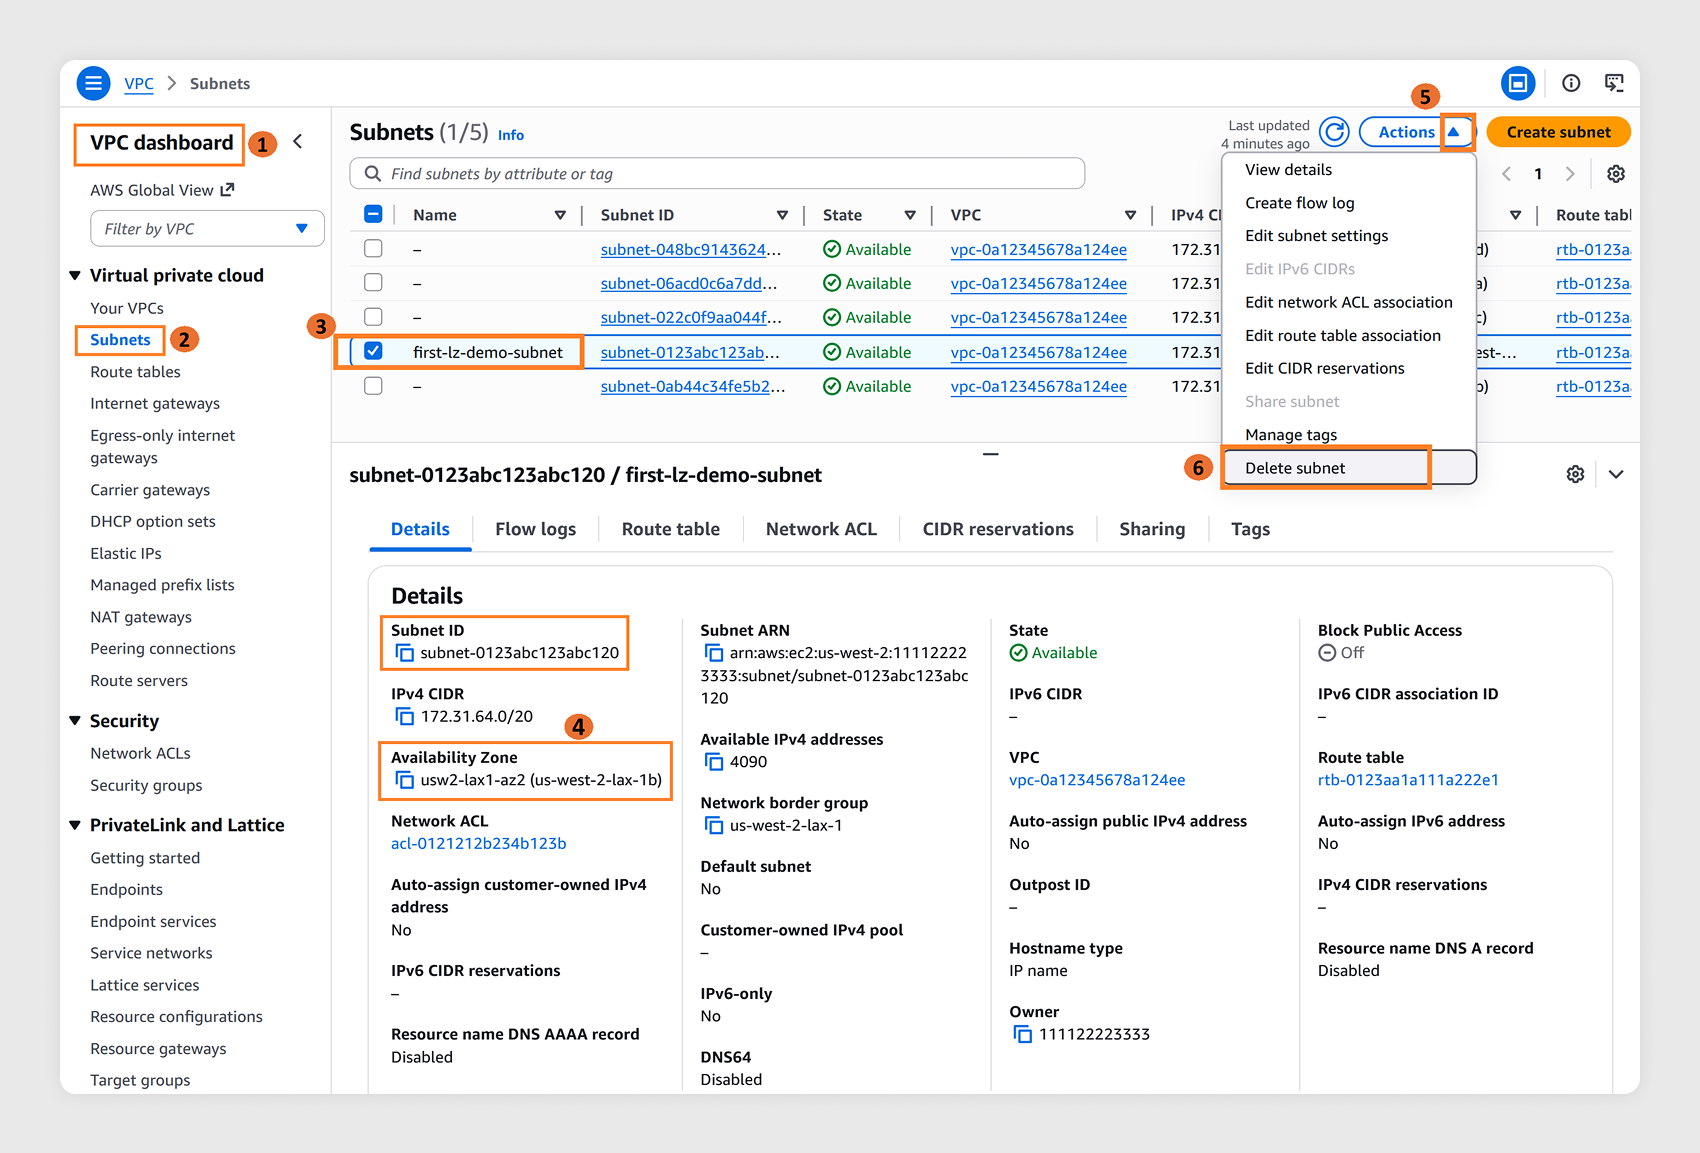
5.4
Delete the subnet in your Local Zone:
- In the VPC console left navigation pane, select Subnets.
- Select the subnet you created in the Local Zone.
- From the Actions dropdown, choose Delete subnet.
5.5
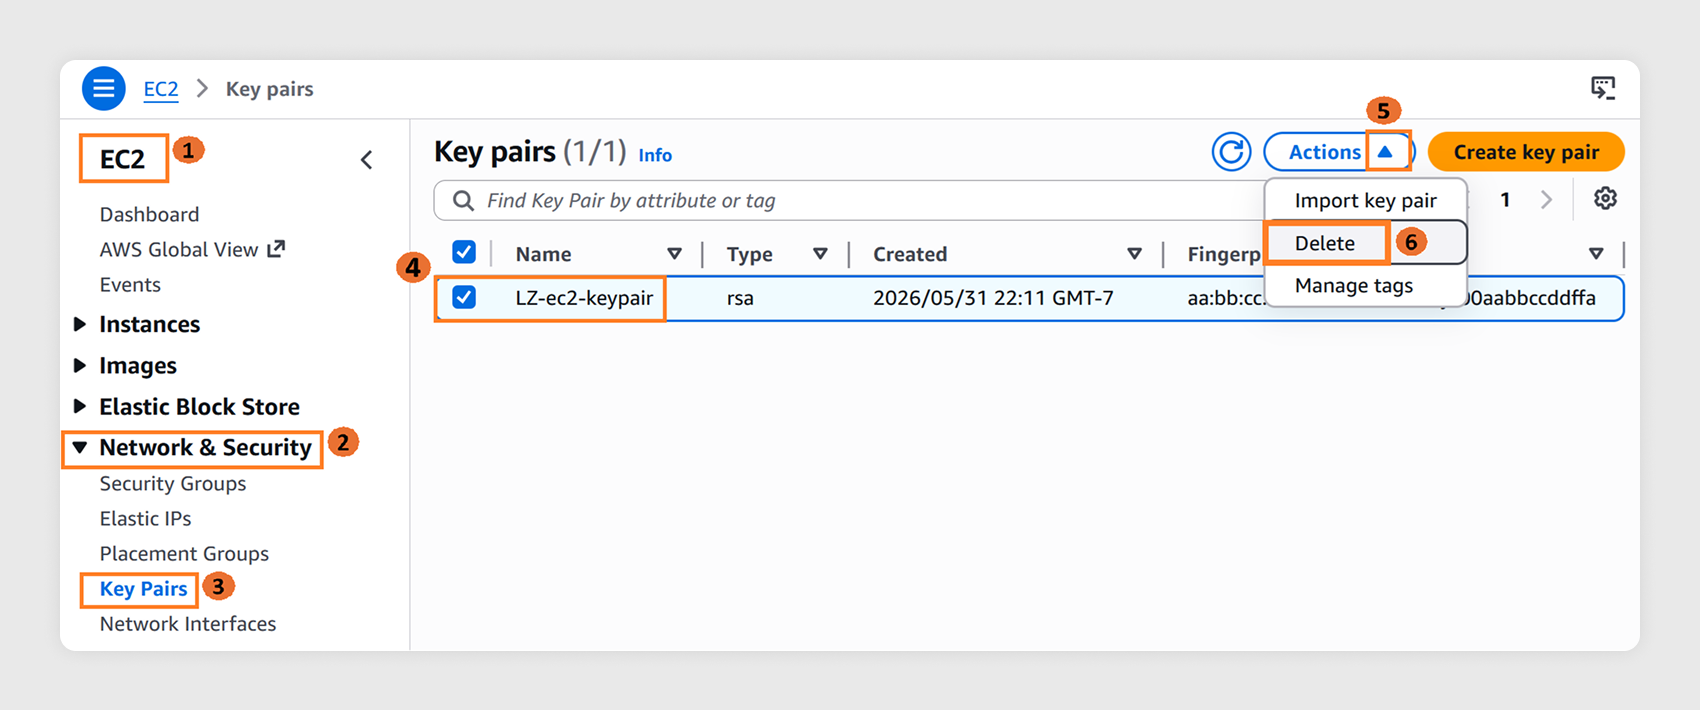
Delete the key pair:
- In the EC2 console left navigation pane, under Network & Security, select Key Pairs.
- Select the Key pair created in step 3.3.
- From the Actions dropdown, choose Delete.
- On your local machine, delete the .pem or .ppk file you downloaded in step 3.3.
Conclusion
Congratulations!
You have finished the Getting Started with AWS Local Zones guide. You can now launch EC2 instances in Local Zones for workloads that require the low latency that Local Zones provide. Not all EC2 instance families and sizes are available in every Local Zone. See the Local Zones features page for the full list of available instance types.
Important: Ensure you have completed all steps in the Step 5. Clean up resources section to avoid unexpected costs from this tutorial.
Additional resources
Did you find what you were looking for today?
Let us know so we can improve the quality of the content on our pages